


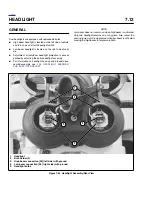


2004 Buell Lightning: Electrical
7-33
HOME
BATTERY CABLES
7.10
REMOVAL
1
WARNING
1
WARNING
To protect against shock and accidental start-up of vehi-
cle, disconnect the negative battery cable before pro-
ceeding. Inadequate safety precautions could result in
death or serious injury.
1
WARNING
1
WARNING
Always disconnect the negative battery cable first. If the
positive cable should contact ground with the negative
cable installed, the resulting sparks may cause a battery
explosion which could result in death or serious injury.
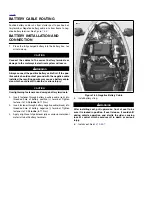
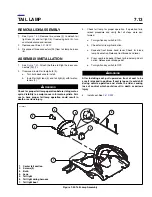
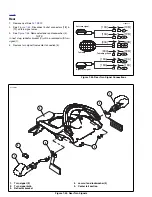
1.
See
Figure 7-38.
Disconnect negative and positive
cables from battery, negative cable first.
a. Remove fastener holding negative cable to negative
terminal.
b.
Remove fastener holding positive cable to positive
battery terminal.
2.
See
Figure 7-39.
Remove fastener to detach negative
battery cable from frame.
3.
See
Figure 7-40.
Remove protective rubber boot from
starter fastener. Remove fastener with washer to detach
positive battery cable from starter.
4.
Cut 14 gauge Red/Yellow wire approximately 6 in. (152.4
mm) above the point where it enters the main harness
bundle.
NOTE
This is to allow a splice to be made for the new positive cable
to be installed.
INSTALLATION
1.
Clean cable connectors and battery terminals using a
wire brush or sandpaper to remove any oxidation.
1
WARNING
1
WARNING
Always connect positive battery cable first. If the positive
cable should contact ground with the negative cable
installed, the resulting sparks may cause a battery explo-
sion which could result in death or serious injury.
CAUTION
Connect cables to correct terminals of battery or serious
damage to motorcycle electrical system will occur.
2.
Connect cables to battery.
a. See
Figure 7-38.
Positive battery cable runs from
starter to positive battery terminal.
b.
Splice 14 gauge Red/Yellow wire coming from posi-
tive battery cable into main harness bundle.
c.
Connect positive cable to positive (+) battery termi-
nal using fastener.
d.
Connect negative cable to negative (-) battery termi-
nal using fastener.
e. Tighten terminal fasteners to 72-96
in-lbs
(8-11
Nm).
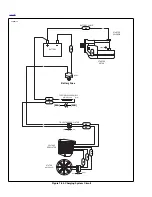
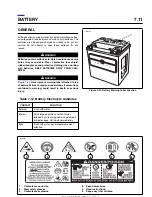
Figure 7-38. Battery
Figure 7-39. Negative Battery Cable
b1005x7x
(+)
(-)
1.
Battery
2.
Battery boot
3.
Positive cable
4.
Negative cable
5.
Cable separator
6.
To frame
7.
To starter
8.
Red/Yellow wire (14 gauge, to be spliced)
9.
Battery strap
6
1
7
3
2
4
5
9
8
8906
Summary of Contents for 2004 XB9S
Page 2: ......
Page 35: ...D 2 2004 Buell Lightning Appendix D HOME Rear Brake Systems Top View b1115xbsx ...
Page 36: ...2004 Buell Lightning Appendix D D 3 HOME Rear Brake Systems Left Side View b1116xcsx ...
Page 44: ...2004 Buell Lightning Appendix D D 11 HOME Clutch Cable Right Side View b1124xasx ...
Page 47: ...HOME NOTES ...
Page 49: ......
Page 103: ......
Page 201: ...HOME NOTES ...
Page 203: ......
Page 275: ...HOME NOTES ...
Page 307: ...HOME NOTES ...
Page 311: ...HOME NOTES ...
Page 351: ...HOME NOTES ...
Page 441: ......
Page 463: ...HOME NOTES ...
Page 465: ......
Page 517: ...HOME NOTES ...
Page 519: ......
Page 595: ...HOME NOTES ...
Page 597: ......