2004 Buell Lightning: Chassis
2-37
HOME
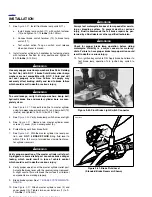
INSTALLATION
1.
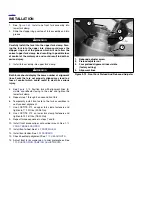
See
Figure 2-51.
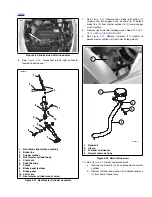
Install master cylinder (4) onto footpeg
mount with fasteners (11). Tighten to 72-96 in-lbs (8-
11 Nm).
2.
Install rear brake switch (1), brake line (2) and new cop-
per crush washers (3). Tighten to 16-20 ft-lbs (22-
27 Nm).
3.
Install footpeg mount to frame. See
2.30 FOOTPEG,
HEEL GUARD AND MOUNT
.
1
1
WARNING
1
WARNING
Use only copper crush banjo washers (See Parts Catalog
for Part No.) with D.O.T. 4 brake fluid. Earlier silver banjo
washers are not compatible with D.O.T. 4 fluid and will
not seal properly over time. Failure to comply may
adversely affect braking ability and lead to brake failure
which could result in death or serious injury.
CAUTION
To avoid leakage after assembly, verify that banjo wash-
ers, banjo bolt, hydraulic brake line and bore of master
cylinder are completely clean.
4.
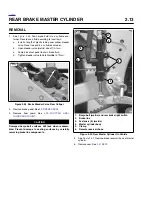
See
Figure 2-52.
Connect remote reservoir.
a. If removed, attach remote reservoir (1) to frame
using fastener and washer (3). Tighten to 48-72 in-
lbs (5.4-8.1 Nm).
b.
Attach hose (3) to rear brake reservoir using clamp.
5.
See
Figure 2-50.
Connect brake line switch connector
under seat.
6.
Install heel guard. See
2.30 FOOTPEG, HEEL GUARD
AND MOUNT.
7.
Install rear brake pedal. See
2.9 BRAKE PEDAL
.
8.
Adjust rear brake pedal. See
BRAKE PEDAL ADJUST-
MENT
in
1.7 BRAKE SYSTEM MAINTENANCE
.
9.
Install master cylinder to brake pedal. See
2.9 BRAKE
PEDAL
.
1
1
WARNING
1
WARNING
Always test motorcycle brakes at low speed after servic-
ing or bleeding system. To prevent death or serious
injury, Buell recommends that all brake repairs be per-
formed by a Buell dealer or other qualified mechanic.
10. Add brake fluid and bleed brake system. See
1.7 BRAKE
SYSTEM MAINTENANCE
.
1
1
WARNING
1
WARNING
Check for proper brake lamp operation before riding
motorcycle. Visibility is a major concern for motorcy-
clists. Failure to have proper brake lamp operation could
result in death or serious injury.
1
1
WARNING
1
WARNING
After installing seat, pull upward on front of seat to be
sure it is locked in position. If seat is loose, it could shift
during vehicle operation and startle the rider, causing
loss of control which could result in death or serious
injury.
11. Install seat. See
2.41 SEAT.
Summary of Contents for 2004 XB9S
Page 2: ......
Page 35: ...D 2 2004 Buell Lightning Appendix D HOME Rear Brake Systems Top View b1115xbsx ...
Page 36: ...2004 Buell Lightning Appendix D D 3 HOME Rear Brake Systems Left Side View b1116xcsx ...
Page 44: ...2004 Buell Lightning Appendix D D 11 HOME Clutch Cable Right Side View b1124xasx ...
Page 47: ...HOME NOTES ...
Page 49: ......
Page 103: ......
Page 201: ...HOME NOTES ...
Page 203: ......
Page 275: ...HOME NOTES ...
Page 307: ...HOME NOTES ...
Page 311: ...HOME NOTES ...
Page 351: ...HOME NOTES ...
Page 441: ......
Page 463: ...HOME NOTES ...
Page 465: ......
Page 517: ...HOME NOTES ...
Page 519: ......
Page 595: ...HOME NOTES ...
Page 597: ......


