2004 Buell Lightning: Fuel System
4-113
HOME
INSTALLATION
1.
See
Figure 4-87.
Replace o-rings (4). Lubricate new o-
rings with clean engine oil.
2.
Install new o-rings on fuel supply stud (2). Larger o-ring
is located in groove closer to fuel pump.
3.
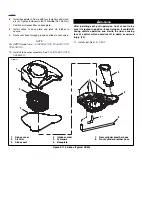
See
Figure 4-93.
Insert fuel pump into frame until resis-
tance is felt.
4.
Insert four screws (5) through fuel pump and into frame.
CAUTION
Use all four screws to draw fuel pump into frame. Using
less than four screws will damage fuel pump o-rings.
5.
Using crosswise pattern, draw fuel pump into frame by
tightening screws. Final tighten screws to 48-51 in-lbs
(5.4-5.8 Nm).
1
WARNING
1
WARNING
Do NOT overtighten fuel fitting nuts. Overtightening fas-
teners may result in excessive compression of sealing
components and fuel leakage which could result in death
or serious injury.
6.
Install fuel supply line banjo fitting (2) over fuel supply
stud (3). Install new fastener. Tighten to 84-108 in-lbs
(9.5-12.2 Nm).
7.
Fill tank with a small amount of fuel. Check for leaks.
8.
Connect fuel pump connector [86] (1) and push cable
strap tab into hole in frame.
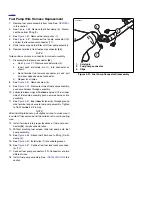
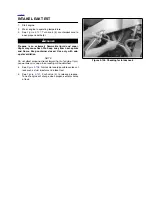
Figure 4-92. Wire Harness Removal Direction
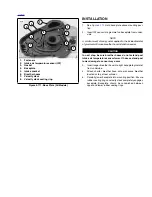
Figure 4-93. Fuel Pump Installation
8780
8774
5
5
1
4
3
1.
Connector [86]
2.
Fuel supply fitting
3.
Fuel supply stud
4.
Drain plug
5.
Fasteners
2
Summary of Contents for 2004 XB9S
Page 2: ......
Page 35: ...D 2 2004 Buell Lightning Appendix D HOME Rear Brake Systems Top View b1115xbsx ...
Page 36: ...2004 Buell Lightning Appendix D D 3 HOME Rear Brake Systems Left Side View b1116xcsx ...
Page 44: ...2004 Buell Lightning Appendix D D 11 HOME Clutch Cable Right Side View b1124xasx ...
Page 47: ...HOME NOTES ...
Page 49: ......
Page 103: ......
Page 201: ...HOME NOTES ...
Page 203: ......
Page 275: ...HOME NOTES ...
Page 307: ...HOME NOTES ...
Page 311: ...HOME NOTES ...
Page 351: ...HOME NOTES ...
Page 441: ......
Page 463: ...HOME NOTES ...
Page 465: ......
Page 517: ...HOME NOTES ...
Page 519: ......
Page 595: ...HOME NOTES ...
Page 597: ......

