


2004 Buell Lightning: Chassis
2-83
HOME
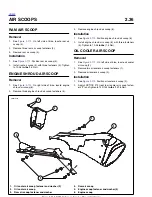
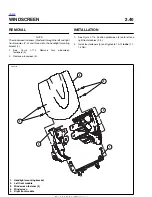
INTAKE COVER ASSEMBLY
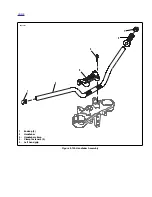
2.35
REMOVAL
1.
Remove seat. See
2.41 SEAT.
2.
See
Figure 2-111.
Remove fasteners and nylon washers
(2).
3.
Remove intake cover assembly (1).
INSTALLATION
1.
Position intake cover assembly over top of airbox cover.
2.
See
Figure 2-111.
Start the front two fasteners (2) with
nylon washers.
3.
Install the remaining fasteners and nylon washers (2).
Tighten all fasteners to 12-36 in-lbs (1-4 Nm).
NOTE
Front screws go in at a slight angle.
1
1
WARNING
1
WARNING
After installing seat, pull upward on front of seat to be
sure it is locked in position. If seat is loose, it could shift
during vehicle operation and startle the rider, causing
loss of control which could result in death or serious
injury.
4.
Install seat. See
2.41 SEAT.
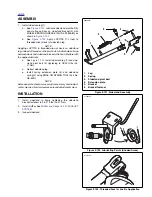
Figure 2-111. Intake Cover Assembly
b0981x2x
1
2
1.
Intake cover assembly
2.
Intake cover fasteners
Summary of Contents for 2004 XB9S
Page 2: ......
Page 35: ...D 2 2004 Buell Lightning Appendix D HOME Rear Brake Systems Top View b1115xbsx ...
Page 36: ...2004 Buell Lightning Appendix D D 3 HOME Rear Brake Systems Left Side View b1116xcsx ...
Page 44: ...2004 Buell Lightning Appendix D D 11 HOME Clutch Cable Right Side View b1124xasx ...
Page 47: ...HOME NOTES ...
Page 49: ......
Page 103: ......
Page 201: ...HOME NOTES ...
Page 203: ......
Page 275: ...HOME NOTES ...
Page 307: ...HOME NOTES ...
Page 311: ...HOME NOTES ...
Page 351: ...HOME NOTES ...
Page 441: ......
Page 463: ...HOME NOTES ...
Page 465: ......
Page 517: ...HOME NOTES ...
Page 519: ......
Page 595: ...HOME NOTES ...
Page 597: ......