2004 Buell Lightning: Engine
3-89
HOME
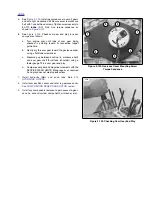
5.
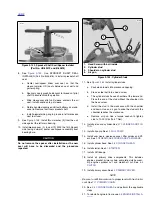
See
Figure 3-129.
Install gearcase cover over all gears
and onto right crankcase half. Secure cover to crankcase
half with 7 socket head screws. Tighten screws evenly to
80-110
in-lbs
(9-12 Nm). Use torque sequence as
shown in
Figure 3-129.
6.
See
Figure 3-130.
Check cam gear end play for each
cam gear as follows:
a. Turn engine over until lobe of cam gear being
checked is pointing toward its respective tappet
guide hole.
b.
Gently pry the cam gear toward the gearcase cover
using a flat blade screwdriver.
c. Measure gap between bushing (in crankcase half)
and cam gear shaft thrust face (shoulder) using a
feeler gauge. This is cam gear end play.
d.
Compare cam gear end play measurements with the
SERVICE WEAR LIMITS. Make repairs as required
if end play does not meet specifications.
7.
Install hydraulic lifters and push rods. See
3.15
HYDRAULIC LIFTERS
.
8.
Install cam position sensor and rotor in gearcase cover.
See CAM POSITION SENSOR AND ROTOR section.
9.
Install any components removed to gain access to gear-
case (i.e. exhaust system components, air cleaner, etc.).
Figure 3-129. Gearcase Cover Mounting Screw
Torque Sequence
Figure 3-130. Checking Cam Gear End Play
2
4
1
3
6
5
7
8653
8654
Summary of Contents for 2004 XB9S
Page 2: ......
Page 35: ...D 2 2004 Buell Lightning Appendix D HOME Rear Brake Systems Top View b1115xbsx ...
Page 36: ...2004 Buell Lightning Appendix D D 3 HOME Rear Brake Systems Left Side View b1116xcsx ...
Page 44: ...2004 Buell Lightning Appendix D D 11 HOME Clutch Cable Right Side View b1124xasx ...
Page 47: ...HOME NOTES ...
Page 49: ......
Page 103: ......
Page 201: ...HOME NOTES ...
Page 203: ......
Page 275: ...HOME NOTES ...
Page 307: ...HOME NOTES ...
Page 311: ...HOME NOTES ...
Page 351: ...HOME NOTES ...
Page 441: ......
Page 463: ...HOME NOTES ...
Page 465: ......
Page 517: ...HOME NOTES ...
Page 519: ......
Page 595: ...HOME NOTES ...
Page 597: ......

