background image


23 

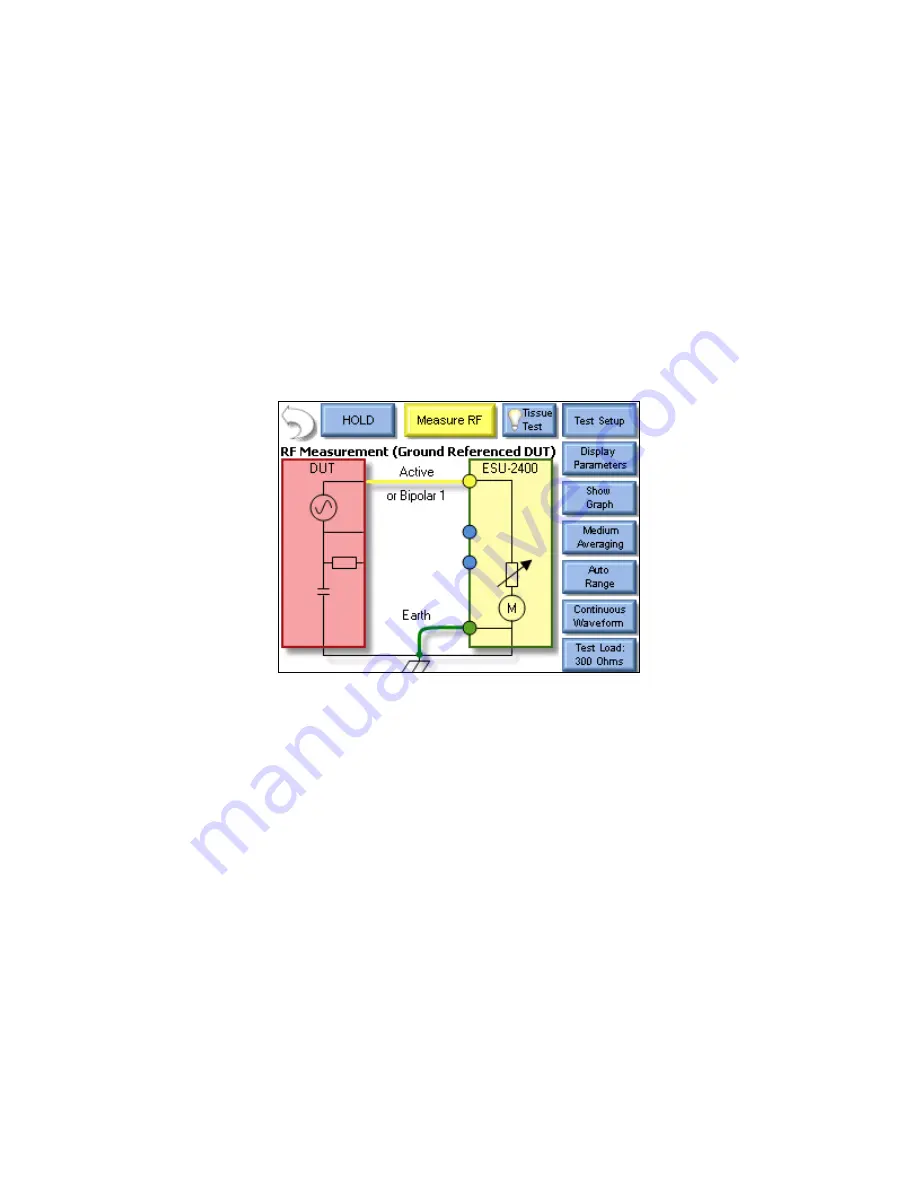
Scenario 3


– I need to measure the mA output of a Hyfrecator (ground referenced 

generator) with a 1

00 ohm load.  I don’t have a footswitch cable, so I will trigger the 

DUT myself.   
 

Solution


–  

1.  Select Measure RF Energy from the main menu. 
2.  Connect the Active output from the DUT to the Active input on the ESU-2400.  If 

you are using the cables from the ESU-2400 accessory kit, use the Yellow Lead. 

3.  Press the Gnd Ref generator type button to configure the ESU-2400 to make a 

ground referenced measurement.   
 

NOTE: To see how the ESU-2400 is internally configured, press the Test Setup button.  To close 
the image, press Test Setup again.  


Summary of Contents for ESU-2400

Page 1: ...ELECTROSURGICAL UNIT ANALYZER ESU 2400 Series USER MANUAL...

Page 2: ......

Page 3: ...2 Measure mA and Watts 300 ohm load footswitch triggers DUT 20 Scenario 3 Measure Hyfrecator mA 200 ohm load manual DUT trigger 23 Scenario 4 Measure mA and kHz 200 ohm load manual DUT Pulse Mode 1 25...

Page 4: ...ENCES 57 Running the Autosequence 74 Autosequence Results 78 MEASURE RF ENERGY 79 Tissue Response Test 80 Parameter Descriptions 82 Graph Screen 85 Footswitch Configuration 87 ESU 2400H Advanced Input...

Page 5: ...NICATION PROTOCOL 141 COMMUNICATION COMMAND SUMMARY 148 FREQUENTLY ASKED QUESTIONS FAQ 162 MANUAL REVISIONS 164 LIMITED WARRANTY 164 SPECIFICATIONS 166 NOTES 174 CALIBRATION INTERVAL To ensure the acc...

Page 6: ...occur if the patient is connected when testing with the ESU 2400 Series Do not connect any leads from the patient directly to the ESU 2400 Series or DUT WARNING POWER ADAPTOR Unplug the Power Adaptor...

Page 7: ...spill liquids on the ESU 2400 Series Do not operate the ESU 2400 Series if internal components not intended for use with fluids may have been exposed to fluid as the internal leakage may have caused...

Page 8: ...2400 Series to acclimate to specified conditions for at least 30 minutes before attempting to operate it CAUTION CLEANING Do not immerse The ESU 2400 Series should be cleaned by wiping gently with a d...

Page 9: ...vii...

Page 10: ...can National Standards Institute ARM Aspen Return Monitor C Celsius CF Crest Factor CQM Contact Quality Monitor Degree DFA Digital Fast Acquisition DUT Device Under Test hrs Hours Hz Hertz IEC Interna...

Page 11: ...SCLAIMER BC GROUP INTERNATIONAL INC RESERVES THE RIGHT TO MAKE CHANGES TO ITS PRODUCTS OR SPECIFICATIONS AT ANY TIME WITHOUT NOTICE IN ORDER TO IMPROVE THE DESIGN OR PERFORMANCE AND TO SUPPLY THE BEST...

Page 12: ...pintl com Made in the USA 11 17 Rev 10 NOTICE CONTACT INFORMATION BC BIOMEDICAL BC GROUP INTERNATIONAL INC 3081 ELM POINT INDUSTRIAL DRIVE ST CHARLES MO 63301 USA 1 800 242 8428 1 314 638 3800 www bcg...

Page 13: ...utilized in the ESU 2400 and DFA2 Technology Patent Pending utilized in the ESU 2400H allow the system to aggressively digitize the complex RF waveforms produced by Electrosurgical Generators analyze...

Page 14: ...AL ON SCREEN REPRESENTATION OF MEASURED RF SIGNAL HIGH RANGE 1000 mV AND LOW RANGE 100 mV WITH AUTOSCALING CAPABILITY PULSED RF WAVEFORM MEASUREMENT MODE FOR LOW DUTY CYCLE PULSED OUTPUTS OFFERED BY S...

Page 15: ...BC20 00133 CONMED Automation Kit BC20 00140 Replacement packaging BC20 41360 Communications Cable USB Null Modem BC20 00232 BNC To BNC Cable BC20 03000 Footswitch Cable Unterminated BC20 03001 Footswi...

Page 16: ...4 BC20 03005 Monopolar Hand Switch Simulator BC20 03006 Footswitch Cable for Olympus ESG 100 BC20 03007 Footswitch Cable for Olympus ESG 400 TRL 2420 Tissue Response Load...

Page 17: ...C20 00131 ForceTriad PM Accessory Kit BC20 03004 Footswitch Simulator TRL 2420 Tissue Response Load BC20 03005 Monopolar Handpiece Simulator Autobipolar Lead Cross Coupling Lead Carrying Case UFP Port...

Page 18: ...is used to bypass the REM circuit and allow for shorting of the REM leads Note that some generators do not allow for the REM circuit to be disabled For these generators it does not matter which cable...

Page 19: ...g Handle Computer Interface Serial Port 2 USB Ports 10 100 Ethernet Power Kycon 3 position locking receptacle QVGA Display with touchscreen Durable Powder Coated Custom Aluminum Case Front USB Port Po...

Page 20: ...ernal configuration relays allow for simple connections to the DUT When the Measure RF Energy Measure RF Leakage or REM ARM CQM mode is selected from the main menu the relays configure the internal co...

Page 21: ...low Active Lead from Active Jack on ESU 2400 to DUT Bipolar Output Electrode 1 2 Blue Lead from Dispersive1 Jack on ESU 2400 to DUT Bipolar Output Electrode 2 ESU DUT Bipolar Electrode 1 ESU DUT Bipol...

Page 22: ...Yellow Active Lead from Active Jack on ESU 2400 to DUT Output 3 Blue Lead from Dispersive 1 Jack on ESU 2400 to External Load 4 External Load to DUT Dispersive ESU DUT Active Electrode ESU DUT Patien...

Page 23: ...from Active Jack on ESU 2400 to DUT Bipolar Output Electrode 1 2 Blue Lead from Dispersive 1 Jack on ESU 2400 to External Load 3 External Load to DUT Bipolar Output Electrode 2 ESU DUT Bipolar Electro...

Page 24: ...UT Return terminal shown below is typically not the Patient Return or REM electrode Refer to the DUT service manual to determine which DUT ports are used for the tissue response output If the output t...

Page 25: ...open circuit RF leakage of the DUT meets or exceeds the IEC specification The ESU 2400 internally connects the load to earth ground An external ground is also provided at the front panel NOTE DO NOT...

Page 26: ...circuit RF leakage of the DUT meets or exceeds the IEC specification The ESU 2400 internally connects the load to earth ground An external ground is also provided at the front panel NOTE DO NOT TEST...

Page 27: ...tput This test complies with IEC 601 2 2 sec 19 101a test 1 fig 102 and sec 19 102 adopted by ANSI AAMI HF18 2001 The purpose of this test is to verify that the RF leakage of the DUT meets or exceeds...

Page 28: ...ive output This test complies with IEC 601 2 2 sec 19 101a test 2 fig 102 and sec 19 102 adopted by ANSI AAMI HF18 2001 The purpose of this test is to verify that the RF leakage of the DUT meets or ex...

Page 29: ...quirements Scenario 1 I need to do a Preventative Maintenance safety check on a Covidien ForceTriad surgical generator Solution The ESU 2400 is capable of automating the ForceTraid testing under the m...

Page 30: ...the ESU 2400 accessory kit use the Yellow Lead 3 Connect the Dispersive or Return port on the DUT to the Dispersive 1 and Dispersive 2 inputs on the ESU 2400 If you are using the cables from the ESU 2...

Page 31: ...ed internal and external loads The total load will automatically be updated For most testing the internal loads will be sufficient 6 Press the Button next to Internal Load and enter 500 in the number...

Page 32: ...from the ESU 2400 accessory kit use the Yellow Lead 3 Connect the other Bipolar output port from the DUT to the Dispersive 1 input on the ESU 2400 If you are using the cables from the ESU 2400 accesso...

Page 33: ...n and select Two Readings from the Select Screen menu NOTE By default mA RMS and Watts RMS are shown when Two Readings are selected Each position can display any of the ESU 2400 measurements by pressi...

Page 34: ...tion is only valid for footswitch cables that are designed for a specific DUT such as the BC20 03001 or BC20 03002 If you are using the unterminated footswitch cable BC20 03000 the output selection is...

Page 35: ...y from the main menu 2 Connect the Active output from the DUT to the Active input on the ESU 2400 If you are using the cables from the ESU 2400 accessory kit use the Yellow Lead 3 Press the Gnd Ref ge...

Page 36: ...rnal and external loads The total load will automatically be updated For most testing the internal loads will be sufficient 5 Press the Button next to Internal Load and enter 100 in the number pad The...

Page 37: ...e output from the DUT to the Active input on the ESU 2400 If you are using the cables from the ESU 2400 accessory kit use the Yellow Lead 3 Connect the Dispersive or Return port on the DUT to the Disp...

Page 38: ...um value to account for variations in the waveform In this scenario 600mA is sufficient to detect the 700mA waveform See pg 89 for more information on choosing a threshold 8 Press the button next to T...

Page 39: ...atts are displayed when selecting two readings Press the button labeled Watts and then press the button labeled kHz to change the measurement to frequency 12 Trigger the DUT The measurements will be d...

Page 40: ...e using the cables from the ESU 2400 accessory kit use the Yellow Lead 3 Connect the Dispersive or Return port on the DUT to the Dispersive 1 and Dispersive 2 inputs on the ESU 2400 If you are using t...

Page 41: ...s will open the Delayed Mode Configuration screen Press the button below Delay Time and enter 2000 ms as the delay 7 Click the Accept Changes button to enter your settings and return to the measuremen...

Page 42: ...y default mA is displayed Press the button labeled mA and then press the button labeled V Load to change the measurement to load voltage 9 Trigger the DUT The measurements will be displayed on the ESU...

Page 43: ...mode menu 3 Connect the Active output from the DUT to the Active input on the ESU 2400 If you are using the cables from the ESU 2400 accessory kit use the Yellow Lead 4 Connect earth ground port on th...

Page 44: ...32 5 Trigger the DUT The ESU 2400 will show the mA RMS measurement in the display...

Page 45: ...nnect the Dispersive output from the DUT to the Dispersive inputs on the ESU 2400 If you are using the cables from the ESU 2400 accessory kit use the Blue cable without the clear pin 4 Connect earth g...

Page 46: ...34 5 Trigger the DUT The ESU 2400 will show the mA RMS measurement in the display...

Page 47: ...Active input on the ESU 2400 If you are using the cables from the ESU 2400 accessory kit use the Yellow Lead 4 Connect the Dispersive output from the DUT to the Dispersive inputs on the ESU 2400 If yo...

Page 48: ...36 6 Trigger the DUT The ESU 2400 will show the mA RMS measurement in the display...

Page 49: ...tive input on the ESU 2400 If you are using the cables from the ESU 2400 accessory kit use the Yellow Lead 4 Connect the Dispersive output from the DUT to the Dispersive inputs on the ESU 2400 If you...

Page 50: ...38 6 Trigger the DUT The ESU 2400 will show the mA RMS measurement in the display...

Page 51: ...rom the main menu 2 Press the CQM Resistance button and enter 35 in the number pad The screen should look like the following 3 Connect the Dispersive output from the DUT to the Dispersive inputs on th...

Page 52: ...this example we will use 50 ohms 3 Press the Change By Percent button and enter 40 in the number pad The screen should look like the following 4 Connect the Dispersive output from the DUT to the Disp...

Page 53: ...the main menu 2 Select Configure Load Curve from the Load Curve Menu 3 Press The Setup Loads tab at the top of the screen to configure the Loads 4 Press the Load resistance setting for the First Load...

Page 54: ...ber pad The screen should look like the following 10 Press the DUT tab at the top of the screen to configure the settings for the DUT trigger 11 Select the ESU 2400 option for DUT activation This will...

Page 55: ...een cable from the Dispersive 1 port of the ESU 2400 to the other Bipolar output on the DUT 16 Connect the RS 232 cable from the ESU 2400 serial port to the DUT serial port 17 Connect the BC20 03001 f...

Page 56: ...re the list of loads to be used for the test 5 Press Clear List to remove all of the previous settings from the list of loads to be used 6 Press the Add Load button and enter 50 in the number pad 7 Pr...

Page 57: ...gle Power Level tab to configure the test for one power setting 10 Press the DUT Power setting button and enter 300 in the number pad The screen should look like the following 11 Press the DUT tab at...

Page 58: ...on the DUT Connect the Blue cable from the Dispersive ports of the ESU 2400 to the return on the DUT 14 Press Save Configuration on the ESU 2400 to save the Load Curve settings to a file for future u...

Page 59: ...s OK 3 The new step will always default to an instruction type step Select the RF Energy Leakage option button near the bottom of the screen 4 Press the title Text box to change the step title as desi...

Page 60: ...asurement 11 The DUT output mode and output type and power setting can be selected at the top of the screen These are informational only and do not have any effect on the test or measurement 12 Use th...

Page 61: ...e automated limit testing you can check the box next to Allow operator to select Pass Fail status 17 The screen should look like the following the configuration is complete for this step Press Back to...

Page 62: ...p will always default to an instruction type step Select the Load Curve option button near the bottom of the screen 4 Press the Title text box to change the step title as desired You will need to use...

Page 63: ...The screen should now look like the following 11 Press the Setup Power tab at the top of the screen to configure the power setting for the test 12 Select the Single Power Level tab to configure the te...

Page 64: ...press OK 3 The new step will always default to an instruction type step Select the REM ARM CQM option button near the bottom of the screen 4 Press the Title text box to change the step title as desir...

Page 65: ...rs 13 Press the Set Tolerance button to configure the Pass Fail limits for the test Since the requirement is to alarm at 135 5 ohms set the CQM Trip point for 135 ohms 14 Press the Trip Upper limit bu...

Page 66: ...automated DUT testing Autosequences can consist of any combination of user instructions RF measurements Load Curves or CQM tests Autosequences can be edited loaded and saved to either on board memory...

Page 67: ...This mode also has the ability to set the CQM load to an open circuit Measure RF Leakage This mode provides for RF Leakage measurements The user can configure the ESU 2400 for the desired RF Leakage...

Page 68: ...is shown by pressing the ESU 2400 title bar on the main screen This window provides the basic information about the system including software versions and calibration due date To exit the system info...

Page 69: ...which cannot be modified The following image shows the main autosequence menu where the user can load an autosequence begin a ForceTriad PM view previously saved test results or create new autosequen...

Page 70: ...button will create a new autosequence Open This button will show the file open dialog box that will open an existing autosequence Save This button will show the file save dialog box When saving the a...

Page 71: ...a step to the autosequence select where to add the step and then press OK Delete Step This button will delete the selected step from the autosequence Copy Step This button will copy the selected step...

Page 72: ...step title and instructions to the user These fields must be entered using an external keyboard or remotely with a PC Each step can be configured as an Instruction Only RF Energy Leakage Load Curve or...

Page 73: ...te the ESU Auto Advance on Pass This setting allows for automatically stepping through the autosequence if a measurement passes the tolerance limits that are configured for the selected step Auto Capt...

Page 74: ...he baud rate and enters commands to be used for DUT setup and control When entering commands use P to represent the power level In the example below the ESU 2400 would send the command FTP300 when the...

Page 75: ...RF measurement and leakage modes are available in the RF Energy Leakage step configuration The user must configure both the ESU 2400 meter as well as the measurement tolerance To setup the tolerance s...

Page 76: ...ter page 79 High Low Limit These settings determine the limits of the measurement If Expected Reading is set to Equal To the limits will be based on a percentage of the expected reading If the Expecte...

Page 77: ...ds Tab The loads can be configured as either a step based load change or a list based load change For the step based loads the user enters the first load to be used and the last load to be used Then t...

Page 78: ...is shown allowing the user to select specific resistances to be used for the test The load configuration list can be saved to a file or loaded from a previously saved list The loads are automatically...

Page 79: ...can set the ESU 2400 to run the load curve at a single power level or multiple power levels The following screen shows the configuration for a single power level By pressing on the power setting the u...

Page 80: ...on a fixed change in watts or based on the number of desired steps in the test For list based power levels the user can enter any combination of power settings to use for the load curve as shown belo...

Page 81: ...se settings are adjustable to match the waveform or device being tested For the ESU 2400 model analyzer the load curve will always display measured power in Watts With the model ESU 2400H analyzer the...

Page 82: ...automatic tests For manual CQM autosequence steps the user configures the initial CQM resistance and selects whether the operator will be allowed to modify the CQM resistance When the test is running...

Page 83: ...ically stepping through the autosequence if the CQM status matches the expected setting Auto Start CQM Test When this setting is enabled the ESU 2400 will automatically trigger the CQM state evaluatio...

Page 84: ...he DUT CQM state is evaluated The test can be configured to stop when either an alarm or normal CQM state occurs The Set Tolerance button is used to determine the pass fail parameters The CQM resistan...

Page 85: ...tep can be configured to stop when the CQM state is either alarm or normal The Set Tolerance button is used to determine the pass fail parameters The CQM resistance will be stepped until the CQM state...

Page 86: ...formation from the onscreen keyboard external keyboard or barcode scanner Instruction Only Steps These steps will display the instructions that the user is supposed to follow before proceeding to the...

Page 87: ...step is setup for the operator to trigger the DUT the operator must activate the DUT and then press Capture to analyze the measurement and validate the step If the step is setup to automatically trig...

Page 88: ...ctions After the instructions are read pressing the Show Meter button will allow the operator to perform the load curve At the end of the load curve the operator can view the measurements or rerun the...

Page 89: ...resistance the following screen will be shown The user must manually determine the pass or fail status of this step Auto CQM Step The automated CQM step also shows the instructions to the user as well...

Page 90: ...This button allows the user to print only the test header and test summary sections Print Details This button allows the user to print the test header test summary and details of each autosequence ste...

Page 91: ...n and even trigger the DUT The measurement mode can be configured using the keys around the top and right side of the screen The buttons are described below in a clockwise sequence starting with the b...

Page 92: ...Tissue Test This button is used to initiate the Tissue Test mode This mode evaluates the tissue response function of the DUT In this mode the ESU 2400 is configured for an external TRL 2420 lamp load...

Page 93: ...een 6 Screen configurations are available 5 Display Screens which have 1 2 3 4 and 5 display zones respectively and a sixth screen which shows all measurements available for signals that are Continuou...

Page 94: ...the buffer For asymmetric waveforms this can determine if the output polarity is reversed Crest Factor CF This is the ratio of peak to rms of the measured waveform Frequency kHz This the frequency of...

Page 95: ...ram 2 mA P1 mAP1 This is the converted mA measurement of Pulse 1 based on the RF transformer mV to mA attenuation ratio See Diagram 2 Watts P1 WP1 This is the computed power in Watts based on load set...

Page 96: ...ulsed waveform to measurements taken Diagram 2 Pulsed mode 1 only Ton Toff Tcyc Vcyc mAcyc Wcyc CF V Load mA Watts Diagram 3 Pulsed mode 2 only P1 P2 Tcyc V P1 mA P1 Watts P1 V P2 mA P2 Watts P2 Diagr...

Page 97: ...Returns to RF Measurement Screen Save Stores waveform to a comma delimited file This file can then be imported into Microsoft Excel Load Opens previously saved waveform data Hold Stops the waveform m...

Page 98: ...d as Continuous or Pulsed or Delayed Continuous RF waveforms include Cut Bipolar or Coag modes Pulsed RF waveforms consist of a long period duty cycle where the RF output might be active for 20 ms and...

Page 99: ...ground as the current return path When testing these generators select Gnd Ref and the ESU 2400 will configure the variable load to measure current from the active input to earth ground Configure Foot...

Page 100: ...that is configured in the Footswitch Setup menu The footswitch can be deactivated before the activation timeout period by pressing the Activate Footswitch button a second time While the footswitch out...

Page 101: ...f each label Threshold 2 is only available when in Pulsed Mode 3 and is not used in Pulsed Mode 1 or Pulsed Mode 2 These thresholds are used to define the pulse and decide when the ESU 2400H will take...

Page 102: ...hat have zero amplitude between pulses Below is an example of such a waveform Pulsed Mode 1 uses a user selectable threshold to decide when a waveform is on and should be read for a measurement Any ti...

Page 103: ...capable of measuring and analyzing the pulsed waveform This allows the ESU 2400H to provide measurements for several parameters Below is a typical set of measurements when All Readings is selected fro...

Page 104: ...When the waveform amplitude is greater than the threshold the waveform is considered to be pulse 1 When it is below the threshold it is considered to be pulse 2 In the above illustration the red line...

Page 105: ...ve three different amplitudes to be measured Below is an example of such a waveform Pulse Mode 3 uses two user selectable thresholds to determine if the waveform is currently in pulse 1 pulse 2 or pul...

Page 106: ...as pulse 1 The blue signal represents when the waveform is below threshold 1 but above threshold 2 and is being measured as pulse 2 The bottom green signal represents when the waveform is below thresh...

Page 107: ...green signal represents a waveform to be measured in Delayed Mode The red line represents the user selectable threshold The purple signal represents when the waveform has crossed the threshold and ha...

Page 108: ...delay between detection of the pulse and the beginning of the measurement The red X button in the upper right corner is the Cancel button Selecting this will return to the Measurement screen and disc...

Page 109: ...rigger the DUT using one of the five footswitch relay outputs For further automation the RS 232 port can be used to configure the DUT output mode and power level during the Load Curve The load curve m...

Page 110: ...hange or a list based load change For the step based loads the user enters the first load to be used and the last load to be used Then the ESU 2400 steps the loads by either a fixed resistance or by a...

Page 111: ...wer Level Tab For the load curve power configuration the user can set the ESU 2400 to run the load curve at a single power level or multiple power levels The following screen shows the configuration f...

Page 112: ...are similar to the Load config The user can select either step based power levels based on a fixed change in watts or based on the number of desired steps in the test For list based power levels the u...

Page 113: ...se settings are adjustable to match the waveform or device being tested For the ESU 2400 model analyzer the load curve will always display measured power in Watts With the model ESU 2400H analyzer the...

Page 114: ...urce the activation can be setup manually or by DUT manufacturer and model For Manual Setup the user selects the desired footswitch output to be used If RS 232 is enabled the user also selects the bau...

Page 115: ...the desired output mode The ESU 2400 handles all of the RS 232 and footswitch output setup As the load curve runs the screen will be updated with the measured power from the DUT At the end of the loa...

Page 116: ...low the user to adjust the CQM resistance up or down by a set number of ohms The maximum step size is 500 ohms Change by Percent These buttons allow the user to adjust the CQM resistance up or down by...

Page 117: ...around the top and right side of the screen The buttons on this screen are described below in a clockwise sequence starting with the back arrow Back Arrow Pressing the back arrow takes the user to the...

Page 118: ...ies with IEC 601 2 2 sec 19 101b fig 104 and sec 19 102 adopted by ANSI AAMI HF18 2001 The purpose of this test is to verify that open circuit RF leakage of the Device Under Test DUT meets or exceeds...

Page 119: ...so provided at the front panel NOTE DO NOT TEST AN EARTH REFERENCED TYPE BF ELECTROSURGICAL GENERATOR WITH THIS TEST THE RESULTING MEASUREMENT WILL BE ERRONEOUS Leakage 2 This leakage test specified b...

Page 120: ...ed Output type BF electrosurgical generator from the active output This test complies with IEC 601 2 2 sec 19 101a test 2 fig 102 and sec 19 102 adopted by ANSI AAMI HF18 2001 The purpose of this test...

Page 121: ...asurement Graphs can be saved and loaded from internal memory or external USB storage Averaging This key allows the user to select the FAST MEDIUM or SLOW averaging mode Fast averaging will provide a...

Page 122: ...al loads The menu also allows for the selection of the internal and external load values Configure Footswitch This button opens the footswitch configuration menu that will select the footswitch output...

Page 123: ...that is configured in the Footswitch Setup menu The footswitch can be deactivated before the activation timeout period by pressing the Activate Footswitch button a second time While the footswitch out...

Page 124: ...which page is currently viewed Transfer Files This button allows the user to copy any folder or file including pdf between the ESU 2400 and an external USB flash drive directly from the ESU 2400 The...

Page 125: ...Date Time settings are set by scrolling the display to the desired value Once the proper setting is shown the Date Time button is pressed again to accept the change Time Zone This setting allows the u...

Page 126: ...114 Calibrate Touchscreen This button allows the user to calibrate the touchscreen using a 4 calibration Once calibration is started follow the on screen prompts to perform the calibration...

Page 127: ...dings The filter span determines the maximum change in input readings that will be averaged Volume This sets the volume for the ESU 2400 Startup Screen This selects the screen that is loaded as the ES...

Page 128: ...he ESU 2400 and allows the user to update the system to new versions or restore previous versions NOTE Analog Version is only present in the ESU 2400H model analyzer Update System This button allows t...

Page 129: ...he FTP server and check for available updates to the system NOTE Analog Updating only available in the ESU 2400H model analyzer The user can perform all updates at once or select the software to updat...

Page 130: ...dating the system is to download the updated files backup the existing software install the new software and reboot if necessary Downloading Updates Updating Firmware Backing Up Software Installing Up...

Page 131: ...n extension of S19 Software update files should begin with the filename ESU 2400_ end with the revision code and have an extension of exe Operating system files should begin with NK_ and have an exten...

Page 132: ...dated it creates a backup of the previous version in case it is ever needed The firmware software and operating system files are restored independently To restore a previous version first select the f...

Page 133: ...n DHCP is enabled or allows the user to enter a Subnet Mask when the Static Address Type is selected Default Gateway This field identifies the Default Gateway when DHCP is enabled or allows the user t...

Page 134: ...f setting up the remote mode connection The CERHost utility mentioned in the procedure can be found on the ESU 2400 Browse to the device through the network in windows explorer by typing ESU2400_xxxx...

Page 135: ...ote PC display or on the ESU 2400 CERHost Configuration The PC display may flicker or show lines in it based on the ESU 2400 Operating mode To fix this go to the Config menu on the CERHost application...

Page 136: ...screen which allows for a direct RS 232 connection to the DUT Some devices require RS 232 commands to enable calibration or service modes To send data from the ESU 2400 terminal an external keyboard...

Page 137: ...This button is used to toggle the mouse cursor when using a mouse System Maintenance This button is used by the manufacturer to calibrate and debug the ESU 2400 Revision Log The revision log contains...

Page 138: ...election Select from USB Drives or local C Drive Delete Button Deletes selected file or folder New Folder Creates a new folder in the current directory Folder Up Move Up one folder in the file structu...

Page 139: ...ve Delete Button Deletes selected file or folder New Folder Creates a new folder in the current directory Folder Up Move Up one folder in the file structure Current Folder Shows folder being viewed Fi...

Page 140: ...tween upper lowercase characters and numbers symbols until it is manually disabled Cancel Exits the screen without submitting any values Clear Clears the current text entry box Enter Exits the screen...

Page 141: ...s the screen without returning any data Clear Clears the current data entry box Enter Exits the screen and returns the data in the number entry window An external keyboard may also be used to enter da...

Page 142: ...le configuration for local printing Printer Select PCL Inkjet or PCL Laserjet based on the type of printer connected to the ESU 2400 Even if the printer name shows up in the list i e OfficeJet H470 se...

Page 143: ...Leave setting at All Orientation Leave setting at Portrait Margins These are currently unused The ESU 2400 uses margins of 0 5 inches Network Printing Networked printers are connected to a PC on the n...

Page 144: ...erShareName To get the printer share name open the printer properties on the PC the printer is connected to and select the Sharing tab Paper Size Set to Letter for proper operation Draft Mode This wil...

Page 145: ...any time numerical or text entry is required by the user NOTE PS2 keyboards and mice must be connected before powering on the ESU 2400 The ESU 2400 is compatible with USB type barcode scanners These...

Page 146: ...the user will be notified by a warning message as shown below When the user presses the OK button the warning message is cleared from the screen After a failure has been detected the main screen will...

Page 147: ...ts and the status of the faults When a fault has been cleared such as a blocked fan or system overtemp pressing the Reset Cleared Faults button will remove the fault from the list Once all faults are...

Page 148: ...e footswitch interface has opened Contact BC Biomedical for service Front USB Fuse Open The internal fuse protecting the power supply to the front USB port has opened Contact BC Biomedical for service...

Page 149: ...sed to connect devices such as keyboards mice PCL printers or flash drives ETHERNET COMMUNICATION There is a 10 100 Ethernet port on the side panel This is used for firmware updates or for connection...

Page 150: ...pply input Two receptacles are available one on the side of the unit and one on the rear NOTE Only one power receptacle should be used at any time The Universal Power Supply takes a Standard Power Ada...

Page 151: ...ng the signal a more accurate frequency independent measurement can be made The ESU 2400H makes further advances by introducing DFA2 Patent Pending Digital Fast Acquisition Technology The high speed a...

Page 152: ...e connector Pin Function Use 1 Relay 1 Cut 2 3 Relay 2 Coag 4 5 Relay 3 Bipolar 6 7 Relay 4 Future Use 8 9 Relay 5 Future Use 10 11 12V Future Use 12 GND The accessory BC20 03000 is an unterminated fo...

Page 153: ...ption is broken into 3 columns the KEYWORD the PARAMETER FORM and COMMENTS Keyword The KEYWORD column provides the name of the command The actual name of the command consists of one or more keywords s...

Page 154: ...the commands and must be included for example CONF RFM INP RANG All commands sent to the unit are terminated with a Carriage Return NOTE Commands can be entered in either upper or lowercase or a mixt...

Page 155: ...1 mA RMS 9 Time Pulse On 3 Three Parameters 2 Watts RMS 10 Time Pulse Off 4 Four Parameters 3 mV Peak 11 Time Total Cycle 5 Five Parameters 4 mV Pk Pk 12 Duty Cycle 6 Display All Parameters 5 mV Pk m...

Page 156: ...mV Peak 11 Time Total Cycle 5 Five Parameters 4 mV Pk Pk 12 Duty Cycle 6 Display All Parameters 5 mV Pk mV Pk Pk 13 mV Pulse Cycle 6 mV Pk 14 mA Pulse Cycle 7 Crest Factor 15 Watts Pulse Cycle SCReen...

Page 157: ...are used UP Same as pressing Change by Percent Up button DOWN Same as pressing Change by Percent Down button HOLD ON OFF MODE MAIN RFMeasure RFLeakage CQM LCURve ASEQuence SYStools SYSTem Subsystem T...

Page 158: ...ystem supply voltages Footswitch Fuse 12V Vbacklight 5V 3D 3ETX 3DISP VPS2 Front USB Bottom USB Top USB STATus Sub system This subsystem provides status on the operating mode of the unit including mes...

Page 159: ...selected the saved profile is loaded see Profiles on page 115 STB Read Only Returns the status byte information Bit Value Definition 0 1 Hold Mode 1 2 2 4 Calibration Mode 3 8 4 16 Tissue Response Mod...

Page 160: ...mV Pk 7 Crest Factor 8 kHz 9 Time Pulse On 10 Time Pulse Off 11 Time Total Cycle 12 Duty Cycle 13 mV Total Cycle 14 mA Total Cycle 15 Watts Total Cycle SCReen Range 1 6 1 5 display zones 6 Measuremen...

Page 161: ...Peak 4 V Pk Pk 5 V Pk mV Pk Pk 6 V Pk 7 Crest Factor 8 kHz 9 Time On P1 10 Time Off P1 11 Time Total Cycle 12 Duty Cycle P1 13 V Load P1 14 mA P1 15 Watts P1 16 V Load P2 17 mA P2 18 Watts P2 19 V Pea...

Page 162: ...eturns Watts RMS read only MVPeak Returns mV Peak read only MVPP Returns mV Peak to Peak read only MVP PP Returns mV Peak Peak to Peak read only MVPK Returns mV Positive Peak read only CF Returns Cres...

Page 163: ...d 8 256 Error Present 9 512 mV Out of Range 10 1024 mA Out of Range 11 2048 Watts Out of Range 12 4096 mV Peak Out of Range 13 8192 Crest Factor Out of Range 14 16384 Fan1 Blocked 15 32768 Fan2 Blocke...

Page 164: ...Four Parameters 3 V Peak 17 mA P2 5 Five Parameters 4 V Pk Pk 18 Watts P2 6 Display All Parameters 5 V Pk mV Pk Pk 19 V Peak P2 6 V Pk 20 Time On P2 7 Crest Factor 21 Duty Cycle P2 8 kHz 22 V Load P3...

Page 165: ...ee Parameters 2 Watts 16 V Load P2 4 Four Parameters 3 V Peak 17 mA P2 5 Five Parameters 4 V Pk Pk 18 Watts P2 6 Display All Parameters 5 V Pk mV Pk Pk 19 V Peak P2 6 V Pk 20 Time On P2 7 Crest Factor...

Page 166: ...ing Change by Ohms Down button POHMs numeric_value Range 0 500 sets the amount to change the CQM resistance when the percent UP Down buttons are used UP Same as pressing Change by Percent Up button DO...

Page 167: ...y voltages Footswitch Fuse 12V Vbacklight 5V 3D 3ETX 3DISP VPS2 Front USB Bottom USB Top USB STATus Sub system This subsystem provides status on the operating mode of the unit including messages that...

Page 168: ...selected the saved profile is loaded see Profiles on page 115 STB Read Only Returns the status byte information Bit Value Definition 0 1 Hold Mode 1 2 2 4 Calibration Mode 3 8 4 16 Tissue Response Mod...

Page 169: ...y Cycle P2 22 V Load P3 23 mA P3 24 Watts P3 25 V Peak P3 26 Time On P3 27 Duty Cycle P3 SCReen Range 1 6 1 5 display zones 6 Measurement List AVERaging FAST SLOW MEDium LOAD MODE INTernal EXTernal IN...

Page 170: ...Peak 4 V Pk Pk 5 V Pk mV Pk Pk 6 V Pk 7 Crest Factor 8 kHz 9 Time On P1 10 Time Off P1 11 Time Total Cycle 12 Duty Cycle P1 13 V Load P1 14 mA P1 15 Watts P1 16 V Load P2 17 mA P2 18 Watts P2 19 V Pe...

Page 171: ...0 10000 mA PulseT2 0 10000 mA Timeout 0 1000 us DELayed PulseT1 0 10000 mA DELay 0 64000 ms FOOTswitch OUTput ON OFF DURation 5 10 15 seconds SELect 1 5 CQM LOAD OPEN or 0 500 ohms Set or read CQM re...

Page 172: ...only VP1 Returns Load Voltage of Pulse 1 read only MAP1 Returns mA Current of Pulse 1 read only WP1 Returns Watts Pulse 1 read only VP2 Returns Load Voltage of Pulse 2 read only MAP2 Returns mA Curre...

Page 173: ...Error Present 9 512 mV Out of Range 10 1024 mA Out of Range 11 2048 Watts Out of Range 12 4096 mV Peak Out of Range 13 8192 Crest Factor Out of Range 14 16384 Fan1 Blocked 15 32768 Fan2 Blocked IDN R...

Page 174: ...rofile How do I enter text for the Autosequence title or instructions to user Click in the text box to be edited To enter text you will need an external USB keyboard You can also enter the text from y...

Page 175: ...the Tool icon on the right most display and select Demo Mode from the menu on the left most display The ESU 2400 shows a mV RMS measurement Is this the load voltage No this is the output voltage of th...

Page 176: ...3 80 and 4 00 Rev 10 Updated Specifications MANUAL REVISIONS LIMITED WARRANTY WARRANTY BC GROUP INTERNATIONAL INC WARRANTS ITS NEW PRODUCTS TO BE FREE FROM DEFECTS IN MATERIALS AND WORKMANSHIP UNDER...

Page 177: ...165 This Page Intentionally Left Blank...

Page 178: ...1000 0 mV 0 1 mV Resolution ACCURACY 100 mV RANGE f 1 0 MHz 1 0 MHz f 2 5 MHz f 2 5 MHz Input 10 0 mV 1 Reading Or 0 25 mV 1 Reading Or 0 25 mV 1 Reading Or 1 0 mV 10 0 mV Input 35 0 mV 1 Reading Or...

Page 179: ...RMS 0 1 mA Resolution 1000 mV RANGE 20 7000 mA RMS 1 mA Resolution POWER 0 999 9 W 0 1 W Resolution 4 of reading 1W Accuracy CREST FACTOR 1 4 500 0 1 Resolution LOAD VOLTAGE ESU 2400H ONLY 100 mV RANG...

Page 180: ...mV 0 01 mV Resolution 1000 mV RANGE 2 0 1000 0 mV 0 1 mV Resolution ACCURACY 100 mV RANGE f 1 0 MHz 1 0 MHz f 2 5 MHz f 2 5 MHz Input 10 0 mV 1 Reading Or 0 25 mV 1 Reading Or 0 25 mV 1 Reading Or 1 0...

Page 181: ...RMS 0 1 mA Resolution 1000 mV RANGE 20 7000 mA RMS 1 mA Resolution POWER 0 999 9 W 0 1 W Resolution 4 of reading 1W Accuracy CREST FACTOR 1 4 500 0 1 Resolution LOAD VOLTAGE ESU 2400H ONLY 100 mV RANG...

Page 182: ...hm Non Inductive POWER RATING 1 ohm 25W 2 ohm 50W 4 ohm 100W Remaining loads 225W DUTY CYCLE 10 seconds on 30 seconds off LOAD COOLING Dual 120mm Variable Speed Fans Controlled by load temperature or...

Page 183: ...3 USB 1 RS 232 OPERATING SYSTEM Windows CE 7 EXTERNAL DEVICE SUPPORT Most Windows supported USB flash disks printers keyboard mouse etc CONNECTIONS INPUT CONNECTORS Color Coded 4mm Safety Banana Conn...

Page 184: ...ELECTRICAL OPERATING RANGE 15 30 C 59 86 F 20 80 RH Non Condensing STORAGE RANGE 20 60 C 4 140 F SIZE 7 8 x 15 0 x 22 5 inches 198 1 x 381 x 571 5 mm WEIGHT 31 lbs 14 kg POWER 12 VDC minimum 4A Kycon...

Page 185: ...nced Type BF generators This test complies with IEC 601 2 2 sec 19 101a test 1 fig 102 and sec 19 102 adopted by ANSI AAMI HF18 2001 LEAKAGE TEST 3 Tests the leakage to ground of Earth Referenced Type...

Page 186: ...174 NOTES...

Page 187: ...175 NOTES...

Page 188: ...176 NOTES...

Page 189: ......

Page 190: ...81 ELM POINT INDUSTRIAL DRIVE ST CHARLES MO 63301 USA 1 800 242 8428 1 314 638 3800 www bcgroupintl com sales bcgroupintl com esu bcgroupintl com ESU 2400 Series User Manual 11 17 Rev 10 LM 7378X UM C...

Reviews: