


Deploying Avaya IP Office™ Platform IP500 V2
Page 187
15-601042 Issue 30j (18 May 2015)
IP Office™ Platform 9.1
Comments on this document? [email protected]
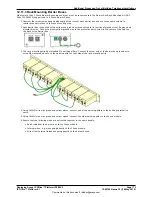
Additional Processes: Erasing the Core Software
12.19 Enabling IP Office Web Manager
Access to IP Office Web Manager is via the system's IP address and then selecting the IP Office Web Management
link. In order to use IP Office Web Manager, a number of criteria as listed below must be met. Most of these are applied
automatic to a new system installed with IP Office Release 8.0 or higher. However, for systems being upgraded to IP
Office Release 8.0 or higher, additional upgrade steps may be required.
Enabling IP Office Web Manager
1. The IP Office Web Manager files must be present on the System SD card. This can be done in a number of way:
·
By selecting to include those files when prompted to do so while
recreating the IP Office SD card
using IP
Office Manager.
·
By selecting Upload System Files when upgrading the system using IP Office Manager.
2. The IP Office system security must allow IP Office Web Manager operation:
·
This is done automatically for any new system installed with IP Office Release 8.0 or higher software.
·
This is done automatically for any existing pre-IP Office Release 8.0 system during the upgrade if the system
is set to use the pre-IP Office Release 8.0 default password of password.
·
For any system upgraded to IP Office Release 8.0 without first being set back to the default password, either:
·
Using IP Office Manager:
1. If not already done, select View | Advanced View.
2. Select File | Advanced | Erase Security Settings (Default).
3. From the Select IP Office dialog, select the required system and click OK.
4. Enter the user name Administrator and the password for that account (by default for a pre-IP Office
Release 8.0 system: password).
5. IP Office Manager will confirm if the action was successful or not.
·
Default the
system security settings using an RS232 DTE cable
.
124
155


