
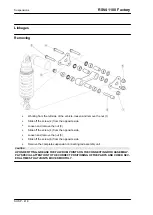


FINAL DRIVE UNIT - BEARING REMOVAL
•
Remove the final drive unit.
•
Clean the two sides of the hub with a
cloth.
•
Remove the left spacer (15).
•
Remove the sealing gasket (16).
•
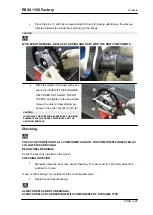
Remove the circlip (17).
CAUTION
THE CIRCLIP (17) IS FITTED ONLY ON THE FINAL DRIVE
UNIT, LEFT SIDE.
•
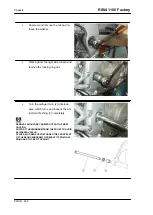
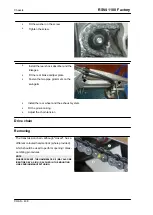
Remove the left bearing (18) with the
specific extractor.
•
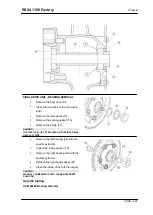
Collect the inside spacer (19).
•
Remove the right bearing (20) with the
specific extractor.
•
Retrieve the right hand spacer (21).
•
Clean the inside of the hub thoroughly.
CAUTION
WASH ALL COMPONENTS WITH CLEAN DETERGENT
SOLUTION.
Specific tooling
AP8140180
Bearing extractor
RSV4 1100 Factory
Chassis
CHAS - 429
Summary of Contents for RSV4 1100 Factory
Page 1: ...SERVICE STATION MANUAL 2Q000401 RSV4 1100 Factory ...
Page 4: ......
Page 6: ...INDEX OF TOPICS CHARACTERISTICS CHAR ...
Page 55: ...INDEX OF TOPICS SPECIAL TOOLS S TOOLS ...
Page 63: ...INDEX OF TOPICS MAINTENANCE MAIN ...
Page 89: ...INDEX OF TOPICS ELECTRICAL SYSTEM ELE SYS ...
Page 245: ...INDEX OF TOPICS ENGINE FROM VEHICLE ENG VE ...
Page 270: ...INDEX OF TOPICS ENGINE ENG ...
Page 384: ...INDEX OF TOPICS POWER SUPPLY P SUPP ...
Page 387: ... Remove the fuel pump Injection RSV4 1100 Factory Power supply P SUPP 387 ...
Page 393: ...INDEX OF TOPICS SUSPENSIONS SUSP ...
Page 417: ...INDEX OF TOPICS CHASSIS CHAS ...
Page 455: ...INDEX OF TOPICS BRAKING SYSTEM BRAK SYS ...
Page 457: ...Operating diagram ABS functional diagram key RSV4 1100 Factory Braking system BRAK SYS 457 ...
Page 488: ...INDEX OF TOPICS COOLING SYSTEM COOL SYS ...
Page 499: ...INDEX OF TOPICS BODYWORK BODYW ...
Page 540: ...INDEX OF TOPICS PRE DELIVERY PRE DE ...
Page 546: ... Fit the two seater saddle Pre delivery RSV4 1100 Factory PRE DE 546 ...


