5.3 Procedure operative
Vengono di seguito descritte le procedure operative che l’utilizzatore
deve svolgere usualmente sul sollevatore.
a. Accensione.
·
Verificare- la presenza del`alimentazione pneumatica in ingresso alla
centralina
di comando.
·
Verificare il corretto collegamento dell’alimentazione pneumatica tra
la centralina ed il sollevatore.
·
Verificare la presenza di energia elettrica in inteso alla centralina.
·
Porre il sezionatore su «I» é verificare l’accensione della lampada bianca
b. Spegnimento.
·
Abbassare il telaio mobile fino a fatale corsa.
·
Porre il sezionatore in. posizione «O».
c. Sollevamento.
·
Dopo aver effettuato la procedura di accensione, verificare che
non ci siano impedìmenti alla salita del sollevatore.
·
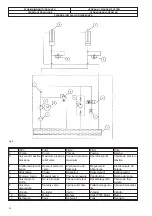
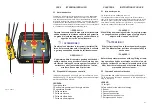
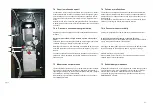
Premere il pulsante (4, fig. 10) e mantenerlo premuto fino al raggiun-
gimento della posizione. desiderata; quindi rilasciare
il pulsante.
!!! P E R I C O L O ! ! !
Prima di avvicinarsi al sollevatore per le operazioni
da compiere sull’autovettura., porre il selettore
(2, fig. 10) su «O».
d. Discesa
·
Verificare che non ci siano impedimenti alla discesa del sollevatore.
·
Premere il pulsante (5, fig. 10) fino all’abbassamento completo del
sollevatore.
e) Premere il pulsante discesa "5" fino alla chiusura completa delle
piattaforma utilizzando nell'ultimo tratto, contemporaneamente il
relativo pulsante " 6" .
5.3 Operating procedures
A description follows of the operating procedures the user normally has
to carry out on the lift
.
a. Switching on
·
Check the presence of the pneumatic supply in input to the control
unit.
·
Check correct connection of the pneumatic supply between the unit
and the lift.
·
Check the presence of the electrical energy in input to the unit.
·
Put the switch on «I» and check that the white light comes on.
b. Switching off
·
Lower the mobile frame until it reaches the end of travel.
·
Put the switch on «O».
c. Lifting.
·
After having carried out the switching on procedure, check there
are no impediments to prevent the lift from moving up.
·
Press the push button (4, Fig. 10) and keep it pressed until the posi-
tion wanted is reached and then release the button.
!!! DANGER !!!
Before approaching the lift to carry out the work on
the car, put the selector (2, Fig. 10) on
«O».
d. Lowering.
·
Check there are no impediments to prevent the lift from moving
down.
·
Press the push button (5, Fig. 10) until the lift is completely lowered.
e) Press the descent push button “5” until the platforms are fully down
simultaneously using the relative push button “6” for the last part.
33
Содержание RPK25/B
Страница 2: ......
Страница 22: ...SCHEMA ELETTRICO ELECTRIC WIRING SCHEME SCH MA LECTRIQUE ELEKTRISCHER ANSCHLUSSPLAN ESQUEMA EL CTRICO Fig 7...
Страница 53: ......
Страница 58: ...QUADRO ELETTRICO TRIFASE 3PH CONTROL PANEL SCHALTTAFEL DREHSTROM 3PH COFFRET LECTRIQUE 3PH CUADRO ELECTRICO 3PH...
Страница 59: ...CENTRALINA OLEODINAMICA OLEODYNAMIC CONTROL UNIT HYDRAULIKEINHEIT CENTRALE HYDRAULIQUE CENTRALITA HIDRAULICA...


