7-10
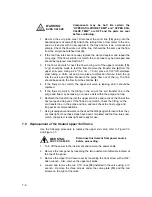
13. The plunger rod arm will stop about ½" from the
bottom of the plunger rod (5). Grasp the plunger rod
with your fingers and pull it down into the hole in the
arm (3).
14. Press any key. The display will now show the
following menu. Replace the thumbscrew then press
any key.
Replace thumbscrew.
Press any key to continue.
15. The display now shows “Clean Syringe” and the
plunger will move up. The vial gripper will move back
to the home position. Press the System key twice to
exit back to the main Archon menu.
Turn the helium toggle switch "ON.” The Archon is
now ready to begin running samples.
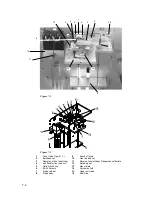
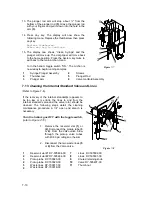
Figure 7-7
1
Syringe Plunger Assemby
4
Screws
2
Thumbscrew
5
Plunger Rod
3
Plunger Arm
6
Valve manifold Assembly
7.13
Cleaning the Internal Standard Valve and Lines
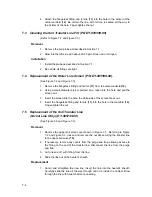
(Refer to Figure 7-8).
If the recovery of the internal standard(s) appears to
be too low or is erratic, the lines to and from the
internal standard valve and the valve rotor should be
cleaned. The following steps detail the cleaning
maintenance procedure. A 1/4" open end wrench is
necessary.
Turn the helium gas OFF with the toggle switch,
(refer to Figure 7-10).
1. Remove the reservoir vial (1) or
(2). Disconnect the pickup tube (3
or 4). From the Valco valve, blow
through the pickup valve tubes
with 40-50 psi nitrogen or helium.
2. Disconnect the two waste lines (5
or 6) from the Valco valve.
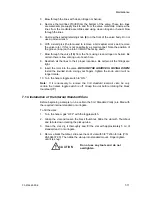
Figure 7-8
1
Reservoir vial #1 DY-505484-00
7
Lines DY-505502-00
2
Reservoir vial #2 DY-505484-00
8
Lines DY-505501-00
3
Pickup tube DY-700020-00
9
Knuled retaining knob
4
Pickup tube DY-700020-00
10
Valve DY-505407-00
5
Waste lines DY-700017-00
11
Thumb nut
6
Waste lines DY-700018-00
Содержание archon
Страница 43: ...4 6 ...
Страница 73: ...6 18 ...
Страница 103: ...9 4 ...
Страница 117: ...11 10 11 6 Interconnect Diagram Note F R L R and U D P O T should be set at 3 4 std valve full power ...
Страница 119: ...12 2 ...

