Method Setup
03-914642-00:6
5-5
5.3
Blanks After Vial Editing
Single blank runs can be programmed after specific sample vials within a
particular method. These are known as "Method Blanks" and complement the
alternative of creating a whole method where all of the runs are blanks.
Method blanks are particularly useful when analyzing sample sets containing both
high and low concentration samples. The blanks allow additional system cleaning
of not only the Archon, but also of the Purge and Trap and the GC. The blank
water is withdrawn from the blank water reservoir rather than a user-prepared
vial, but otherwise is followed by the whole analysis sequence. Method blanks can
also be used to confirm that cross-sample contamination has not occurred.
To program Method Blanks, build the rest of the method first entering the
parameters under the <Edit Method> menu. Then press the "Method" key to exit
to the *METHOD* menu. Scroll down to <Edit Blank Vials> and press Enter.
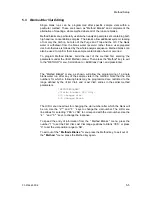
The *Method Blanks* menu, as shown, will allow the programming of a single
blank water run after any of the sample vials in the method. Note that the vial
numbers for which a following blank may be programmed are restricted to the
range defined by the <First Vial> and <Last Vial> entries in the earlier method
parameters.
*METHOD#BLANKS*
<Vial#= Blanks= YES (NO)>
U/D changes vial.
L/R changes blank.
The U/D menu line allows for changing the vial number after which the blank will
be run. Use the “2
” and “8
” keys to change the vial number. The L/R menu
line allows for selecting ‘YES’ or ‘NO’ to correspond with the vial number. Use the
“4
” and “6
” keys to change the response.
To speed the entry of information from the * Method Blanks * menu, press the
number “1” to set the First Vial, Last Vial range positions to Blank ‘YES’, or press
“0” to set the vial position range to ‘NO’.
To exit out of the * Methods Blanks * menu press the Method key, to exit out of
the * Method * menu, press the Method key again.
Содержание archon
Страница 43: ...4 6 ...
Страница 73: ...6 18 ...
Страница 103: ...9 4 ...
Страница 117: ...11 10 11 6 Interconnect Diagram Note F R L R and U D P O T should be set at 3 4 std valve full power ...
Страница 119: ...12 2 ...

