8.4.2 Properties Setting
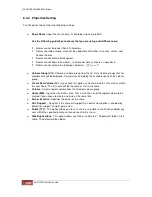
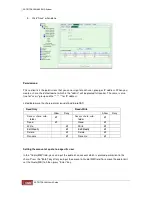
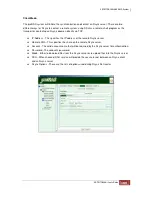
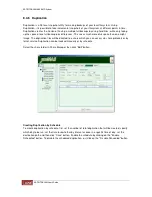
The Properties tab contains the following settings:
♦
Share Name -
Input the share name, it should be unique in proNAS.
Use the following guidelines to ensure that you are using a valid Share name:
Names cannot be longer than 31 characters.
Names should be unique. It cannot be a duplicate with other LV names, shares, and
Account names.
Names cannot contain blank spaces.
Names cannot begin with a dash (-) and cannot consist of only a single dash.
Names cannot contain the following characters: /\[]";:|<>+=,?*
♦
Volume Group (VG)
- Choose a volume group from the list. Only Volume groups that has
member disk will be displayed. System will also display the available space of the volume
group.
♦
Create New Volume (LV)
-If you check this option, system will create LV as well as create
the new Share. The LV name will be the same as the share name.
♦
Volume -
Select a logical volume from the selected volume group.
♦
Quota (MB) -
Input the size of the share. This is also the size of the logical volume to be
created if you choose to create a volume at the same time.
♦
Owner Account -
Specifies the owner of the share.
♦
ACL Support
– Specifies if the share will support ACL permission (option is enabled by
default) or support “chmod” permission.
♦
Public (777)
- This option allows you to set a share as a public share. When enabled, any
user within the specified private net can connect to this share.
♦
Hide Duplications
- This option allows you hide or unhide the "_Duplication" folder in this
share. The default will be hidden.
Содержание TRITON 16Ni
Страница 1: ...SurfRAID TRITON 16Ni User s Guide Revision 1 1...
Страница 40: ......
Страница 41: ......
Страница 42: ......
Страница 43: ......
Страница 67: ...5 3 7 Stop Volume Check Use this option to stop current running Check Volume Set process...
Страница 111: ...4 Verify the new LV size...
Страница 135: ...4 The iSCSI logical volume capacity is extended...
Страница 207: ...The proBackup page will be displayed Click Start Java Web Enter the login account admin and password 00000000...
Страница 216: ...10 5 Account Detail Under Plan Manager click the account name to view information about the account...
Страница 236: ...2 Select Set LAN Configuration and press Enter key 3 Setup LAN Configuration...
Страница 238: ...6 Press F10 to save configuration changes and exit setup With Ok selected press Enter key to restart system...
Страница 247: ......

