


LMV
Series
Technical
Instructions
Document
No.
LV5
‐
1000
SCC
Inc.
Page
15
Section
5
Suggested
Setup
Procedure
for
the
VFD
Control
After
verifying
that
all
VFD
related
components
are
installed
and
wired
correctly,
the
VFD
control
can
be
set
up.
Naturally,
if
the
burner
has
a
VFD,
this
must
be
done
before
the
Ratio
Control
Curves
are
commissioned.
Particular
attention
should
be
paid
to
the
following
points:
1.
The
arrow
on
the
speed
wheel
points
in
the
same
direction
as
the
correct
blower
rotation.
2.
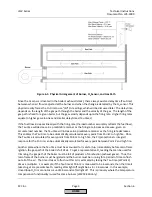
The
gap
between
the
inductive
sensor
and
the
speed
wheel
finger
is
correct
(approx.
1/16").
3.
The
VFD,
motor,
and
LMV52
share
a
common
ground.
4.
The
analog
signal
from
the
LMV52
to
the
VFD
must
be
in
shielded
cable
with
one
end
of
the
shield
grounded.
After
these
points
are
double
‐
checked,
the
LMV52
parameters
can
be
set.
1.
Activate
the
VFD.
The
VFD
control
can
be
activated
/
deactivated
for
either
fuel
in
a
dual
fuel
burner.
Typically,
if
a
burner
has
a
VFD,
it
will
be
activated
on
each
fuel.
The
VFD
can
be
activated
using
the
following
menu
path:
Params
&
Display
>
RatioControl
>
Gas/Oil
Setting
>
VSD
2.
Set
the
air
actuator
to
be
“air
influenced”.
This
is
done
so
that
the
air
damper
will
open
to
pre
‐
purge
position
when
the
LMV52
is
standardized.
This
can
be
done
using
the
following
menu
path:
Params
&
Display
>
RatioControl
>
Gas/Oil
Settings
>
AirActuator
=
air
influen
3.
Set
or
check
the
LMV52
ramp
times.
Both
of
these
must
be
at
least
5
seconds
longer
than
the
ramp
times
set
in
the
VFD.
The
ramp
times
can
be
checked
using
the
following
menu
path:
Params
&
Display
>
RatioControl
>
Times
>
OperatRampMod
Params
&
Display
>
RatioControl
>
Times
>
TimeNoFlame
4.
If
using
a
6
‐
finger
speed
wheel
(rarely
necessary
‐
only
if
the
VFD
will
be
operated
under
300
RPM),
change
the
number
of
pulses
per
revolution
from
3
to
6
using
the
following
menu
path:
Params
&
Display
>
VSD
Module
>
Configuration
>
Speed
>
Num
Puls
per
R
5.
Configure
the
analog
output
of
the
LMV52
to
match
the
analog
input
of
the
VFD.
Typically,
a
4
‐
20mA
signal
is
used.
The
analog
output
signal
can
be
set
using
the
following
menu
path:
Params
&
Display
>
VSD
Module
>
Configuration
>
Speed
>
Setpoint
Output
6.
If
the
VFD
was
not
purchased
pre
‐
programmed
for
an
LMV52,
set
the
relevant
VFD
parameters.
See
section
on
previous
pages
titled
"Configuring
VFDs
for
use
with
the
LMV52".
HOME
Содержание LMV 5 Series
Страница 2: ...Intentionally Left Blank ...
Страница 25: ...LMV Series Technical Instructions Document No LV5 1000 SCC Inc Page 21 Section 1 Intentionally Left Blank HOME ...
Страница 27: ...LMV Series Technical Instructions Document No LV5 1000 SCC Inc Page 23 Section 1 Intentionally Left Blank HOME ...
Страница 41: ...LMV Series Technical Instructions Document No LV5 1000 SCC Inc Page 7 Section 2 HOME ...
Страница 42: ...Technical Instructions LMV Series Document No LV5 1000 Section 2 Page 8 SCC Inc HOME ...
Страница 43: ...LMV Series Technical Instructions Document No LV5 1000 SCC Inc Page 9 Section 2 HOME ...
Страница 44: ...Technical Instructions LMV Series Document No LV5 1000 Section 2 Page 10 SCC Inc HOME ...
Страница 45: ...LMV Series Technical Instructions Document No LV5 1000 SCC Inc Page 11 Section 2 HOME ...
Страница 46: ...Technical Instructions LMV Series Document No LV5 1000 Section 2 Page 12 SCC Inc HOME ...
Страница 47: ...LMV Series Technical Instructions Document No LV5 1000 SCC Inc Page 13 Section 2 HOME ...
Страница 48: ...Technical Instructions LMV Series Document No LV5 1000 Section 2 Page 14 SCC Inc HOME ...
Страница 49: ...LMV Series Technical Instructions Document No LV5 1000 SCC Inc Page 15 Section 2 HOME ...
Страница 50: ...Technical Instructions LMV Series Document No LV5 1000 Section 2 Page 16 SCC Inc HOME ...
Страница 51: ...LMV Series Technical Instructions Document No LV5 1000 SCC Inc Page 17 Section 2 HOME ...
Страница 52: ...Technical Instructions LMV Series Document No LV5 1000 Section 2 Page 18 SCC Inc HOME ...
Страница 53: ...LMV Series Technical Instructions Document No LV5 1000 SCC Inc Page 19 Section 2 HOME ...
Страница 54: ...Technical Instructions LMV Series Document No LV5 1000 Section 2 Page 20 SCC Inc HOME ...
Страница 55: ...LMV Series Technical Instructions Document No LV5 1000 SCC Inc Page 21 Section 2 HOME ...
Страница 56: ...Technical Instructions LMV Series Document No LV5 1000 Section 2 Page 22 SCC Inc Intentionally Left Blank HOME ...
Страница 116: ...Technical Instructions LMV Series Document No LV5 1000 Section 3 Page 58 SCC Inc Intentionally Left Blank HOME ...
Страница 150: ...Technical Instructions LMV Series Document No LV5 1000 Section 4 Page 32 SCC Inc Intentionally Left Blank HOME ...
Страница 170: ...Technical Instructions LMV Series Document No LV5 1000 Section 5 Page 18 SCC Inc Intentionally Left Blank HOME ...
Страница 290: ...Technical Instructions LMV Series Document No LV5 1000 Section 8 Page 20 SCC Inc Intentionally Left Blank HOME ...
Страница 306: ...Technical Instructions LMV Series Document No LV5 1000 Section 9 Page 14 SCC Inc Intentionally Left Blank HOME ...
Страница 373: ...Intentionally Left Blank ...