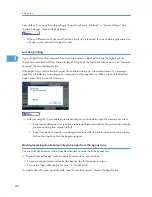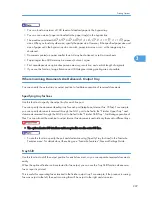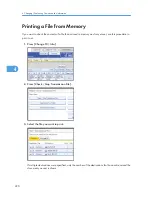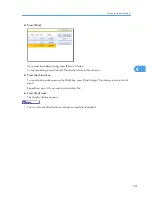
• You can load a maximum of 100 sheets of standard paper in the bypass tray.
• You can use a size of paper not loaded in the paper tray(s) in the bypass tray.
• The machine can detect A6 , A5 , A4 , A3 (5
1
/
2
× 8
1
/
2
, 8
1
/
2
× 11 , 11 × 17 ) paper
sizes. When you load any other size, specify the paper size. However, if the specified paper size and
size of paper set in the bypass tray do not match, paper jams may occur, or the image may be
shortened.
• Documents printed on paper smaller than A4 may be shortened, or split across sheets.
• Paper longer than 600 mm may be creased, not sent, or jam.
• Print area depends on optional expansion memory, resolution, and vertical length of originals.
• If you use this function, Image Rotation and 180-degree rotating printing are not possible.
Where Incoming Documents Are Delivered - Output Tray
You can specify the output tray or output position to facilitate separation of received documents.
Specifying tray for lines
Use this function to specify the output tray for each line port.
You can specify the document feeding tray for each port (telephone, Internet Fax, IP-Fax). For example,
you can specify documents received through the G3-1 port to be fed to the “Finisher Upper Tray” and
documents received through the G3-2 port to be fed to the “Finisher Shift Tray”, facilitating separation of
files. You can also set the machine to output Internet Fax documents and ordinary faxes onto different trays.
• The optional extra G3 interface unit is required to use the extra G3 line.
• To use this function, specify the port and destination using [Specify Tray for Lines] in the Facsimile
Features menu. For details about the setting, see “Facsimile Features”, General Settings Guide.
Tray Shift
Use this function to shift the output position for each document, so you can separate received documents
easily.
When the optional finisher unit is selected for fax output, you can use the Tray Shift function whenever a
fax or report is printed.
This is useful for separating faxes stacked in the finisher output tray. For example, if the previous incoming
fax was output to the left, the next incoming fax will be output to the right and vice-versa.
Printing Options
207
3
Содержание Aficio MP 4000
Страница 46: ...1 Getting Started 46 1 ...
Страница 50: ...2 Entering Text 50 2 ...
Страница 99: ...MEMO 99 ...
Страница 100: ...MEMO 100 EN USA D012 7754 ...
Страница 138: ...2 Troubleshooting When Using the Copy Document Server Function 34 2 ...
Страница 184: ...4 Troubleshooting When Using the Printer Function 80 4 ...
Страница 205: ...Original Orientation Exposure glass ADF copy scanner Paper Orientation BBR036S Loading Paper 101 6 ...
Страница 217: ...BAZ035S Adding Staples 113 6 ...
Страница 220: ...6 Adding Paper Toner and Staples 116 6 ...
Страница 224: ...When C is displayed BBR030S When D is displayed BBR031S 7 Clearing Misfeeds 120 7 ...
Страница 225: ...When P is displayed BBR040S Removing Jammed Paper 121 7 ...
Страница 227: ...When R5 R8 is displayed in the case of 3000 sheet finisher BAZ052S Removing Jammed Paper 123 7 ...
Страница 234: ...BAZ062S 7 Clearing Misfeeds 130 7 ...
Страница 242: ...BBR022S Clean 1 and 2 8 Remarks 138 8 ...
Страница 246: ...MEMO 142 ...
Страница 247: ...MEMO 143 ...
Страница 248: ...MEMO 144 EN USA D012 7804 ...
Страница 275: ...BAT021S 1 Press Special Original 2 Select the original orientation and then press OK Placing Originals 23 1 ...
Страница 284: ...1 Placing Originals 32 1 ...
Страница 338: ...2 Basic Copying 86 2 ...
Страница 396: ...3 Advanced Copying 144 3 ...
Страница 420: ...4 Document Server 168 4 ...
Страница 442: ...MEMO 190 ...
Страница 443: ...MEMO 191 ...
Страница 444: ...MEMO 192 EN USA D012 7652 ...
Страница 478: ...2 After checking the settings on the display press Exit 1 Transmission 30 1 ...
Страница 602: ...1 Transmission 154 1 ...
Страница 608: ... p 131 Sender Settings 2 Other Transmission Features 160 2 ...
Страница 626: ...2 Other Transmission Features 178 2 ...
Страница 666: ...6 Press SMTP 7 Select Yes or No and then press OK 8 Press OK 4 Changing Confirming Communication Information 218 4 ...
Страница 778: ...MEMO 330 ...
Страница 779: ...MEMO 331 ...
Страница 780: ...MEMO 332 EN USA D346 8515 ...
Страница 808: ...24 ...
Страница 858: ...2 Setting Up the Printer Driver 74 2 ...
Страница 915: ...ftp ftp put path name file name Virtual Printer Name Using the Virtual Printer 131 3 ...
Страница 916: ...3 Other Print Operations 132 3 ...
Страница 928: ...5 Appendix 144 5 ...
Страница 931: ...MEMO 147 ...
Страница 932: ...MEMO 148 EN USA AE AE D381 ...
Страница 933: ...Copyright 2007 ...
Страница 934: ...Operating Instructions Printer Reference D381 7002 EN USA ...
Страница 943: ...Specifications 174 INDEX 177 7 ...
Страница 946: ... p 115 Scanning Originals with the Network TWAIN Scanner p 75 Storing Files Using the Scanner Function 10 ...
Страница 954: ...18 ...
Страница 986: ...1 Sending Scan Files by E mail 50 1 ...
Страница 1010: ...2 Sending Scan Files to Folders 74 2 ...
Страница 1050: ...4 Delivering Scan Files 114 4 ...
Страница 1098: ...Scan size Maximum resolution dpi A6 1200 7 Appendix 162 7 ...
Страница 1112: ...7 Appendix 176 7 ...
Страница 1118: ...Operating Instructions Scanner Reference D381 7102 EN USA ...

