


40_
menu setup
menu setup
Record Setup
You can set resolution, IPS, and quality of recordings by channel, and by recording type of standard / event.
You can check frame rates and data transfer amount of Full Frame and Key Frame recordings for each channel,
and set the transfer limit for recordings.
menu > Record > Record Setup
•
CH : Click <
> to display the channel information table.
•
Apply to CH : If you select <
Apply to Ch
>, the "
Apply to Ch
" confirmation window will appear.
After selecting channels that the settings will be applied to, click on <
OK
> to apply them to the selected channels.
•
Standard, Event : Configures Standard recording and Event recording.
- FULL : Records all frames fed by the camera.
- I-frame : Records only key frames fed by the camera.
Actual recording rate may differ from camera settings. In general, 1 to 2 frames per second are recorded.
- OFF : No recording is made.
•
Frame
- FULL : Shows the amount of data for all the scene recordings.
- I-frame : Shows the amount of data for the main scene recordings.
•
Limit : Set the amount of data allowed for input for each channel.
•
Event : When an event occurs, you can set which point you will start or stop recording.
- Pre : When an event occurs, recording will be started regardless of the time set.
If you set it to five seconds, recording will start at five seconds before an event occurs.
- Post : When an event occurs, recording will continue after the time set.
If you set it to five seconds, recording will continue for a further five seconds after an event is finished.
•
Audio : Specify whether to record the sound received from the camera or not.
`
If a channel's data transfer exceeds defined allowed limit, then it may affect to other channels, and may force switching to
<
I-frame
> recording even when the channel is configured to <
FULL
> recording mode. For Key Frame recording channels, the
icon for limited recording appears on the live screen's top side.
But if the sum of the limits is below the max limit, you can still receive the entire frames despite exceeding the permitted
bitrates for each channel.
`
A channel displayed in yellow indicates that the recorded data is not being transferred from the camera and that the recording
is being performed temporarily using another profile on the camera.
Check the channel information to see the applied profile to the channel listed in yellow.
A channel displayed in orange indicates that the amount of inputted data is greater than the permitted data amount. In this
case, it is impossible to record all of the incoming frames.
Instead, only part of the frames (1 or 2 frames per second) can be recorded. To resolve this issue, you must set the permitted
data amount to be greater than the amount of inputted data.
See the note text on the "
Record status
" page under "
Live
>
Status
" in the Table of Contents.
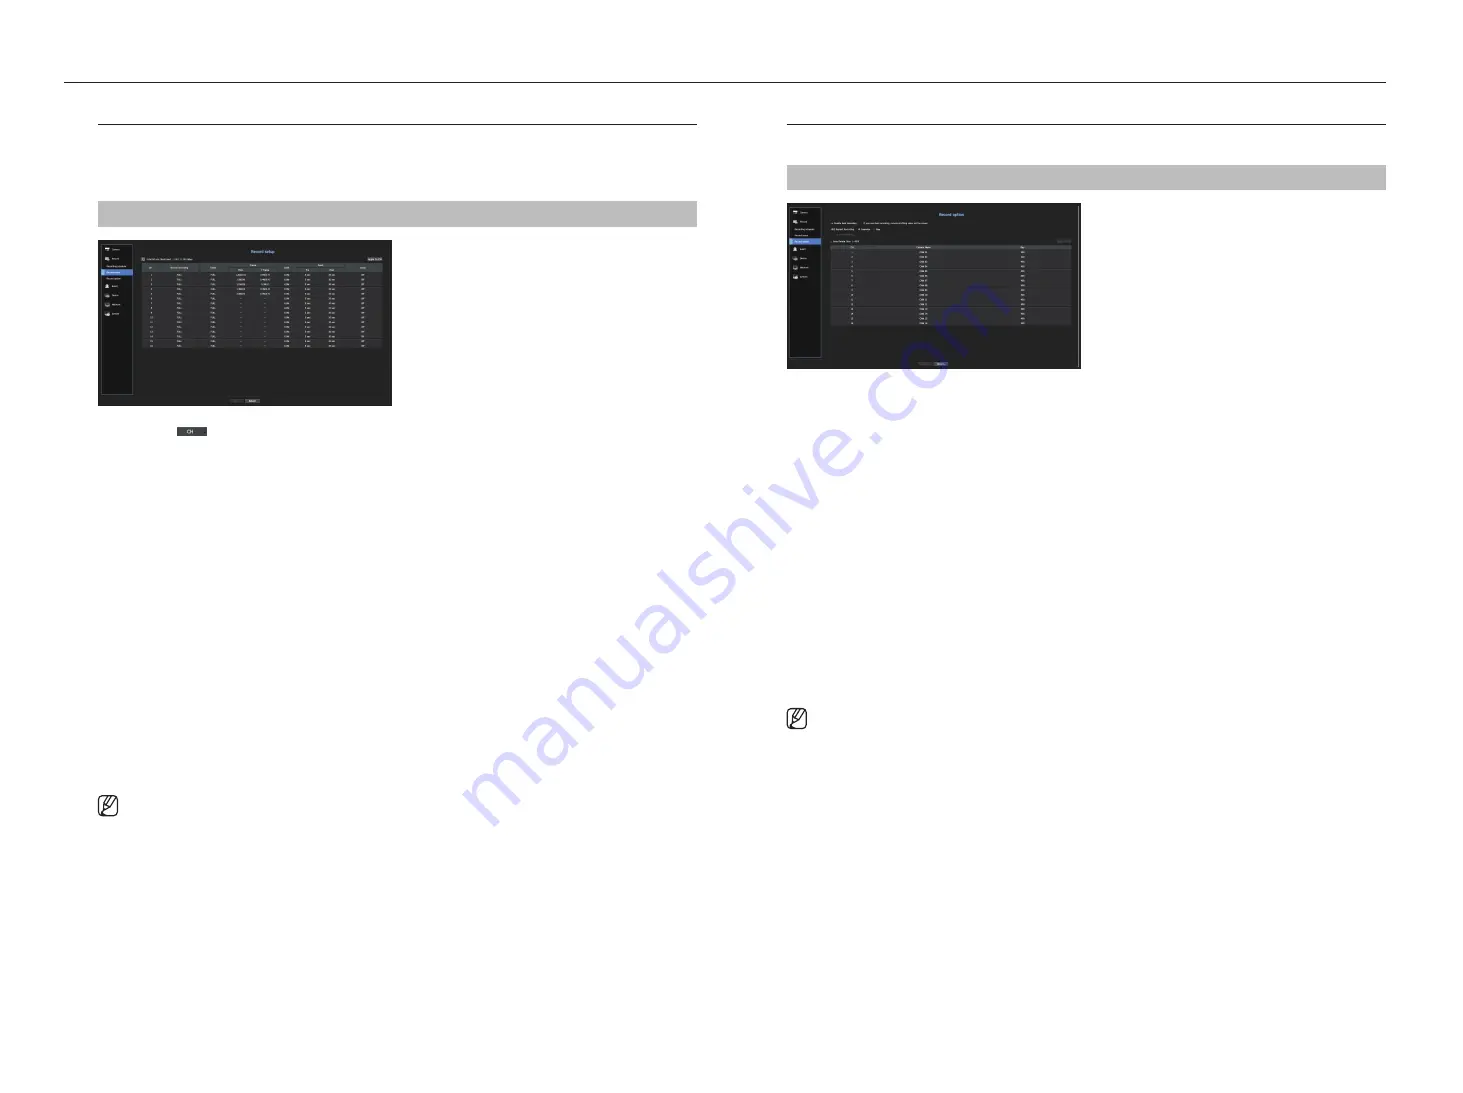
Record Option
When the HDD capacity is full, you can set whether to stop recording or start overwriting.
menu > Record > Record Option
•
Enable dual recording
: Check it if you want to record the recording profile and remote profile simultaneously.
"Enable dual recording"can be applied as a profile appropriate for the split mode during the playback.
•
HDD Repeat Recording : Select a HDD repetitive recording type.
- Overwrite : If the HDD is full, this will overwrite the existing data and keep recording.
- Stop : If the HDD is full, this will stop recording automatically.
•
Disk End Beep : If you select <
Stop
> for the HDD Repeat Recording mode, this button will be active. Specify
the use of beep when the HDD recording ends.
If you check it, the beep will sound on the disk full and the recording stops.
•
Auto Delete : If you check this option, the period list box is active. Specify the deletion period to delete any
earlier data than the specified date. However, you can search for data from the current time to the selected
date.
`
If you select <
Overwrite
> for the HDD Repeat Recording, the button is enabled.
`
You can select a channel and set a different recording duration for each channel.
•
Apply to CH : If you select <
Apply to Ch
>, a confirmation dialog window is opened.
Select a channel to apply the applicable settings then press <
OK
>. The settings will be applied to the
selected channel.
`
If you press <
OK
> when you have completed your settings, all the existing data earlier than the specified period will be deleted
automatically. So it is recommend to backup the previous data if necessary for later use.
Содержание LRN-1610S
Страница 1: ...NETWORK VIDEO RECORDER User Manual Wisenet NVR...
Страница 83: ......


