GE H
EALTHCARE
D
IRECTION
FQ091013, R
EVISION
1
V
IVID
I
N
AND
V
IVID
Q
N S
ERVICE
M
ANUAL
8-126
Section 8-5 - Software Loading
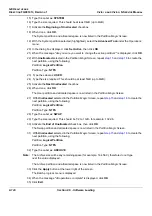
15) Type the Label as:
SYSTEM
16) Type the size required. This should be at least 3GB (up to 4GB).
17) Activate the
Beginning of Unallocated
checkbox.
18) When done, click
OK
.
The System partition and allocated space is now listed in the
Partition Magic Screen
.
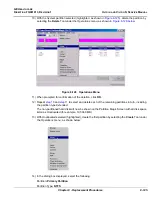
19) With the System partition selected (highlighted), select the
Advanced Tool
under the
Operations
menu.
20) In the dialog box displayed, click
Set Active
, then click
OK
.
21) When the message "
Are you sure you want to change the active partition?"
is displayed, click
OK
.
22) With
Unallocated
selected in the
Partition Magic Screen
, repeat
and
to create the
next partition, using the following:
Partition:
Logical Partition
Partition Type:
NTFS
23) Type the Label as:
USER
24) Type the size required. This should be at least 5GB (up to 6GB).
25) Activate the
Next Unallocated
checkbox.
26) When done, click
OK
.
The User partition and allocated space is now listed in the
Partition Magic Screen
.
27) With
Unallocated
selected in the
Partition Magic Screen
, repeat
and
to create the
next partition, using the following:
Partition:
Logical Partition
Partition Type:
NTFS
28) Type the Label as:
SWAP
29) Type the size required. This should be 1/2 to 1GB - for example, 1022.6.
30) Activate the
End of Unallocated
check box, then click
OK
.
The Swap partition and allocated space is now listed in the
Partition Magic Screen
.
31) With
Unallocated
selected in the
Partition Magic Screen
, repeat
and
to create the
next partition, using the following:
Partition:
Logical Partition
Partition Type:
NTFS
32) Type the Label as:
ARCHIVE
Note:
The Archive size will be any remaining space (for example, 14,456.9), therefore
do not type
over the value displayed
.
The Archive partition and allocated space is now listed in the
Partition Magic Screen
.
33) Click the
Apply
button at the lower right of the screen.
The Batch progress menu is displayed.
34) When the message "
All operations complete
" is displayed, click
OK
.
35) Click
Exit
.
Содержание Vivid in
Страница 2: ......
Страница 30: ...GE HEALTHCARE DIRECTION FQ091013 REVISION 1 VIVID I N AND VIVID Q N SERVICE MANUAL xxviii...
Страница 739: ......


