5-170
T60 Transformer Protection System
GE Multilin
5.5 FLEXLOGIC
5 SETTINGS
5
2.
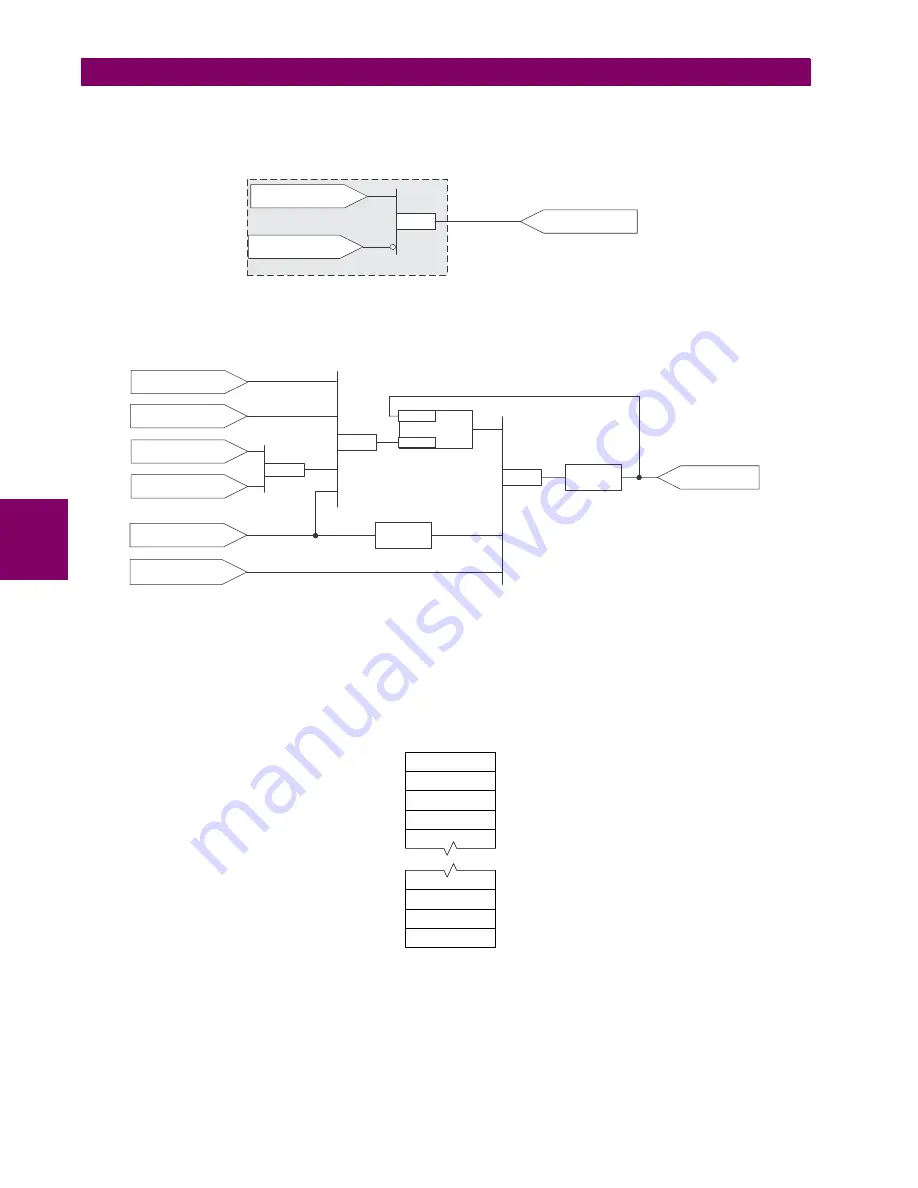
Prepare a logic diagram for the equation to produce virtual output 3, as this output will be used as an operand in the
virtual output 4 equation (create the equation for every output that will be used as an operand first, so that when these
operands are required they will already have been evaluated and assigned to a specific virtual output). The logic for
virtual output 3 is shown below with the final output assigned.
Figure 5–60: LOGIC FOR VIRTUAL OUTPUT 3
3.
Prepare a logic diagram for virtual output 4, replacing the logic ahead of virtual output 3 with a symbol identified as vir-
tual output 3, as shown below.
Figure 5–61: LOGIC FOR VIRTUAL OUTPUT 4
4.
Program the FlexLogic equation for virtual output 3 by translating the logic into available FlexLogic parameters. The
equation is formed one parameter at a time until the required logic is complete. It is generally easier to start at the out-
put end of the equation and work back towards the input, as shown in the following steps. It is also recommended to list
operator inputs from bottom to top. For demonstration, the final output will be arbitrarily identified as parameter 99, and
each preceding parameter decremented by one in turn. Until accustomed to using FlexLogic, it is suggested that a
worksheet with a series of cells marked with the arbitrary parameter numbers be prepared, as shown below.
Figure 5–62: FLEXLOGIC WORKSHEET
5.
Following the procedure outlined, start with parameter 99, as follows:
99: The final output of the equation is virtual output 3, which is created by the operator "= Virt Op n". This parameter is
therefore "= Virt Op 3."
CONTACT INPUT H1c
State=Closed
AND(2)
DIGITAL ELEMENT 2
State=Operated
VIRTUAL OUTPUT 3
827027A2.VSD
LATCH
CONTACT INPUT H1c
State=Closed
XOR
Reset
Set
VIRTUAL OUTPUT 2
State=ON
VIRTUAL INPUT 1
State=ON
DIGITAL ELEMENT 1
State=Pickup
OR #2
VIRTUAL
OUTPUT 4
OR #1
(800 ms)
Timer 1
Time Delay
on Pickup
(200 ms)
Timer 2
Time Delay
on Dropout
VIRTUAL OUTPUT 3
State=ON
VIRTUAL OUTPUT 1
State=ON
827028A2.VSD
01
02
03
04
05
97
98
99
.....
827029A1.VSD
Содержание T60
Страница 6: ...vi T60 Transformer Protection System GE Multilin TABLE OF CONTENTS ...
Страница 14: ...xiv T60 Transformer Protection System GE Multilin TABLE OF CONTENTS ...
Страница 34: ...1 20 T60 Transformer Protection System GE Multilin 1 5 USING THE RELAY 1 GETTING STARTED 1 ...
Страница 118: ...3 48 T60 Transformer Protection System GE Multilin 3 3 DIRECT INPUT OUTPUT COMMUNICATIONS 3 HARDWARE 3 ...
Страница 146: ...4 28 T60 Transformer Protection System GE Multilin 4 3 FACEPLATE INTERFACE 4 HUMAN INTERFACES 4 ...
Страница 490: ...5 344 T60 Transformer Protection System GE Multilin 5 10 TESTING 5 SETTINGS 5 ...
Страница 522: ...6 32 T60 Transformer Protection System GE Multilin 6 5 PRODUCT INFORMATION 6 ACTUAL VALUES 6 ...
Страница 536: ...7 14 T60 Transformer Protection System GE Multilin 7 1 COMMANDS 7 COMMANDS AND TARGETS 7 ...
Страница 538: ...8 2 T60 Transformer Protection System GE Multilin 8 1 DIRECTIONAL PRINCIPLE 8 THEORY OF OPERATION 8 ...
Страница 568: ...10 12 T60 Transformer Protection System GE Multilin 10 6 DISPOSAL 10 MAINTENANCE 10 ...
Страница 596: ...A 28 T60 Transformer Protection System GE Multilin A 1 PARAMETER LISTS APPENDIX A A ...
Страница 716: ...B 120 T60 Transformer Protection System GE Multilin B 4 MEMORY MAPPING APPENDIX B B ...
Страница 762: ...E 10 T60 Transformer Protection System GE Multilin E 1 IEC 60870 5 104 PROTOCOL APPENDIX E E ...
Страница 774: ...F 12 T60 Transformer Protection System GE Multilin F 2 DNP POINT LISTS APPENDIX F F ...
Страница 785: ...GE Multilin T60 Transformer Protection System H 9 APPENDIX H H 2 ABBREVIATIONS H Z Impedance Zone ...


