GE H
EALTHCARE
O
PTIMA
XR200
AMX
/XR220
AMX
D
IRECTION
5336113-1EN, R
EVISION
10
I
NSTALLATION
M
ANUAL
Page 116
Section 5.4 PACS image tests
5.4.3 Optional PACS tests
Perform the following tests to obtain further information for troubleshooting.
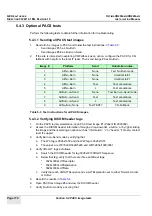
5.4.3.1 Sending all PACS test images
1.
Send all nine images to PACS and follow the test instructions in
-
Send images #1-5 as No-Burn
-
Send images #6-8 as Burn-on-Send
2.
If the site is interested in exploring CR-Fallback as an option, configure the PACS for CR-
fallback with help from the local IT team. Then send image #9 as No-Burn.
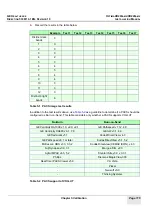
Table 5-3 Test instructions for all PACS images
5.4.3.2 Verifying DICOM header tags
1.
On the PACS review workstation, open PACS test image #1 (Patient ID 2000002).
2.
Access the DICOM header information through a drop-down list, a button, or by right-clicking
the image and then selecting an option such as “information,” “i,” or “header.” For help, contact
local IT support.
3.
Verify Burn-on-Send mode by verifying that:
a.
The WC tag is 0028x1050 and the WW tag is 0028x1051
b.
The values are WC=5226\5226\5226 and WW=2654\1990\3981
4.
Verify VOI-LUT tags as follows:
a.
Search the DICOM header for tag 0028x3010VOILUTSequence.
b.
Below that tag, verify that there are three additional tags:
*
0028x3002LUTDescriptor
*
0028x3003LUTExplanation
*
0028x3006LUTData
c.
Verify that each VOILUTSequence has a LUTExplanation set to either Normal, Harder,
or Softer.
5.
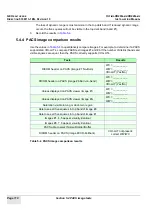
Record the results in
6.
Open PACS test image #6 and view the DICOM header.
7.
Verify No-Burn mode by ensuring that:
Image #
Platform
Send
Annotation notes
1
All No-Burn
None
Test No-Burn mode
2
All No-Burn
None
Identical to #1
3
All No-Burn
None
Identical to #1
4
All No-Burn
Text
Test annotations
5
All No-Burn
L
Test annotations
6
All Burn-on-Send
None
Test Burn-on-Send mode
7
All Burn-on-Send
Text
Test annotations
8
All Burn-on-Send
L
Test annotations
9
All No-Burn None
Test TEXT?
CR-Fallback


