


GE M
EDICAL
S
YSTEMS
D
IRECTION
2392751-100, R
EVISION
3
V
IVID
™ 4 S
ERVICE
M
ANUAL
6-10
Section 6-6 - Vivid™ 4 17" Monitor Operation & Image Quality Calibration
6-6-2
Image Quality Calibration
The
image quality settings on the Vivid™ 4 17" monitor may need periodic adjustment due to changes
in ambient light. These adjustments can be easily made using the
Contrast
and
Brightness
buttons
on the front part of the display monitor. As the image quality settings are often adjusted, it is
recommended to check - and if necessary recalibrate - these settings on a regular basis.
This section describes how to calibrate image quality related settings for the Vivid™ 4 ultrasound unit
monitor, configured with software version 4.1 and above. This section complements the basic monitor
adjustment instructions described in the
Vivid™ 4 User Manual.
Note:
When the monitor is too dark, and the user attempts to compensate by raising the total Gain
higher than normal, the resulting image quality may not be optimal.
Note:
When the system is first switched ON, the image may appear to be too dark, too light, or to have
too much contrast. The display monitor takes 20 minutes to warm up before it shows its final
contrast, brightness, and color hues. Therefore,
Brightness
and
Contrast
setting adjustments
should only be performed after the display monitor has warmed up.
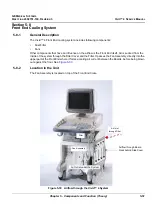
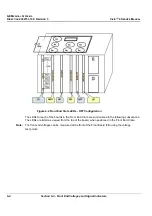
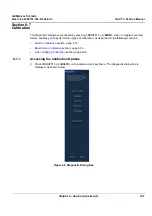
1) Press the
center
button located on the front of the monitor (refer to
on page 6-9). The
Contrast adjustment bar is displayed.
2) Use the other buttons on the front of the monitor (refer to
on page 6-9), as follows. Press
the
left
button to
decrease
the contrast
or
right
button to
increase
the contrast. Refer to the
recommended settings in
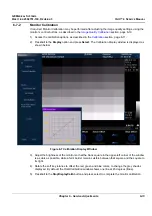
3) When the Contrast setting is correct, press the
center
button again to make adjustments to the
Brightness. The Brightness adjustment bar is displayed.
4) Repeat Step 2 using the
left
and
right
buttons to select the correct Brightness adjustment. Refer to
the recommended settings in
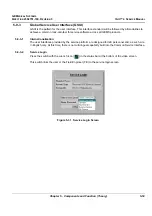
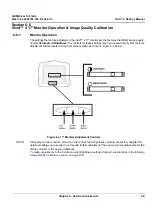
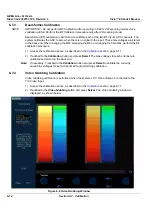
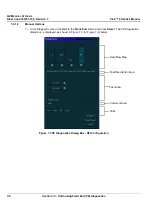
Note:
While performing these adjustments, it is useful to activate the
Calibration Display
window
on page 6-13) pressing
<Ctrl> Q
. Adjust the brightness of the monitor so
that the black square in the upper-left corner of the window is as dark as possible, while a
faint border remains visible between that square and the square to its right. The faint Vivid
logo will be just visible.
Note:
These recommended settings are stable and do not drift over time, but may vary from monitor
to monitor. Adjust these recommended values to meet your specific requirements. For
example, cardiac users may prefer greater contrast, in which case set the contrast to 90 or
even 100. Radiologists may prefer less contrast, in which case set the contrast to below 80.
Note:
Always perform the calibration in similar lighting conditions to those where the unit will be
used. If the unit is to be used in different lighting conditions, perform full calibration in both
dark and light conditions. It is suggested that you write down the brightness and contrast
settings for both conditions, so that the monitor can be reset to the calibrated values.
5) When the Brightness setting is correct, press the
center
button again to close the Brightness
adjustment bar. The scanning screen is displayed.
6) Perform monitor calibration (if required) as described in the
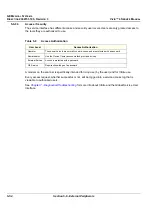
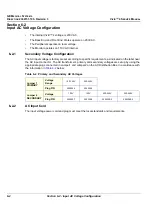
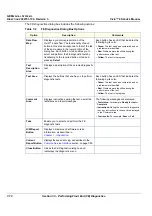
Table 6-10 Vivid™ 4 17" Monitor - Recommended Brightness and Contrast Settings
Dark Room
Light Room
Brightness
40
60
Contrast
80
100


