Replacing Consumables
103
Mainte
na
nc
e
3
Emptying the Hole Punch Waste Container (for C3 Finisher or C3
Finisher with Booklet Maker)
When the C3 Finisher (optional) or the C3 Finisher with Booklet Maker (optional) is installed
and the hole punch waste container becomes full, a message appears on the touch screen.
When the message appears, empty the hole punch waste container as instructed.
Important
z
Empty the hole punch waste container when the machine is on. If you empty the container while the
machine is off, the machine does not recognize that the container has been emptied.
z
Empty the hole punch waste container after the message appears. Otherwise, the machine cannot recognize
the correct remaining amount of the punch scraps.
z
Make sure to discard all paper chads when emptying the hole punch waste container. Not doing so will cause
the container to fill up before the message telling you to empty the container appears again, and this can
cause machine malfunction.
z
When the machine is in Power Saver mode, exit Power Saver mode by pressing the <Power Saver> button and
the <Machine Status> button on the control panel before you empty the punch waste container.
z
Before emptying the punch waste container, press the <Machine Status> button and check the current status
for the punch waste container even when the control panel is lit.
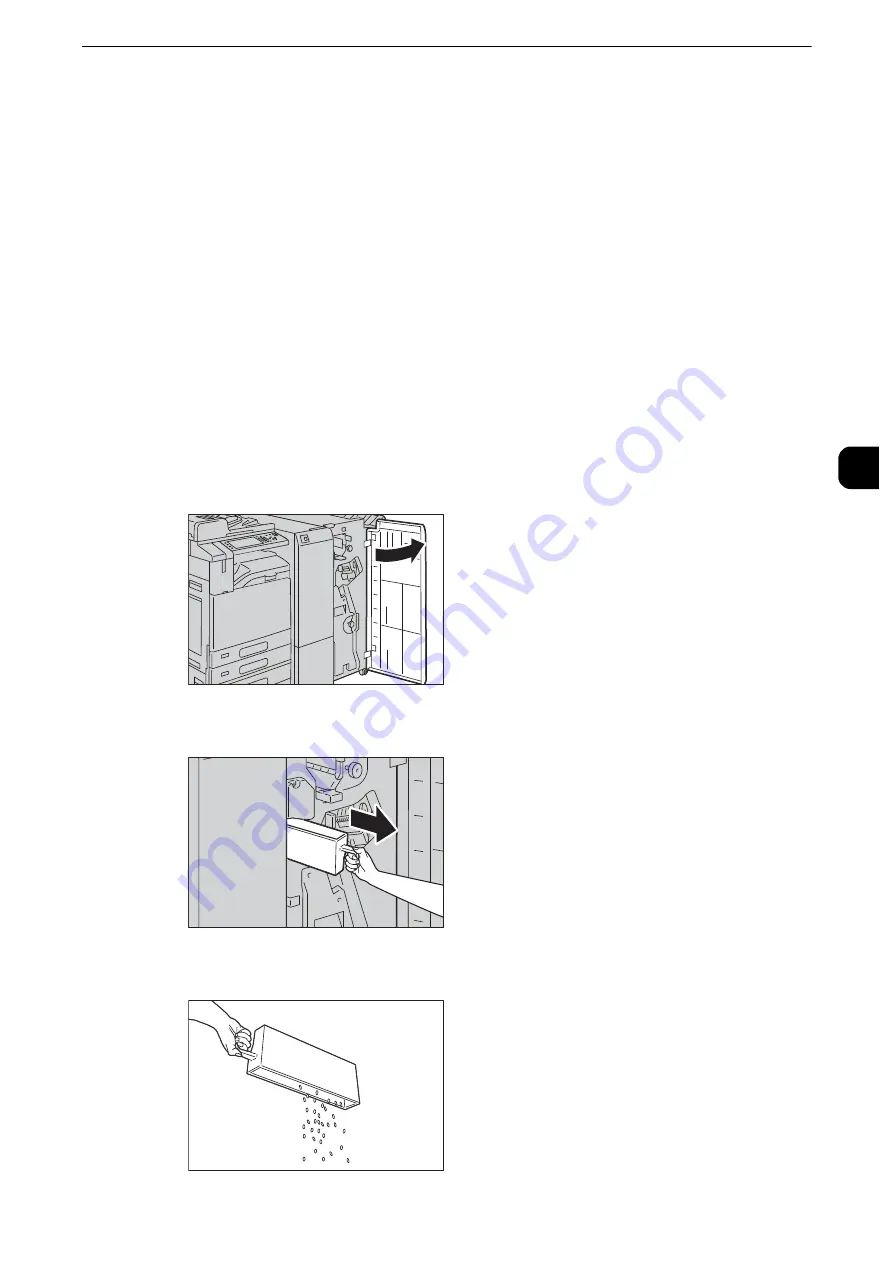
1
Make sure that the machine is not operating, and open the finisher front door.
2
Pull out the hole punch waste container [R4].
3
Empty the container.
Содержание apeosport-iv C3370
Страница 14: ...14...
Страница 15: ...1 1Before Using the Machine...
Страница 47: ...2 2Paper and Other Media...
Страница 76: ...Paper and Other Media 76 Paper and Other Media 2...
Страница 77: ...3 3Maintenance...
Страница 127: ...4 4Machine Status...
Страница 154: ...Machine Status 154 Machine Status 4...
Страница 155: ...5 5Tools...
Страница 365: ...6 6CentreWare Internet Services Settings...
Страница 373: ...7 7Printer Environment Settings...
Страница 386: ...Printer Environment Settings 386 Printer Environment Settings 7...
Страница 387: ...8 8E mail Environment Settings...
Страница 397: ...9 9Scanner Environment Settings...
Страница 421: ...10 10Using IP Fax SIP...
Страница 430: ...Using IP Fax SIP 430 Using IP Fax SIP 10...
Страница 431: ...11 11Using the Internet Fax Service...
Страница 438: ...Using the Internet Fax Service 438 Using the Internet Fax Service 11...
Страница 439: ...12 12Using the Server Fax Service...
Страница 445: ...13 13Encryption and Digital Signature Settings...
Страница 465: ...14 14Authentication and Accounting Features...
Страница 486: ...Authentication and Accounting Features 486 Authentication and Accounting Features 14 11 Select Close...
Страница 494: ...Authentication and Accounting Features 494 Authentication and Accounting Features 14...
Страница 495: ...15 15Problem Solving...
Страница 710: ...Problem Solving 710 Problem Solving 15...
Страница 711: ...16 16Appendix...
Страница 782: ...Appendix 782 Appendix 16 15 Select Adjust The specified transfer output values will be applied 16 Select Close...


