194
Camera
*: Unavailable when 2in1 is set to B mode.
e
Pressing
o
(
) on the image checking screen
also allows you to compose an i-mode message with
a still image attached/inserted. However, Choku-den
is not available when 2in1 is set to B mode.
<Edit image>
e
Selecting "Edit image" changes the display to the
Normal display.
e
"Compose message" and "Save" are available after
you edit an image.
<Set as display>
e
Selecting "microSD" in "Select to save" saves images
to the Camera folder under My picture (you cannot
save the images to the microSD memory card).
<Mirror display>
e
An image shot with the front camera appears
mirrored (inverted left-right). Selecting "Normal
display" means what you see is what you get.
<Select to save>
e
Selecting microSD creates a folder automatically if
there are no folders on the microSD memory card.
e
You cannot select microSD if the number of files
stored in the selected folder has already reached the
maximum.
<File restriction>
e
You can change the file restriction setting for a shot
image after it is saved.
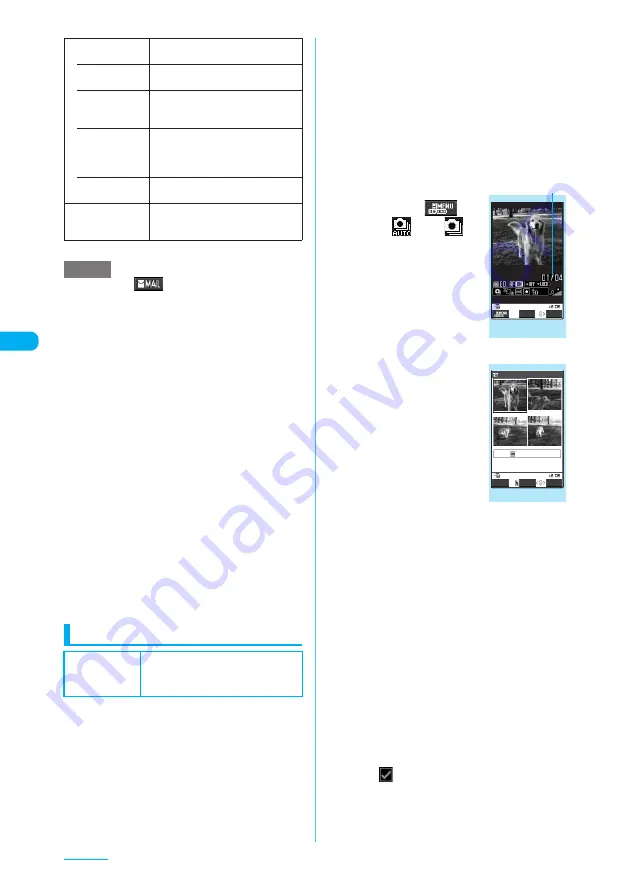
Shooting continuously
<Continuous mode>
You can shoot a series of up to 20 continuous
still images. The continuous mode is
categorized into two types: Auto and Manual.
c
Auto continuous mode allows you to specify the
number of shots and the interval. Once you
release the shutter, the FOMA terminal
automatically shoots the remaining number of
shots at the specified interval. The auto focus
function is available only for the first shot. The
second and subsequent shots are shot with the
focus point placed for the first shot.
c
Manual continuous mode allows you to shoot up to
the specified number, one shot each time you
release the shutter. You can change the auto focus
settings for each shot ("Photo mode"
→
p.191).
c
The following image sizes are available: CIF
(352 x 288), Screen (240 x 427), QVGA V. (240 x
320), QCIF (176 x 144), SubQCIF (128 x 96)
c
You can enjoy the continuous image shots as an
animation added to the original animation.
c
Shooting is terminated if you fold your FOMA
terminal in Continuous mode.
a
Photo mode screen
(p.192)
X
o
(
) or
1
X
"
" or "
"
The "Continuous mode"
screen appears.
■
To turn on/off the auto
focus
X
f
b
Point the camera at an
object
X
d
or
s
[
C
]
Locking the focus turns the focus
frame into green. After shooting,
the "Continuous shooting
checking" screen appears with
four shots at the same time.
■
To shoot with AF lock
"Shooting still images with
AF lock"
→
p.192
■
To shoot with Focus fixed
X
Press
f
to set the
auto focus to "OFF"
X
d
or
s
[
C
]
■
To stop the continuous shooting
Auto continuous mode:
X
y
X
"NO"
Manual continuous mode:
X
t
(or
y
X
"NO")
The shooting is finished and the continuous
shooting checking screen appears.
c
p
(FUNC)
X
Select the saving
method (Store selection, Store all
or Store all&anime)
"Continuous shooting checking function menu"
→
p.195
The images are saved to the folder specified in
"Select to save" (p.193).
If "Store selection" is selected, the "Continuous
shooting checking screen" appears with the saved
images removed after the image saving is complete.
■
To select the image to save
X
Use
b
to select an image
X
d
The
icon (check mark) appears for the
selected image.
Repeat the step to select images.
To cancel the selected image, select the image
again.
Attach location
Adds the location information to the
shot image.
• From
position loc.
Obtains your current location
information and adds it to the image.
• From loc.
history
Adds the location information
retrieved from the location history to
the image.
• Loc. info
detail
Displays the detail screen for the
added location information to see
the date and time, latitude, longitude
and geodetic system (Datum).
• Delete loc.
Info
Deletes the added location
information.
Cancel
Deletes the photographed image
and returns to the Photo mode
screen.
NOTE
Default setting
Select size: Screen (240 x 427)
Shot interval: 0.5 seconds (Auto
continuous mode)
Shot number: 5
Continuous mode
(Ex. manual)
FUNC
Record
Shot number/Max. shot count
Function menu
¨
p.192
Continuous shooting checking
Detail
FUNC
Select
Picture
image 1/ 4
Function menu
¨
p.195


