BODY 1-28
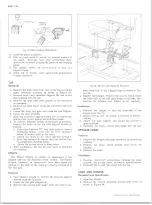
Fig. 72— Body Mount N o . 2
stripping. The sides of the tail gate are sealed by a
weatherstrip on the inside of the body opening. The bot
tom of the tail gate is sealed by a weatherstrip which is
glued across the bottom of the tail gate itself as shown
in Figure 65.
DOORS
Since the front doors on Blazer models do not incor
porate door windows or ventipanes, a cover plate is in
stalled over the opening where these components would
normally be installed as shown in Figure 66.
On those Blazers which do incorporate door windows
and ventipanes,the Service procedures outlined in the
section on Conventional Models are applicable.
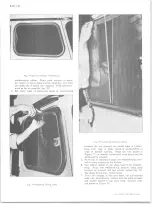
On either the open or closed Blazer model, the ends of
the door opening weatherstrip are sealed at the door
pillar and at the windshield header as shown in Fig
ure 67.
SEATS
Driver Seats
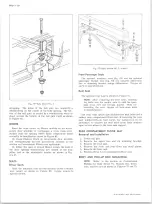
Both the standard seat and the optional driver’s bucket
seat mount as shown in Figure 68. Torque mounts to
specifications.
Front Passenger Seats
The optional auxiliary seat (fig. 69) and the optional
passenger bucket seat (fig. 70) are mounted differently
due to mounting bracket design differences. Torque all
parts to specifications.
Rear Seat
The optional rear seat is shown in Figure 71.
NOTE:
After removing the rear seat, reinstall
the bolts into the anchor nuts to seal the open
ings from dirt and foreign matter. When re
installing the seat, torque all hold-down bolts
to specifications.
The rear seat option also includes two seat belts and a
rubber rear compartment floor mat. If removing the rear
seat temporarily—to haul cargo, for instance—it is not
necessary to remove the seat belts from their anchor
ages as they attach to the rear seat support.
REAR COMPARTMENT FLOOR M AT
Removal and Installation
1. Lower tail gate.
2. Remove the spare tire and its mounting bracket.
3. Remove the rear seat.
4. Remove the front and rear floor mat scuff plates.
5. Remove the floor mat.
6. Reverse Steps 1-5 to reinstall the floor mat.
BODY A N D PICK-UP BO X M O U N T IN G
NOTE:
Refer to the section on Conventional
Models for Body Mount #1. Mounts two, three,
four, and five are as shown in Figures 72 and 73.
10-30 CHEVROLET TRUCK SERVICE MANUAL
Содержание 10 1971 Series
Страница 1: ......
Страница 96: ......
Страница 100: ...10 30 CHEVROLET TRUCK SERVICE MANUAL Fig 4 10 30 Series Truck Frame FRAME 2 4 ...
Страница 120: ......
Страница 203: ...ENGINE 6 25 Fig 22L Engine Mounts 10 30 CHEVROLET TRUCK SERVICE MANUAL ...
Страница 215: ...ENGINE 6 37 REAR M O U NT Fig 21V Engine Mounts 10 30 CHEVROLET TRUCK SERVICE MANUAL ...
Страница 218: ......
Страница 249: ......
Страница 250: ...EMISSION CONTROL SYSTEMS 6T 4 Fig 3 Combination Emission Control System Routing V8 10 30 CHEVROLET TRUCK SERVICE MANUAL ...
Страница 324: ......
Страница 339: ...FUEL TANK AND EXHAUST SYSTEMS 8 15 SPECIAL TOOLS Fig 22 Special Tools 1 J 23346 Fuel Tank Gauge Remover and Installer ...
Страница 340: ......
Страница 365: ...10 30 CHEVROLET TRUCK SERVICE MANUAL Fig 43 Power Steering Pump M ounting STEERING 9 25 ...
Страница 368: ......
Страница 386: ......
Страница 390: ...ELECTRICAL BODY AND CHASSIS 12 4 10 30 CHEVROLET TRUCK SERVICE MANUAL ...
Страница 391: ......
Страница 392: ...ELECTRICAL BODY AND CHASSIS 12 6 Fig 5 Rear Lighting Composite 10 30 CHEVROLET TRUCK SERVICE MANUAL ...
Страница 409: ...ELECTRICAL BODY AND CHASSIS 12 23 Fig 27 Engine Compartment CA30 02 10 30 CHEVROLET TRUCK SERVICE MANUAL ...
Страница 410: ...ELECTRICAL BODY AND CHASSIS 12 24 18DK GRN 19 Fig 28 Instrument Panel CA30 02 10 30 CHEVROLET TRUCK SERVICE MANUAL ...
Страница 411: ...ELECTRICAL BODY AND CHASSIS 12 25 Fig 29 Instrument Panel CA30 02 10 30 CHEVROLET TRUCK SERVICE MANUAL ...
Страница 412: ...ELECTRICAL BODY AND CHASSIS 12 26 fh Ar r kk 4 Fig 30 Engine Compartment C A K A 10 20 CA30 03 z _ ...
Страница 416: ...ELECTRICAL BODY AND CHASSIS 12 30 Fig 34 Engine Compartment CA KA10 20 CA30 04 10 30 CHEVROLET TRUCK SERVICE MANUAL ...
Страница 420: ...ELECTRICAL BODY AND CHASSIS 12 34 Fig 38 Engine Compartment C A K A 1 0 20 06 16 10 30 CHEVROLET TRUCK SERVICE MANUAL ...
Страница 422: ...ELECTRICAL BODY AND CHASSIS 12 36 Fig 40 Instrument Panel C A K A 10 20 06 16 10 30 CHEVROLET TRUCK SERVICE MANUAL ...
Страница 423: ...ELECTRICAL BODY AND CHASSIS 12 37 Fig 41 R ear Lamps C A K A 1 0 20 06 16 10 30 CHEVROLET TRUCK SERVICE MANUAL ...
Страница 424: ...ELECTRICAL BODY AND CHASSIS 12 38 Fig 42 Engine Compartment CA KA10 20 CAl30 14 34 10 30 CHEVROLET TRUCK SERVICE MANUAL ...
Страница 426: ...ELECTRICAL BODY AND CHASSIS 12 40 Fig 44 Instrument Panel CA KA10 20 CA30 14 34 10 30 CHEVROLET TRUCK SERVICE MANUAL ...
Страница 428: ......
Страница 432: ......
Страница 449: ...SPECIFICATIONS 9 10 30 CHEVROLET TRUCK SERVICE MANUAL ...
Страница 463: ......
Страница 464: ......
Страница 465: ......
Страница 466: ......

