


WHEELS AN D TIRES 10-5
Dynamic Balance
Dynamic balance (sometimes called running balance)
means that the wheel must be in static balance, and also
run smoothly at all speeds.
To insure successful, accurate balancing, the following
precautions must be observed:
• Wheel and tire must be clean and free from all
foreign matter.
• The tires should be in good condition and properly
mounted with the balance mark on the tire, if any,
lined up with the valve.
• Bent wheels that have runout over 1/16" should
either be replaced or straightened before being
balanced.
• Inspect tire and wheel assembly to determine if an
eccentric or out-of-round condition exists. Note
that this condition, if severe, cannot be "balanced
out." An assembly which has an out-of-round con
dition exceeding 3/16" on tire sizes through 19.5"
is not suitable for use on the front of the vehicle.
Its use on the rear should be governed by its gen
eral condition and whether the roundness defect
seriously detracts from overall ride quality.
• When balancing wheels and tires, it is recommended
that the instructions covering the operation of the
wheel balancer being used be closely followed.
WHEEL REM OVAL A N D INSTALLATION
Jacking Instructions
The chart will assist in performing wheel and tire
changes using vehicle jacks supplied with or recom
mended for use on Chevrolet Trucks.
Model
Jacking Point on Vehicle
Front
Rear
CP10, 20, 30
Lower Control Arm
Pivot
Axle Housing
K10-20
Under Front Axle
Near Spring Seat
Axle Housing
Dual and Single Wheels
When installing the tire and wheel on the vehicle, the
following procedure should be followed:
After wheel nuts are put on loosely, turn the wheel
until one nut is at the top of the bolt circle; tighten the
nut just snug. Snug up the remaining nuts criss-cross
to minimize runout, then tighten the nuts to the recom
mended torque alternately and evenly to avoid excessive
runout.
Lateral runout should not exceed 1/8" on front wheel
or 3/16" on rear wheel.
Matching Side and Lock Rings
Side and lock rings of different rim types are not inter -
changeable. Some may appear to be, but they do not fit
properly on the rim base. Serious accidents have re
sulted from the use of mismatched rings. Rim base and
rings must be matched according to manufacturer, size
and type. This information is stamped on each part.
Installing Synthetic Tubes
1. Before installing tube in tire, clean inside of casing
thoroughly.
2. Insert tube in tire and inflate until it is nearly
rounded out.
3. Inspect rim for rust scale and bent flanges—clean
rust scale and straighten flanges where necessary.
4. Using a brush or cloth swab, apply a solution of
neutral vegetable oil soap to the inside and outside
of tire beads and also to the rim side of the tube.
Do not allow soap solution to run down into tire.
5. When mounting tire and tube on a drop center rim,
follow the standard procedure. Be sure tire is cen
tered on rim so that beads are out of rim well before
inflating. Do not allow tire to hang loosely on wheel
while inflating.
6. Center valve and pull it firmly against the rim. Hold
in this position and inflate until tire beads are firmly
seated on rim against flanges.
7. Completely deflate tire by removing valve core.
8. Reinflate tire to recommended pressure.
CAUTION:
When tube and flap are not properly
lubricated and mounted, they will stretch thin
in the tire bead and rim region. This will cause
premature failure.
TUBELESS TIRES
Tubeless tires mounted on one piece full drop center
rims are standard on some Chevrolet trucks. These
tires have a safety inner liner which if punctured, tends
to cling to the penetrating object forming a partial seal
until the object is removed from the tire.
The mounting and demounting of tubeless truck tires
will present no problem when a rubber lubricant, such as
Ru-Glyde or equivalent is applied to tire beads and rim
flanges. Ru-Glyde or equivalent in addition to materially
assisting in mounting and demounting also prevents rust
ing at the tire sealing area and thus prevents tires from
adhering to the wheel.
All tubeless tires used on Chevrolet trucks with the
exception of the 6.50-16 size should be demounted and
mounted as described in this section. The 6.50-16 size
may be demounted using present tire machines or stand
ard tire irons following the same procedure employed in
servicing tube type tires.
CAUTION:
A hammer, or tools with sharp
edges, should never be used to demount or mount
tubeless tires as damage to rim flange or tire
sealing bead may result.
Inspection for Leaks
1. With wheel assembly removed from vehicle, inflate
the tire to recommended operating pressure.
2. Check for leaks at rim bead by placing wheel and tire
horizontal and allowing water to stand in groove be
tween rim and tire. Check for large leads by lower
ing assembly into water tank or running water over
tire.
Demounting (all except 6.50-16 tires)
1. Remove valve core to completely deflate tire. With
tire lying flat on floor, loosen beads from rim seats
by walking around on tire with heels at points close
10-30 CHEVROLET TRUCK SERVICE MANUAL
Содержание 10 1971 Series
Страница 1: ......
Страница 96: ......
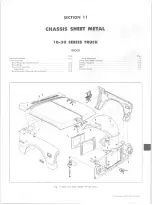
Страница 100: ...10 30 CHEVROLET TRUCK SERVICE MANUAL Fig 4 10 30 Series Truck Frame FRAME 2 4 ...
Страница 120: ......
Страница 203: ...ENGINE 6 25 Fig 22L Engine Mounts 10 30 CHEVROLET TRUCK SERVICE MANUAL ...
Страница 215: ...ENGINE 6 37 REAR M O U NT Fig 21V Engine Mounts 10 30 CHEVROLET TRUCK SERVICE MANUAL ...
Страница 218: ......
Страница 249: ......
Страница 250: ...EMISSION CONTROL SYSTEMS 6T 4 Fig 3 Combination Emission Control System Routing V8 10 30 CHEVROLET TRUCK SERVICE MANUAL ...
Страница 324: ......
Страница 339: ...FUEL TANK AND EXHAUST SYSTEMS 8 15 SPECIAL TOOLS Fig 22 Special Tools 1 J 23346 Fuel Tank Gauge Remover and Installer ...
Страница 340: ......
Страница 365: ...10 30 CHEVROLET TRUCK SERVICE MANUAL Fig 43 Power Steering Pump M ounting STEERING 9 25 ...
Страница 368: ......
Страница 386: ......
Страница 390: ...ELECTRICAL BODY AND CHASSIS 12 4 10 30 CHEVROLET TRUCK SERVICE MANUAL ...
Страница 391: ......
Страница 392: ...ELECTRICAL BODY AND CHASSIS 12 6 Fig 5 Rear Lighting Composite 10 30 CHEVROLET TRUCK SERVICE MANUAL ...
Страница 409: ...ELECTRICAL BODY AND CHASSIS 12 23 Fig 27 Engine Compartment CA30 02 10 30 CHEVROLET TRUCK SERVICE MANUAL ...
Страница 410: ...ELECTRICAL BODY AND CHASSIS 12 24 18DK GRN 19 Fig 28 Instrument Panel CA30 02 10 30 CHEVROLET TRUCK SERVICE MANUAL ...
Страница 411: ...ELECTRICAL BODY AND CHASSIS 12 25 Fig 29 Instrument Panel CA30 02 10 30 CHEVROLET TRUCK SERVICE MANUAL ...
Страница 412: ...ELECTRICAL BODY AND CHASSIS 12 26 fh Ar r kk 4 Fig 30 Engine Compartment C A K A 10 20 CA30 03 z _ ...
Страница 416: ...ELECTRICAL BODY AND CHASSIS 12 30 Fig 34 Engine Compartment CA KA10 20 CA30 04 10 30 CHEVROLET TRUCK SERVICE MANUAL ...
Страница 420: ...ELECTRICAL BODY AND CHASSIS 12 34 Fig 38 Engine Compartment C A K A 1 0 20 06 16 10 30 CHEVROLET TRUCK SERVICE MANUAL ...
Страница 422: ...ELECTRICAL BODY AND CHASSIS 12 36 Fig 40 Instrument Panel C A K A 10 20 06 16 10 30 CHEVROLET TRUCK SERVICE MANUAL ...
Страница 423: ...ELECTRICAL BODY AND CHASSIS 12 37 Fig 41 R ear Lamps C A K A 1 0 20 06 16 10 30 CHEVROLET TRUCK SERVICE MANUAL ...
Страница 424: ...ELECTRICAL BODY AND CHASSIS 12 38 Fig 42 Engine Compartment CA KA10 20 CAl30 14 34 10 30 CHEVROLET TRUCK SERVICE MANUAL ...
Страница 426: ...ELECTRICAL BODY AND CHASSIS 12 40 Fig 44 Instrument Panel CA KA10 20 CA30 14 34 10 30 CHEVROLET TRUCK SERVICE MANUAL ...
Страница 428: ......
Страница 432: ......
Страница 449: ...SPECIFICATIONS 9 10 30 CHEVROLET TRUCK SERVICE MANUAL ...
Страница 463: ......
Страница 464: ......
Страница 465: ......
Страница 466: ......


