


REAR SUSPENSION AND DRIVE LINE 4-20
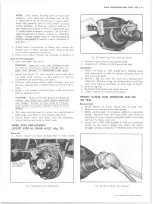
Press bolts out of hub flange (as illustrated in Figure
54) and press new bolts into place, making sure they are
a tight fit. If all bolts were removed, be sure that hub oil
deflector is in position under bolt heads.
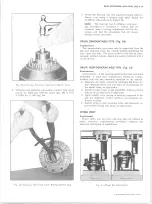
HUB STUD
Replacement
Hub studs can be removed and replaced by using a con
ventional stud remover and replacer. Make sure that
studs are firmly bottomed in holes and that threads are
not damaged during installation.
OIL SEAL SLEEVE A N D BEARING
THRUST SPACER
Replacement
The hub inner bearing spacer and sleeve assembly
should be inspected when the hub and bearing assembly is
removed from the axle housing (figs. 33, 34).
If inspection dictates the need for replacement, pry the
sleeve and spacer assembly from the housing, being
careful not to damage machined surface of axle housing.
Press a new bearing spacer into the I.D. of a new
sleeve - spacer should seat against bottom of sleeve.
CAUTION:
The P.P. of the sleeve is the run-
ning surface for the hub oil seal. Use extreme
care to prevent damage to this surface when in-
stalling the bearing spacer.
Tap the sleeve assembly onto the axle housing until the
bearing spacer contacts shoulder on housing.
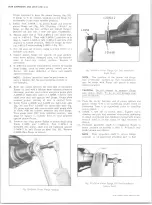
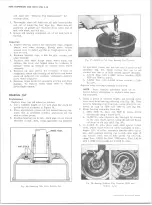
WHEEL HUB OIL SEAL
Replacement
Pry old seal from its location in the hub bore, using
care so as not to damage bore surface. Thoroughly clean
all oil and foreign matter from seal contact area in hub
bore. Pack the cavity between the seal lips with a high-
melting point wheel bearing lubricant, and position seal
in hub bore. Carefully press the seal into the hub bore,
using appropriate tool until seal is properly seated
(fig. 42).
1. J-22351 5200 and 7200 lb. axles - Seal should be
installed flush with end of hub.
2. J-22354 11,000 lb. axle - Seal should be installed
flush with end of hub.
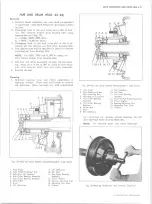
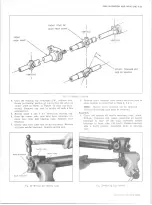
Installation
1. Using a high melting point EP bearing lubricant,
liberally pack bearings and apply a light coat on I.D.
of hub bearing contact surface and O.D. of axle
housing tube.
2. Make sure inner bearing, oil seal, oil seal sleeve,
axle housing oil deflector, and inner bearing race and
oil seal are properly positioned.
3. Install hub and drum assembly on axle housing, exer
cising care so as not to damage oil seal or dislocate
other internal components.
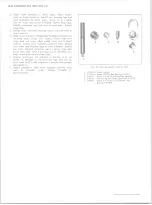
4. On the 11,000 axles, place outer bearing cone and
roller assembly on axle housing and press firmly
into hub with hand.
5. On 5200 through 11,000 lb. install thrust washer so
that tang on I.D. of washer is in keyway on axle
housing.
6. Install adjusting nut and complete the installation as
directed under "Bearing Adjustment/'
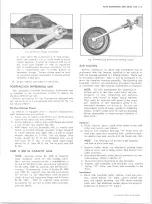
Bearing Adjustment
Before checking bearing adjustment, make sure brakes
are fully released and do not drag.
Check bearing play by grasping tire at top and pulling
back and forth, or by using a pry bar under tire. If bear
ings are properly adjusted, movement of brake drum in
relation to brake flange plate will be barely noticeable
and wheel will turn freely. If movement is excessive,
adjust bearing as follows:
1. Remove axle shaft and raise vehicle until wheel is
free to rotate.
2. Disengage tang of nut lock from locknut and remove
them from axle housing tube.
3. Use appropriate tool as listed for the specified axle:
a. J-2222 for 5200, 7200 axles.
b. J-0870 for 11,000 lb. axles.
Adjust wheel bearings according to the following
procedure.
Fig. 42— Installing Wheel Hub O il Seal
Fig. 43— Tightening Wheel Hub Bearing Adjustment N u t (Typical)
10-30 CHEVROLET TRUCK SERVICE MANUAL
Содержание 10 1971 Series
Страница 1: ......
Страница 96: ......
Страница 100: ...10 30 CHEVROLET TRUCK SERVICE MANUAL Fig 4 10 30 Series Truck Frame FRAME 2 4 ...
Страница 120: ......
Страница 203: ...ENGINE 6 25 Fig 22L Engine Mounts 10 30 CHEVROLET TRUCK SERVICE MANUAL ...
Страница 215: ...ENGINE 6 37 REAR M O U NT Fig 21V Engine Mounts 10 30 CHEVROLET TRUCK SERVICE MANUAL ...
Страница 218: ......
Страница 249: ......
Страница 250: ...EMISSION CONTROL SYSTEMS 6T 4 Fig 3 Combination Emission Control System Routing V8 10 30 CHEVROLET TRUCK SERVICE MANUAL ...
Страница 324: ......
Страница 339: ...FUEL TANK AND EXHAUST SYSTEMS 8 15 SPECIAL TOOLS Fig 22 Special Tools 1 J 23346 Fuel Tank Gauge Remover and Installer ...
Страница 340: ......
Страница 365: ...10 30 CHEVROLET TRUCK SERVICE MANUAL Fig 43 Power Steering Pump M ounting STEERING 9 25 ...
Страница 368: ......
Страница 386: ......
Страница 390: ...ELECTRICAL BODY AND CHASSIS 12 4 10 30 CHEVROLET TRUCK SERVICE MANUAL ...
Страница 391: ......
Страница 392: ...ELECTRICAL BODY AND CHASSIS 12 6 Fig 5 Rear Lighting Composite 10 30 CHEVROLET TRUCK SERVICE MANUAL ...
Страница 409: ...ELECTRICAL BODY AND CHASSIS 12 23 Fig 27 Engine Compartment CA30 02 10 30 CHEVROLET TRUCK SERVICE MANUAL ...
Страница 410: ...ELECTRICAL BODY AND CHASSIS 12 24 18DK GRN 19 Fig 28 Instrument Panel CA30 02 10 30 CHEVROLET TRUCK SERVICE MANUAL ...
Страница 411: ...ELECTRICAL BODY AND CHASSIS 12 25 Fig 29 Instrument Panel CA30 02 10 30 CHEVROLET TRUCK SERVICE MANUAL ...
Страница 412: ...ELECTRICAL BODY AND CHASSIS 12 26 fh Ar r kk 4 Fig 30 Engine Compartment C A K A 10 20 CA30 03 z _ ...
Страница 416: ...ELECTRICAL BODY AND CHASSIS 12 30 Fig 34 Engine Compartment CA KA10 20 CA30 04 10 30 CHEVROLET TRUCK SERVICE MANUAL ...
Страница 420: ...ELECTRICAL BODY AND CHASSIS 12 34 Fig 38 Engine Compartment C A K A 1 0 20 06 16 10 30 CHEVROLET TRUCK SERVICE MANUAL ...
Страница 422: ...ELECTRICAL BODY AND CHASSIS 12 36 Fig 40 Instrument Panel C A K A 10 20 06 16 10 30 CHEVROLET TRUCK SERVICE MANUAL ...
Страница 423: ...ELECTRICAL BODY AND CHASSIS 12 37 Fig 41 R ear Lamps C A K A 1 0 20 06 16 10 30 CHEVROLET TRUCK SERVICE MANUAL ...
Страница 424: ...ELECTRICAL BODY AND CHASSIS 12 38 Fig 42 Engine Compartment CA KA10 20 CAl30 14 34 10 30 CHEVROLET TRUCK SERVICE MANUAL ...
Страница 426: ...ELECTRICAL BODY AND CHASSIS 12 40 Fig 44 Instrument Panel CA KA10 20 CA30 14 34 10 30 CHEVROLET TRUCK SERVICE MANUAL ...
Страница 428: ......
Страница 432: ......
Страница 449: ...SPECIFICATIONS 9 10 30 CHEVROLET TRUCK SERVICE MANUAL ...
Страница 463: ......
Страница 464: ......
Страница 465: ......
Страница 466: ......


