Chapter 14
14-24
a-2. Digital Certificate Setting screen > enter the date for [Start Date of Validity] > enter the date for [End Date of Validity] > enter one of the following:
[Country Name]. [State], [City], Organization], [Organztion Unit], and [Shared Name] > press [Start Key Generation].
a-3. Press [Done] to close the User mode screen.
a-4. Turn OFF the control panel switch and the main power switch. 10 seconds or more later, turn the main power switch ON.
b. Setting the default key pair
b-1. User mode > System Settings > Network Settings > TCP/IP Settings > Certificate Settings > Key and Certificate List > select the key generated in the
step [a] > Default Key Settings
b-2. Press [Done] to close the User mode screen.
b-3. Turn OFF the control panel switch and the main power switch. 10 seconds or more later, turn the main power switch ON.
14.2.2.7.2 What is key pair?
0009-9824
iR2270 / iR2870 / iR3570 / iR4570 / / / / / iR2230 / / / iR3530 / / / /
[ Inspected by Canon Inc. ]
Description
It is necessary to generate and register a key pair in order to use encrypted SSL communication. This machine has the preinstalled key pair and this key pair
enables you to use encrypted SSL communication for IPP printing, e-mail and I-faxes, the Remote UI, and delivery device information.
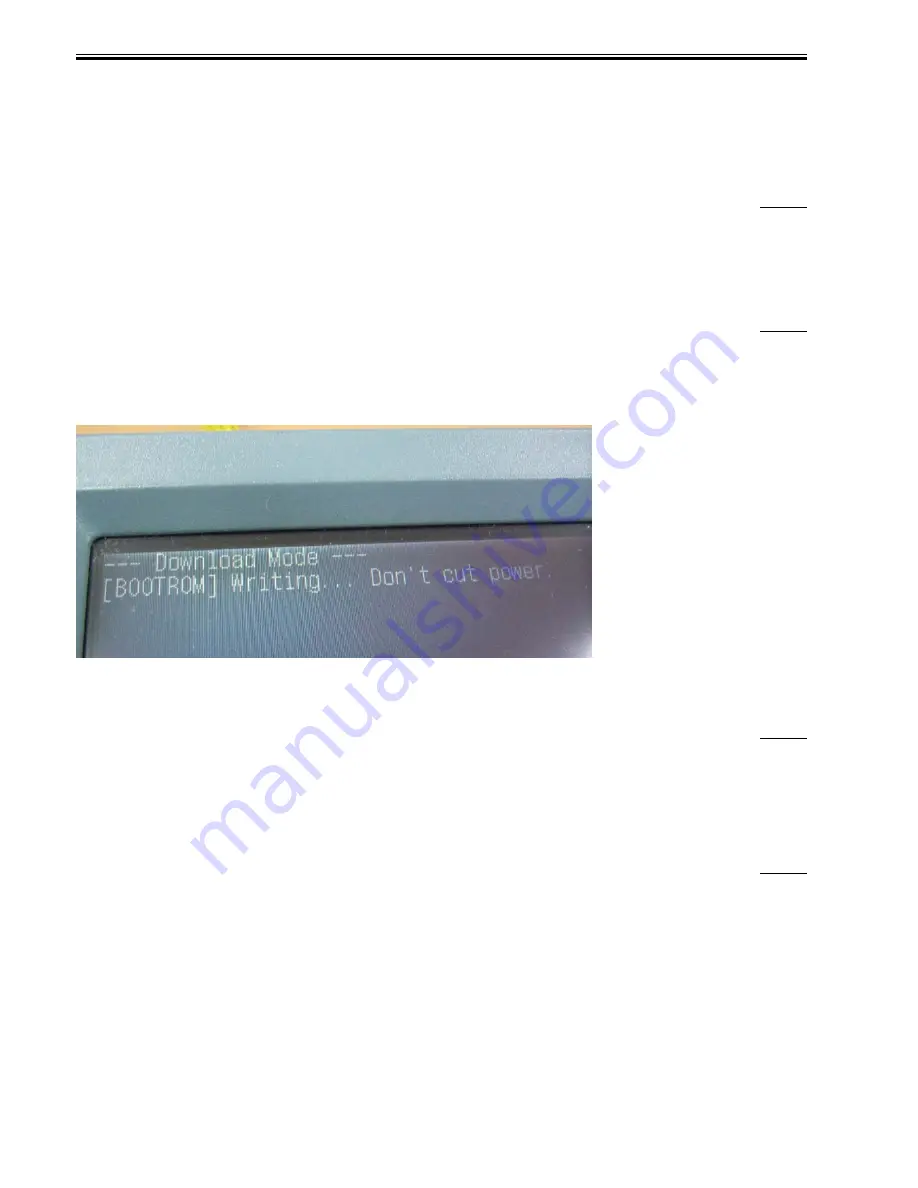
14.2.2.7.3 BootROM writing error: Because main power switch is turned off when Boot software is being downloaded from service
support tool (SST)
0010-4166
iR2270 / iR2870 / iR3570 / iR4570 / / / / / iR2230 / / / iR3530 / / / /
[ Case in the field ]
Description
Never turn the main power switch OFF when BOOT software is being downloaded from SST.
In the field, the symptom occurred because the caution displayed on the LCD was misunderstood and the main power switch was turned OFF while Boot
software was being downloaded from SST. The symptom was not corrected even when the software was downloaded again.
F-14-18
Field Remedy
When the symptom occurs, replace the BootROM with a new one, and then download the software again from SST.
14.2.2.7.4 Tray B is not displayed on Tray Designation screen under User Mode: After installing Inner 2-Way Tray-D1
0010-4168
iR2270 / iR2870 / iR3570 / iR4570 / / / / / iR2230 / / / iR3530 / / / /
[ Case in the field ]
Description
1. In service mode [COPIER > OPTION > ACC], set "1" in [IN-TRAY].
2. Press and hold the control panel switch for more than three seconds, and then turn the main power switch OFF/ON.
3. In user mode [Common Settings > Tray Designation], check to make sure that Tray B is added to the tray designation menu in the Tray Designation screen.
14.2.2.7.5 LCD on control panel does not come on remaining black (the main power indicator alone comes on ): Because PS controller
assembly is faulty
0010-4171
iR2270 / iR2870 / iR3570 / iR4570 / / / / / iR2230 / / / iR3530 / / / /
[ Inspected by Canon Inc. ]
Description
As a result of inspection, it was found that the symptom is solved by replacing the PS controller assembly with a new one.
Field Remedy
When the symptom occurs, follow the procedure below.
1. Connect the red lead terminal of a tester to J303-1 of the main power supply PCB and the black lead terminal to the ground and make sure that 13V DC is
not placed there.
2. Turn the main power switch OFF, remove the connector that is connected to J302 (Two-pin connector) on the main power supply PCB, and then turn the
main power switch ON.
3. Using the test, make sure that 13V DC is placed between J303-1 on the main power supply PCB and the ground.
4. If 13V DC is placed there, replace the PS controller assembly with a new one.
FM2-2764 PS Controller Assembly
FM2-0260 Main Power Supply PCB Assembly (100V/120V)
FM2-0245 Main Power Supply PCB Assembly (230V)
Содержание iR3570 Series
Страница 1: ...Jan 17 2007 Service Manual iR4570 3570 2870 2270 Series...
Страница 2: ......
Страница 6: ......
Страница 27: ...Chapter 1 Introduction...
Страница 28: ......
Страница 70: ......
Страница 71: ...Chapter 2 Installation...
Страница 72: ......
Страница 146: ......
Страница 147: ...Chapter 3 Basic Operation...
Страница 148: ......
Страница 150: ......
Страница 154: ......
Страница 155: ...Chapter 4 Main Controller...
Страница 156: ......
Страница 187: ...Chapter 5 Original Exposure System...
Страница 188: ......
Страница 217: ...Chapter 5 5 27 F 5 91...
Страница 218: ......
Страница 219: ...Chapter 6 Laser Exposure...
Страница 220: ......
Страница 222: ......
Страница 230: ......
Страница 231: ...Chapter 7 Image Formation...
Страница 232: ......
Страница 236: ......
Страница 279: ...Chapter 7 7 43 F 7 241 2 Remove the screw 1 F 7 242 3 Detach the static eliminator 1 to the front F 7 243...
Страница 280: ......
Страница 281: ...Chapter 8 Pickup Feeding System...
Страница 282: ......
Страница 388: ......
Страница 389: ...Chapter 9 Fixing System...
Страница 390: ......
Страница 419: ...Chapter 9 9 27 F 9 148...
Страница 420: ......
Страница 421: ...Chapter 10 External and Controls...
Страница 422: ......
Страница 426: ......
Страница 437: ...Chapter 10 10 11 F 10 12 2 Remove the check mark from SNMP Status Enabled...
Страница 438: ...Chapter 10 10 12 F 10 13...
Страница 440: ...Chapter 10 10 14 F 10 15...
Страница 475: ...Chapter 11 MEAP...
Страница 476: ......
Страница 478: ......
Страница 481: ...Chapter 12 Maintenance and Inspection...
Страница 482: ......
Страница 484: ......
Страница 509: ...Chapter 13 Standards and Adjustments...
Страница 510: ......
Страница 512: ......
Страница 521: ...Chapter 14 Correcting Faulty Images...
Страница 522: ......
Страница 528: ......
Страница 537: ...Chapter 14 14 9 43mm s b Z x i j B iR4570_395 s u A B FM2 0287...
Страница 538: ...Chapter 14 14 10...
Страница 539: ...Chapter 14 14 11...
Страница 585: ...Chapter 15 Self Diagnosis...
Страница 586: ......
Страница 588: ......
Страница 623: ...Chapter 16 Service Mode...
Страница 624: ......
Страница 626: ......
Страница 679: ...Chapter 17 Upgrading...
Страница 680: ......
Страница 682: ......
Страница 693: ...Chapter 17 17 11 F 17 18 2 Click Start F 17 19 3 When the session has ended click OK...
Страница 698: ...Chapter 17 17 16 F 17 28 2 Click Start F 17 29 3 When the session has ended click OK...
Страница 710: ...Chapter 17 17 28 F 17 51 3 Click Start F 17 52 4 Click Save...
Страница 712: ...Chapter 17 17 30 F 17 55 2 Select the data to download F 17 56 3 Click Start...
Страница 714: ......
Страница 715: ...Chapter 18 Service Tools...
Страница 716: ......
Страница 717: ...Contents Contents 18 1 Service Tools 18 1 18 1 1 Special Tools 18 1 18 1 2 Oils and Solvents 18 1...
Страница 718: ......
Страница 720: ......
Страница 721: ...Jan 17 2007...
Страница 722: ......


