Chapter 7
7-17
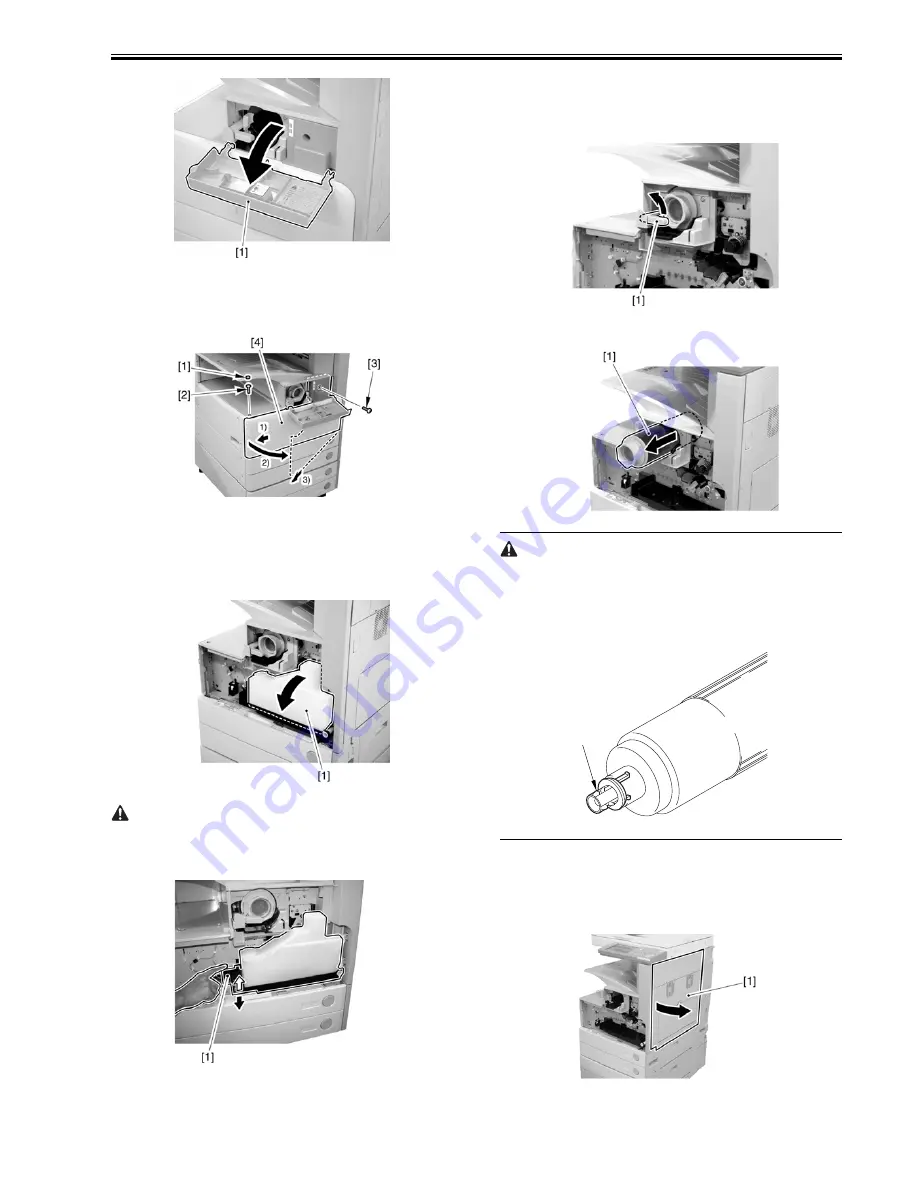
F-7-56
2) Remove the face cover rubber [1].
3) Remove the binding screw [2].
4) Remove the RS tightening screw [3].
5) Detach the front cover unit [4] by moving it in the direction of the arrow.
F-7-57
7.12.3.2 Removing the Waste Toner Case
0007-8017
iR2270 / iR2870 / iR3570 / iR4570 / / iR2270N / / iR2870N / / iR3570N /
/ iR4570N / iR2230 / / / iR3530 /
1) Remove the waste toner case [1].
F-7-58
Point to note after attaching the waste toner receptacle
After attaching the waste toner receptacle, move the waste toner full detec-
tion lever [1] up and down to make sure that the lever is moved smoothly.
Faulty detection may be resulted if the lever is caught in something and is not
moved smoothly.
F-7-59
7.12.3.3 Removing the Toner Cartridge
0007-8351
iR2270 / iR2870 / iR3570 / iR4570 / / iR2270N / / iR2870N / / iR3570N /
/ iR4570N / iR2230 / / / iR3530 /
1) Shift up the lever [1].
F-7-60
2) Remove the toner cartridge [1].
F-7-61
Points to Note on Handing the Toner Cartridge
1. Care should be taken not to bump the toner stop [1] against the covers or
the like when and after removing the toner cartridge. Since the toner stop
comes off easily, toner scattering may be resulted if it comes off by
accident.
2. Keep the toner cartridge horizontal after removing. Since the toner stop [1]
comes off easily as mentioned above, toner scattering may be resulted if
the toner cartridge is placed with the toner stop side down.
F-7-62
7.12.3.4 Removing the Drum Unit
0007-8352
iR2270 / iR2870 / iR3570 / iR4570 / / iR2270N / / iR2870N / / iR3570N /
/ iR4570N / iR2230 / / / iR3530 /
1) Open the right door [1].
F-7-63
2) Remove the screw [1].
[1]
Содержание iR3570 Series
Страница 1: ...Jan 17 2007 Service Manual iR4570 3570 2870 2270 Series...
Страница 2: ......
Страница 6: ......
Страница 27: ...Chapter 1 Introduction...
Страница 28: ......
Страница 70: ......
Страница 71: ...Chapter 2 Installation...
Страница 72: ......
Страница 146: ......
Страница 147: ...Chapter 3 Basic Operation...
Страница 148: ......
Страница 150: ......
Страница 154: ......
Страница 155: ...Chapter 4 Main Controller...
Страница 156: ......
Страница 187: ...Chapter 5 Original Exposure System...
Страница 188: ......
Страница 217: ...Chapter 5 5 27 F 5 91...
Страница 218: ......
Страница 219: ...Chapter 6 Laser Exposure...
Страница 220: ......
Страница 222: ......
Страница 230: ......
Страница 231: ...Chapter 7 Image Formation...
Страница 232: ......
Страница 236: ......
Страница 279: ...Chapter 7 7 43 F 7 241 2 Remove the screw 1 F 7 242 3 Detach the static eliminator 1 to the front F 7 243...
Страница 280: ......
Страница 281: ...Chapter 8 Pickup Feeding System...
Страница 282: ......
Страница 388: ......
Страница 389: ...Chapter 9 Fixing System...
Страница 390: ......
Страница 419: ...Chapter 9 9 27 F 9 148...
Страница 420: ......
Страница 421: ...Chapter 10 External and Controls...
Страница 422: ......
Страница 426: ......
Страница 437: ...Chapter 10 10 11 F 10 12 2 Remove the check mark from SNMP Status Enabled...
Страница 438: ...Chapter 10 10 12 F 10 13...
Страница 440: ...Chapter 10 10 14 F 10 15...
Страница 475: ...Chapter 11 MEAP...
Страница 476: ......
Страница 478: ......
Страница 481: ...Chapter 12 Maintenance and Inspection...
Страница 482: ......
Страница 484: ......
Страница 509: ...Chapter 13 Standards and Adjustments...
Страница 510: ......
Страница 512: ......
Страница 521: ...Chapter 14 Correcting Faulty Images...
Страница 522: ......
Страница 528: ......
Страница 537: ...Chapter 14 14 9 43mm s b Z x i j B iR4570_395 s u A B FM2 0287...
Страница 538: ...Chapter 14 14 10...
Страница 539: ...Chapter 14 14 11...
Страница 585: ...Chapter 15 Self Diagnosis...
Страница 586: ......
Страница 588: ......
Страница 623: ...Chapter 16 Service Mode...
Страница 624: ......
Страница 626: ......
Страница 679: ...Chapter 17 Upgrading...
Страница 680: ......
Страница 682: ......
Страница 693: ...Chapter 17 17 11 F 17 18 2 Click Start F 17 19 3 When the session has ended click OK...
Страница 698: ...Chapter 17 17 16 F 17 28 2 Click Start F 17 29 3 When the session has ended click OK...
Страница 710: ...Chapter 17 17 28 F 17 51 3 Click Start F 17 52 4 Click Save...
Страница 712: ...Chapter 17 17 30 F 17 55 2 Select the data to download F 17 56 3 Click Start...
Страница 714: ......
Страница 715: ...Chapter 18 Service Tools...
Страница 716: ......
Страница 717: ...Contents Contents 18 1 Service Tools 18 1 18 1 1 Special Tools 18 1 18 1 2 Oils and Solvents 18 1...
Страница 718: ......
Страница 720: ......
Страница 721: ...Jan 17 2007...
Страница 722: ......


