Chapter 14
14-19
14.2.2 Malfunction
14.2.2.1 No Power
14.2.2.1.1 Upon installation, machine does not start up / LCD does not come on although main power indicator on control panel lights up:
Poor connection of ROM/RAM
0008-3477
iR2270 / iR2870 / iR3570 / iR4570 / / iR2270N / / iR2870N / / iR3570N / / iR4570N / iR2230 / / / iR3530
[ Inspected by Canon Inc. ]
Field Remedy
In inspection, reinsertion of the ROM corrected the symptoms. If any of the symptoms mentioned above occurs during installation, reinsert the BOOTROM or the
RAM.
14.2.2.1.2 Progress bar stops at midpoint and machine fails to start/Unable to power-on: Because J1016 connector is broken
0009-9821
iR2270 / iR2870 / iR3570 / iR4570 / / / / / iR2230 / / / iR3530 / / / /
[ Inspected by Canon Inc. ]
Description
In the field, the symptom occurred because the J1016 connector on the Main Controller PCB (for the cable connecting to the reader assembly) was broken.
Field Remedy
When the symptom occurs, check the connector for breakage. If it is broken, replace the Main Controller PCB with a new one.
FM2-3226 Main Controller PCB Assembly
14.2.2.1.3 LCD on control panel does not display anything upon installation: Because Main Controller PCB is faulty
0009-9822
iR2270 / iR2870 / iR3570 / iR4570 / / / / / iR2230 / / / iR3530 / / / /
[ Inspected by Canon Inc. ]
Description
As a result of inspection, it was found that the symptom was solved by replacing the main controller PCB with a new one.
Field Remedy
When the symptom occurs, reinsert the connectors on the Main Controller PCB, the BootROM and the RAM. If the symptom still occurs, replace the Main
Controller PCB with a new one.
FM2-3226 Main Controller PCB Assembly
14.2.2.1.4 No power/machine does not start up/LCD displays nothing: Because Main controller PCB is faulty
0010-5007
iR2270 / iR2870 / iR3570 / iR4570 / / / / / iR2230 / / / iR3530 / / / /
[ Inspected by Canon Inc. ]
Description
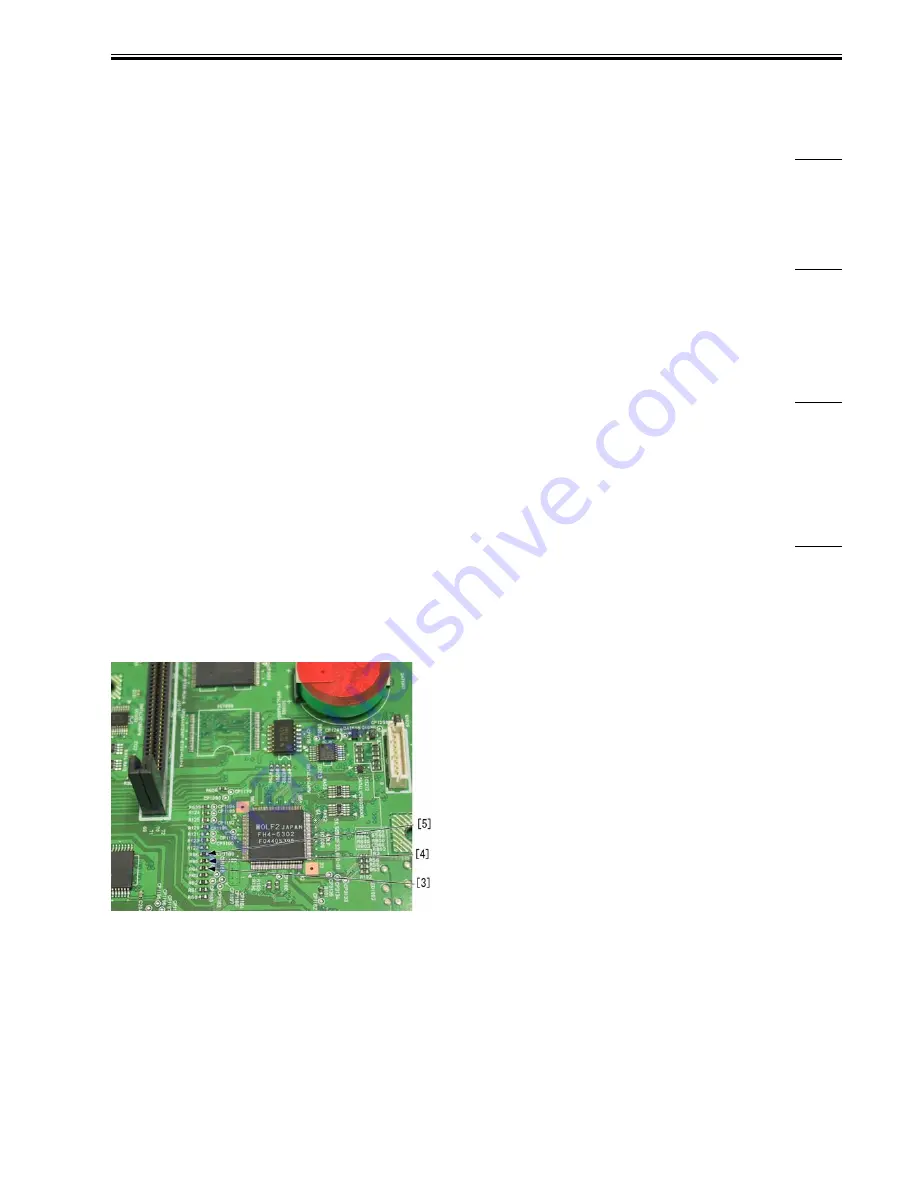
When the startup screen does not appear on the LCD although the main power indicator on the control panel comes on, follow the procedure below.
Field Remedy
Remove the rear cover, and then check if the registers R64 (Fig.[3]), R65 (Fig.[4]), and R66 (Fig.[5]) on the main controller PCB remain supplied with 3.3V
in a state in which the main power switch is turned ON.
a. If 3.3V is not applied to either of the above-mentioned resisters, and the resister remains supplied with nearly 0V, follow the procedure below:
F-14-15
1. Hold down the control panel switch for more than 3 sec., press the Start key on the LCD, and then turn the main power switch OFF referring to the instruction
displayed on the LCD.
2. Connect the resister switch board (Fig.[6]: FH9-0807) to the connector J1013 (Fig.[7]) on the main controller PCB.
Содержание iR3570 Series
Страница 1: ...Jan 17 2007 Service Manual iR4570 3570 2870 2270 Series...
Страница 2: ......
Страница 6: ......
Страница 27: ...Chapter 1 Introduction...
Страница 28: ......
Страница 70: ......
Страница 71: ...Chapter 2 Installation...
Страница 72: ......
Страница 146: ......
Страница 147: ...Chapter 3 Basic Operation...
Страница 148: ......
Страница 150: ......
Страница 154: ......
Страница 155: ...Chapter 4 Main Controller...
Страница 156: ......
Страница 187: ...Chapter 5 Original Exposure System...
Страница 188: ......
Страница 217: ...Chapter 5 5 27 F 5 91...
Страница 218: ......
Страница 219: ...Chapter 6 Laser Exposure...
Страница 220: ......
Страница 222: ......
Страница 230: ......
Страница 231: ...Chapter 7 Image Formation...
Страница 232: ......
Страница 236: ......
Страница 279: ...Chapter 7 7 43 F 7 241 2 Remove the screw 1 F 7 242 3 Detach the static eliminator 1 to the front F 7 243...
Страница 280: ......
Страница 281: ...Chapter 8 Pickup Feeding System...
Страница 282: ......
Страница 388: ......
Страница 389: ...Chapter 9 Fixing System...
Страница 390: ......
Страница 419: ...Chapter 9 9 27 F 9 148...
Страница 420: ......
Страница 421: ...Chapter 10 External and Controls...
Страница 422: ......
Страница 426: ......
Страница 437: ...Chapter 10 10 11 F 10 12 2 Remove the check mark from SNMP Status Enabled...
Страница 438: ...Chapter 10 10 12 F 10 13...
Страница 440: ...Chapter 10 10 14 F 10 15...
Страница 475: ...Chapter 11 MEAP...
Страница 476: ......
Страница 478: ......
Страница 481: ...Chapter 12 Maintenance and Inspection...
Страница 482: ......
Страница 484: ......
Страница 509: ...Chapter 13 Standards and Adjustments...
Страница 510: ......
Страница 512: ......
Страница 521: ...Chapter 14 Correcting Faulty Images...
Страница 522: ......
Страница 528: ......
Страница 537: ...Chapter 14 14 9 43mm s b Z x i j B iR4570_395 s u A B FM2 0287...
Страница 538: ...Chapter 14 14 10...
Страница 539: ...Chapter 14 14 11...
Страница 585: ...Chapter 15 Self Diagnosis...
Страница 586: ......
Страница 588: ......
Страница 623: ...Chapter 16 Service Mode...
Страница 624: ......
Страница 626: ......
Страница 679: ...Chapter 17 Upgrading...
Страница 680: ......
Страница 682: ......
Страница 693: ...Chapter 17 17 11 F 17 18 2 Click Start F 17 19 3 When the session has ended click OK...
Страница 698: ...Chapter 17 17 16 F 17 28 2 Click Start F 17 29 3 When the session has ended click OK...
Страница 710: ...Chapter 17 17 28 F 17 51 3 Click Start F 17 52 4 Click Save...
Страница 712: ...Chapter 17 17 30 F 17 55 2 Select the data to download F 17 56 3 Click Start...
Страница 714: ......
Страница 715: ...Chapter 18 Service Tools...
Страница 716: ......
Страница 717: ...Contents Contents 18 1 Service Tools 18 1 18 1 1 Special Tools 18 1 18 1 2 Oils and Solvents 18 1...
Страница 718: ......
Страница 720: ......
Страница 721: ...Jan 17 2007...
Страница 722: ......


