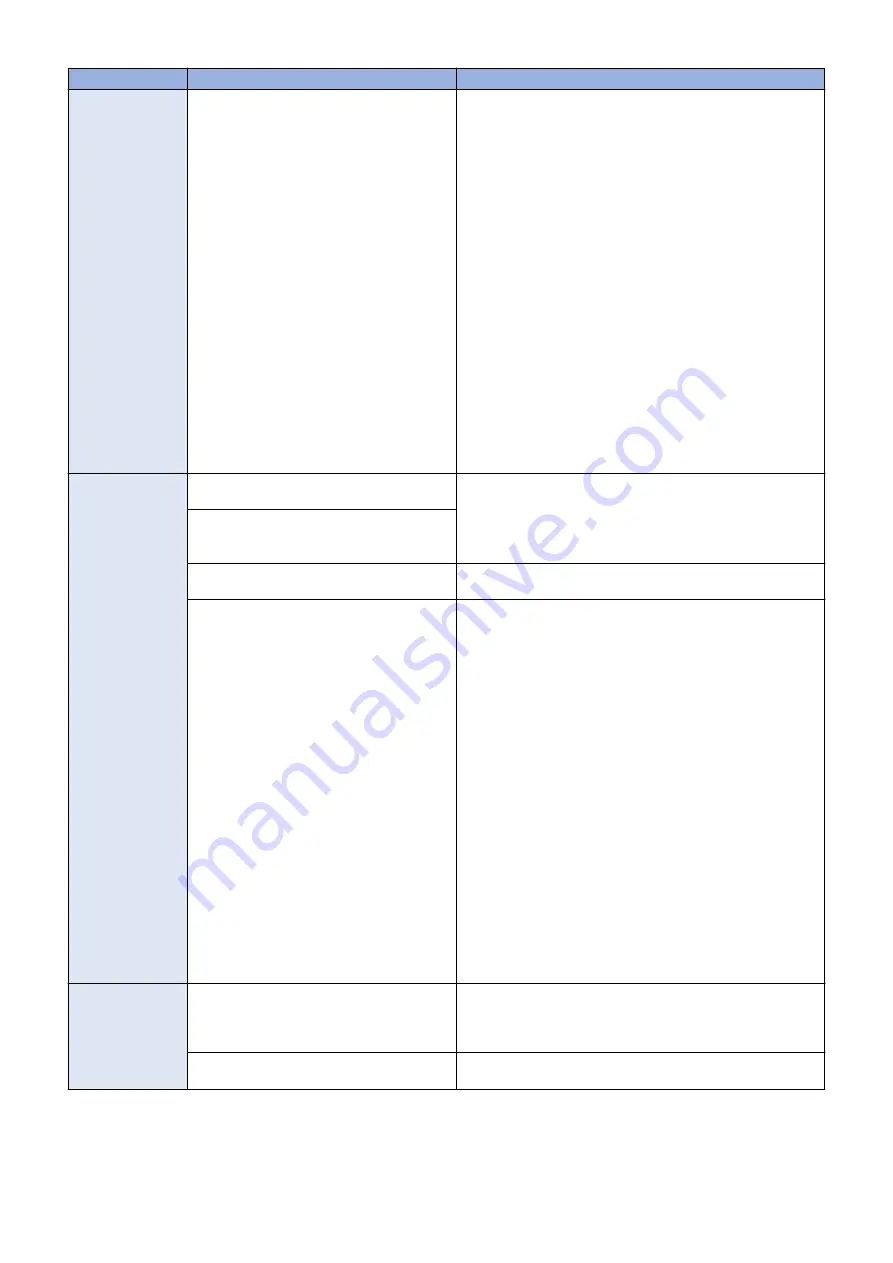
Symptom
Possible cause
Suggested action
Color quality is not
consistent
Out of calibration or calibration information/
curves on the active partition are corrupted
1. If you suspect that a custom calibration setting is causing the
problem, reset the calibration setting to its default measure-
ments:
In Command WorkStation > Device Center > General >
Tools, click Manage. Calibrator opens.
In Calibrator, select the calibration setting that you suspect
is causing the problem, and then click View Measurements.
Click Reset to Default Measurements, and then click Yes to
confirm.
If resetting to default calibration does not solve the problem,
you may need to service the printer.
2. If restoring default measurements fixes the color quality, the
custom calibration may have been the cause of the problem.
Request that the site administrator recalibrate the image-
PASS. For details, see Color Printing, which is part of the
user documentation set.
3. If the problem persists after recalibration, the calibration in-
formation on the hard disk drive may be corrupt. Reinstall
system software.
4. If the problem persists, the hard disk drive may be corrupt.
Verify that all hard disk drive cabling is correct.
5. If hard disk drive cabling is correct, you may need to replace
the hard disk drive.
Print quality is poor Missing or outdated
printer description file
Make sure that the appropriate printer description file is
installed.
For information about printer files, see Printing, which is part
of the user documentation set.
Application cannot find
the appropriate printer description
file
Problem with the printer
Test the printer and service, if necessary (see the service
documentation that accompanies the printer).
Out of calibration or calibration information/
curves on the active partition are corrupted
1. If you suspect that a custom calibration setting is causing the
problem, reset the calibration setting to its default measure-
ments:
In Command WorkStation > Device Center > General >
Tools, click Manage. Calibrator opens.
In Calibrator, select the calibration setting that you suspect
is causing the problem, and then click View Measurements.
Click Reset to Default Measurements, and then click Yes to
confirm.
If resetting to default calibration does not solve the problem,
you may need to service the printer.
2. If restoring default measurements fixes the color quality, the
custom calibration may have been the cause of the problem.
Request that the site administrator recalibrate the image-
PASS. For details, see Color Printing, which is part of the
user documentation set.
3. If the problem persists after recalibration, the calibration in-
formation on the hard disk drive may be corrupt. Reinstall
system software.
4. If the problem persists, the hard disk drive may be corrupt.
Verify that all hard disk drive cabling is correct.
5. If hard disk drive cabling is correct, you may need to replace
the hard disk drive.
Pages come out
blank, or tinted with
green or some other
color
Loose cable connection between the image-
PASS and the printer
1. Check again the printer interface cable and connection at the
imagePASS and the printer.
2. Power off/on the printer.
3. Replace the printer interface cable.
Problem with the printer
Test the printer and service, if necessary (see the service docu-
mentation that accompanies the printer).
5. TROUBLESHOOTING
66
Содержание imagePASS-P2
Страница 1: ...Revision 1 1 imagePASS P2 Service Manual ...
Страница 6: ...Introduction 1 Introduction 2 Specifications 6 ...
Страница 13: ...Using the imagePASS 2 Using the imagePASS 9 ...
Страница 16: ...Figure 3b The imagePASS Tools menu 2 Using the imagePASS 11 ...
Страница 17: ...REPLACING PARTS 3 Replacing Parts 13 ...
Страница 44: ...INSTALLING SYSTEM SOFTWARE 4 Installing System Software 40 ...
Страница 64: ...TROUBLESHOOTI NG 5 Troubleshooting 60 ...
Страница 84: ...2 Stepped Screw M4 2x 3 4x Screw with Toothed Washer M4x8 Stepped Screw M4 4 4x 8x 6 INSTALLATION PROCEDURE 79 ...
Страница 87: ...2 2x Stepped Screw M4 3 Screw with Toothed Washer M4x8 Stepped Screw M4 6x 4 4x 8x 6 INSTALLATION PROCEDURE 82 ...
Страница 88: ...5 4x Screw with Toothed Washer M4x8 6 Crossover Ethernet Cable 1x 2x 7 2x 8 2x 6 INSTALLATION PROCEDURE 83 ...


