background image

2017717_b•en•2016-11-01

We reserve the right to make technical changes

50

WAREMA climatronic® 3.x 

Installation and connection

7.7  Sensor Nnterface

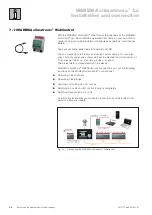
The WAREMA climatronic® sensor interface allows integration of numerous 

conventional sensors into a WAREMA climatronic® system when increased 

requirements are placed on number and quality of measuring data due to 

architectural conditions. 
The Sensor Interface can be used as an alternative to the climatronic® 

weather station or as an additional system component. These two products 

can be combined as desired, but it should be noted that WAREMA 

climatronic® supports a maximum of three components for collecting 

measuring data. 
The following meteorological sensors can be connected to the device:


4  "photo" sensors (inputs can be jointly switched from a voltage to a current 

interface).


1 "global radiation" sensor


1 "dawn/dusk" sensor


4 "wind speed" sensors


1 "wind direction" sensor


1 "temperature" sensor


1 "precipitation" sensor


1 "relative humidity" sensor
A DCF77 radio clock module can also be connected. 

A power supply for active sensors (15 V DC and 24 V DC) is integrated in 

the device.
Do not supply heating units in the sensors with power via the Sensor 

Interface. Use a separate voltage source.
Ideally, the Sensor Interface is supplied with power via a separate power 

supply unit. If only a few sensors with low current consumption are 

connected, supply is possible via the climabus. In this case, note the 

instructions in 

Chapter 5.6 Dimensioning of the power supply on page 30

.

The measuring values of the connected sensors are read in by the control 

panel in blocks via the climabus:


Safety-related data such as the wind speed, wind direction, outside 

temperature, precipitation and relative humidity is gathered every second.


Photo, global radiation. Dawn/dusk and the DCF77 signal are read once 

every ten seconds.

Detailed information on connecting, suitable sensors and the settings on 

the device can be found in the associated installation instructions  

art. no. 890360.

Summary of Contents for climatronic Control panel 3 Series

Page 1: ...Valid from 1st November 2016 2017717_b en Installation and connection WAREMA climatronic Control panel 3 x...

Page 2: ...All rights to the software are specified in the license agreement included WAREMA climatronic is a registered trademark of WAREMA Renkhoff SE WAREMA and the WAREMA logo are trademarks of WAREMA Renkho...

Page 3: ...ontrol panel 17 5 2 Connecting weather station 18 5 3 Connecting switch actuator 4M230 6M230 19 5 4 Connect hub 23 5 5 Connection examples for custom products 25 5 6 Dimensioning of the power supply 3...

Page 4: ...afety is ensured and the WAREMA climatronic system functions safely and without errors Information for installation and connection When you install a WAREMA climatronic system for the first time you w...

Page 5: ...rty damage or environmental harm WARNIN warns of a potentially dangerous situation Possible consequences may include light or serious injuries and even death personal injury property damage or environ...

Page 6: ...n by insufficiently qualified and knowledgeable persons may cause serious damage to the system or even personal injuries Installation connection and commissioning may only be performed by trained qual...

Page 7: ...cooling and ventilating equipment Do not use this device to control doors gates and garage door drives Window drives may only be controlled in compliance with the applicable standards and national sa...

Page 8: ...instructions 4 Operation instructions Base plate for the control panel with a fixing screw and nut Accessories kit with Terminating resistance Connection terminals 4 screws and screw anchors each for...

Page 9: ...or Actuator Sun shading system Sunblind pushbutton Light pushbutton Light WAREMA climatronic weather station 230 V 50 Hz 230 V 50 Hz Power supply unit 230 V 50 Hz Fig 2 Overview of the structure of a...

Page 10: ...1200 actuators 3 weather stations and 2 sensors for inside temperature humidity may be used in one system When using 100 actuators or more one hub is required per 100 devices One hub is required afte...

Page 11: ...nsor and switch actuator data sheets 2 Determine the lines required for connecting the components to each other Use the information given in chapter 5 Connection on page 16 Be aware that terminal sets...

Page 12: ...horizontally with the help of the oblong holes Countersink the 4 countersunk head screws included with the delivery until they are flush to allow the control panel to fully engage A temperature senso...

Page 13: ...right position with a maximum inclination of 2 The photodiodes must be at right angles to the building facades being shaded Please refer also to the information on sun control in the Commissioning Set...

Page 14: ...EMA climatronic 3 x Installation and connection Allocation of the photodiodes The numbers 1 to 4 have been allocated at the factory to the four photodiodes Photo 1 dawn dusk Photo 3 Photo 4 Photo 2 Fi...

Page 15: ...o minimum distances need to be observed between the housing and the surrounding objects REG When installing the device in a distribution board clip it onto a symmetrical DIN rail To make the connectio...

Page 16: ...tage drops The relevant VDE regulations must be followed when routing lines outdoors Furthermore the lines must be suitable for outdoor use The distance from high voltage power lines must be at least...

Page 17: ...lready fitted with a 120 terminating resistor If the control panel is not mounted at the end of the bus use the connection terminals supplied in the accessories box instead Attach the control panel to...

Page 18: ...reconnecting the jumper see Fig 9 1 2 3 4 Weather station Onsite junction box From previous bus device X1 J1 Bus A 0V A B 24V Bus B 0 V 24 V DC CAT line weather proof Network closed 120 Network open P...

Page 19: ...M230 SMI AP REG on page 35 7 4 Switch actuator 4M230I vivamatic 3 0 AP REG on page 36 7 5 Switch actuator 4M230 LS2 Low AP REG on page 37 7 6 Dim actuator 2D AP REG on page 38 5 3 1 Switch actuator ou...

Page 20: ...2 ATTENTION Only one motor can be connected per motor terminal set Parallel connection will damage the motor The total power of all 4 outputs per fuse must not exceed 1000 VA All motor lines H05 RR F...

Page 21: ...otor 9 Sun shading system N PE N PE To next bus device Bus A Bus B 0 V Example Group push button motor 7 and motor 8 Connection of group push buttons at the locking inputs The locking function is no l...

Page 22: ...single locking contact input is needed to lock a product A locking contact input can lock several products on the same actuator For building light and fan product groups one locking contact is requir...

Page 23: ...mber of bus users A maximum of two hubs may be switched in series for the WAREMA climatronic bus A hub is not required for less than 100 devices except for line extension When using 100 actuators or m...

Page 24: ...4 2 P V1 V2 P V3 V4 RS485 0V E 1 1 E 1 2 P E 2 1 E 2 2 E 3 1 E 3 2 P A RS485 B X7 0V E 1 1 E 1 2 P E 2 1 E 2 2 E 3 1 E 3 2 P A RS485 B X7 E E E E E E A B X7 0V 1 11 2 P 2 12 2 3 13 2 P E 4 1 E 4 2 P V...

Page 25: ...Connection example for 3 step fan on page 27 Fig 16 Connection example for fan and or fan valve on page 28 Fig 17 Connection example for fan 6 V 12 V with fan valve on page 29 5 5 1 Pres present and B...

Page 26: ...ted and the contact A 6 2 closes The fault alarm contact can only be connected to a 6M or 6M230 switch actuator A 6 2 fault This actuator must be set up as actuator 1 in the WAREMA climatronic project...

Page 27: ...tch actuator 6M F2 6 3 AT H F3 6 3 AT H Supply line onsite 230 V AC 50 Hz 16 A 3x1 5 mm2 N L PE Step push button max line length 200 m All push button lines JY St Y 2x2x0 8 mm P 1 E 5 2 and E 6 1 are...

Page 28: ...fan valve WAREMA climatronic switch actuator 6M F2 6 3 AT H F3 6 3 AT H Supply line onsite 230 V AC 50 Hz 16 A 3x1 5 mm2 N L PE Push button for fan max line length 200 m All push button lines JY St Y...

Page 29: ...Fan 6 V 12 V with fan valve M 1 DC Vale 0V 12V Motor Valve 0V 6V 12V 230 V N L PE E 5 2 and E 6 1 are not used or may not be used in this application WAREMA climatronic switch actuator 6M F2 6 3 AT H...

Page 30: ...d humidity sensor 2 Control panel JY St Y 4 2 0 8 mm The maximum total line length between the control panel and the equipment cabinet is 200 m Weather station 4 AWG 26C UL black The maximum line leng...

Page 31: ...4M 6M 90 Dim actuator 2D 50 Sensor Interface Tableau Interface Total Note the following regarding the table The current consumption of the Sensor Interface depends on the number and type of sensors c...

Page 32: ...e users or small projects It guides you to a finished project with all the basic settings in just a few steps During the setup procedure the most important parameters can be viewed and changed You can...

Page 33: ...Chapter 7 1 on page 34 Switch actuator 4MDC AP REG Chapter 7 2 on page 34 Switch actuator 16M230 SMI AP REG Chapter 7 3 on page 35 Switch actuator 4M230I vivamatic AP REG Chapter 7 4 on page 36 Switc...

Page 34: ...tuator must be supplied with 24 V DC Detailed information on connecting can be found in the associated installation instructions art no 890012 7 2 Switch actuator 4MDC AP REG The switch actuator 4MDC...

Page 35: ...groups can be controlled When movement is requested the device first switches on the voltage of the SMI drives and then sends with a time delay the SMI telegrams to the drives In addition the switch a...

Page 36: ...is being prepared are ignored Local operation Push buttons are used for local operation Follow the external venetian blind operating instructions art no 867454 and the information at www vivamatic com...

Page 37: ...If the command is issued from a central control unit the product can move directly either to an intermediate position e g 50 or the second lower limit switch Each actuator uses three relays to contro...

Page 38: ...missible loads Lamps and fans that already have a dimmer Electric devices that are not among the loads specified above Combination of electronic and conventional transformers since these require diffe...

Page 39: ...vided by customer 230 V AC 50 Hz 16 A 3 x 1 5 mm2 All motor lines H05 RR F 4 G 0 75 black type WAREMA All push button lines JY St Y 2x2x0 8 mm Max line length 200 m for interference proof routing use...

Page 40: ...TTENTION Only one motor can be connected per motor terminal set Parallel connection will damage the motor The total power of all 4 outputs per fuse must not exceed 1000 VA All motor lines H05 RR F 4 G...

Page 41: ...nt group is freely programmable within an actuator see WAREMA climatronic installation instructions Example group push button motor 5 and motor 6 Groups are built for all actuators by jumpering Only c...

Page 42: ...0700 1 and EN 60335 1 From previous bus device Bus A Bus B 0 V Bus A Bus B 0 V Legend for other climatro nic actuators In P In5 V1 In6 V2 In7 V3 In8 V4 In1 1 1 E1 1 In1 1 2 E1 2 Motor 2 M 24 V DC Exam...

Page 43: ...are built for all actuators by jumpe ring Only connect In for the actuators in the group S1 Example Interlocking via window contact Operation is enabled when the window is shut This function must be...

Page 44: ...om previous bus device Bus A Bus B 0 V Legend for other climatronic actuators In P In1 1 1 E1 1 In1 1 2 E1 2 4 3 1 2 4 3 1 2 4 3 1 2 4 3 1 2 BU BN BK GY GNGY BU BN BK GY GNGY BU BN BK GY GNYE Bus A Bu...

Page 45: ...vice Bus A Bus B 0 V BU BN BK GY GNGY To the motors Example Connection of SMI motors on SMI interface that is not fuse protected terminals Lout Maximum 16 motors Total power maximum 3500 VA on SMI int...

Page 46: ...oup is freely programmable within an actuator see WAREMA climatronic installation instructions Example Single push button motor 1 Bus connection nc not connected not assigned The nc connection yellow...

Page 47: ...0 V Schaltaktor 4M230I vivamatic 3 0 F1 6 3 AT H F2 6 3 AT H Example Interlocking via window contact Operation is enabled when the window is shut This function must be programmed accordingly Example g...

Page 48: ...ect In for the actuators in the group Bus A Bus B 0 V In From previous bus device Bus A Bus B 0 V Motor 2 2 TE Motor 3 2 TE Motor 4 2 TE ATTENTION Only one motor can be connected per motor terminal se...

Page 49: ...tion of group push buttons at the locking inputs The locking function is no longer available The relevant group is freely programmable within an actuator see WAREMA climatronic Commissioning Setting i...

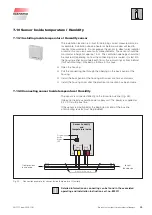
Page 50: ...direction sensor 1 temperature sensor 1 precipitation sensor 1 relative humidity sensor A DCF77 radio clock module can also be connected A power supply for active sensors 15 V DC and 24 V DC is integr...

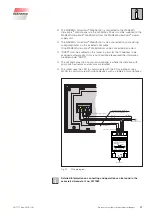
Page 51: ...15V 3 0V 15V 4 0V 15V 0V 15V 0V X1 X2 X3 X4 X5 Input X6 RS485 Prog X7 X8 S2 0V 24V A B ID LED 15V 0V 15V 1 0V 15V 2 0V 15V 3 0V 15V 4 0V 15V 0V 1 2 3 4 5 6 7 8 Terminal strip X1 Reserve terminals for...

Page 52: ...wire slave bus line Each Tableau Interface S can be addressed separately in the bus via an address that can be set in the device WAREMA climatronic bus device Tableau Interface M 48 inputs WAREMA cli...

Page 53: ...1 2 3 4 ON X10 Input X11 RS485 X3 0V 24V A1 B1 LED S2 Adr P 17 18 19 20 1 2 3 4 ON X10 Output X11 RS485 S2 Adr P 24V 0V B1 A1 S L A V E X2 1 2 3 4 5 Slave Bus last JY St Y 2 2 0 8 mm WH YE BU OG 1 2 3...

Page 54: ...plitter makes 24 V DC 250 mA available on the bus on the sensor side sufficient for one weather station If multiple weather stations are connected they need to be supplied by a separate power supply u...

Page 55: ...l the connecting line through the opening on the back panel of the housing Install the back panel of the housing with screw anchors and screws Install the housing cover after the electrical connection...

Page 56: ...save them to selected rooms maximum of 10 entries per room i e channels groups or scenes The project data is stored directly on the device WAREMA climatronic WebControl can be used to carry out the fo...

Page 57: ...P address to be assigned automatically If this is not possible please read the information provided under DHCP The second connection on your control panel is where the climabus with your switch actuat...

Page 58: ...ttings and the created project are lost If necessary save the project created in the control panel on the SD card Switch off the power supply for the WAREMA climatronic system Press and hold the funct...

Page 59: ...midity sensor Measuring range 0 99 Frel Resolution 1 Frel Accuracy 3 5 Frel HF receiver Receive frequency 433 92 MHz Dimensions WxHxD 245 160 28 mm Degree of protection safety class Protection rating...

Page 60: ...nly one product moves The default settings are such that only one relay is activated at a time and connected single push buttons operate in dead man s mode Group buttons are functional after the actua...

Page 61: ...ther station is terminated at the factory using jumpers with 120 10 2 4 Checking resistance values of the bus line In order to check the correct wiring of the bus lines measure the resistance between...

Page 62: ...th each other 10 2 7 Positioning of the weather station Weather station correctly positioned on the building The photodiodes must be at right angles to the building facades being shaded see also chapt...

Page 63: ...Hub 23 I Install actuators 15 Installation 11 Installation and connection 7 Installing base plate for control panel 12 Installing control panel 12 Installing weather station 13 Intended use 6 11 Inde...

Page 64: ...idenfeld Germany www warema com info warema com KEEP IN A SAFE PLACE FOR COMMISSIONING Affix ID sticker of control panel here 00001358 Bedienger t Note down installation location here Notes on commiss...

Reviews: