Page
189
of
244
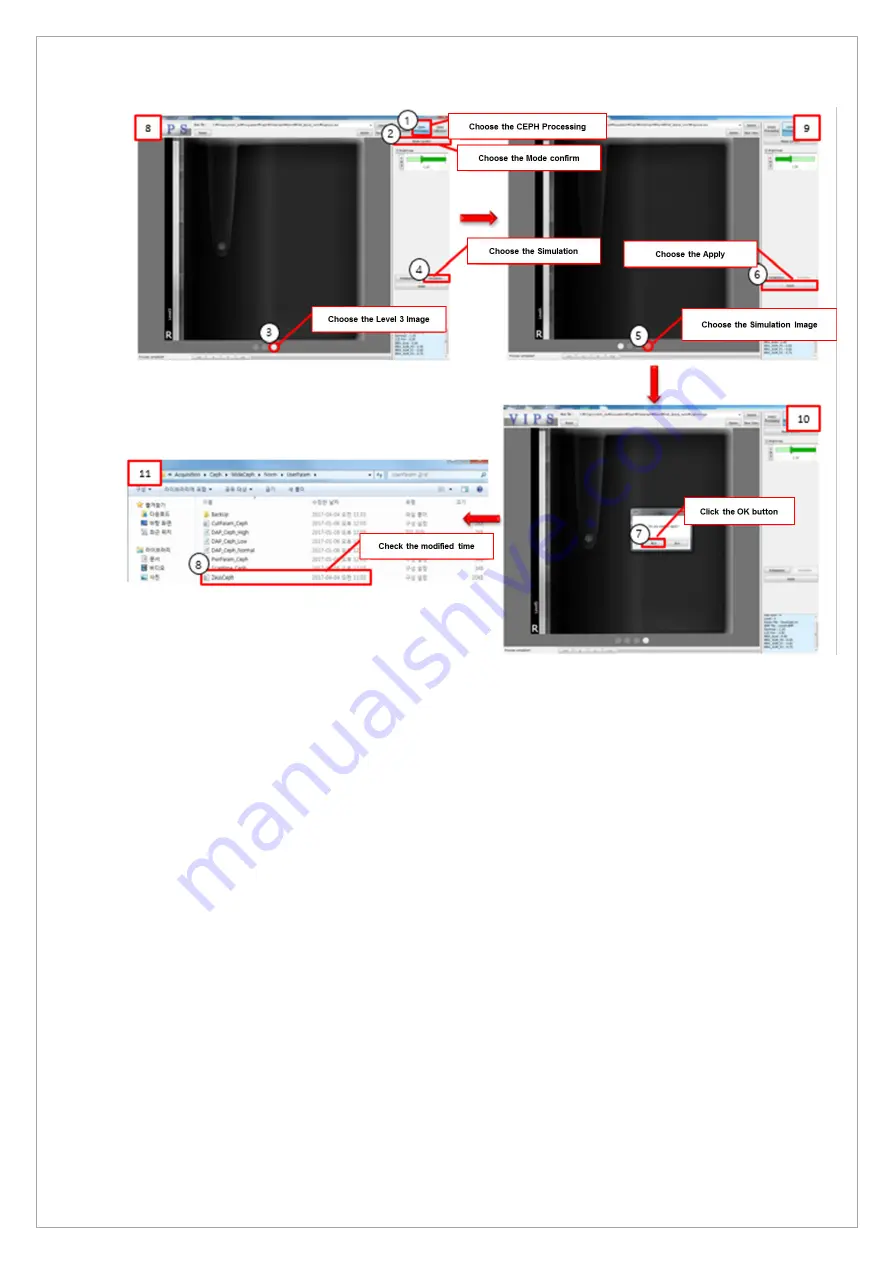
10. Complete the CEPH Calibration, and choose the
①
CEPH Processing button, as shown in [8].
11. When the Mode Confirm button is chosen, Level 1~3 images are created.
* Level 1~3: Level 3 has the highest contrast due to the difference in contrast.
12. Choose the O mark on the far right of
③
, which is an image of Level 3 among the created
images.
13. When the Simulation button is chosen, an image of O marked in red, as shown in [9], is created.
14. Choose O marked in red and
⑥
click the
Apply
button.
15. When a pop-up window is created, as shown in [10],
⑦
click the
OK
button.
16. As shown in [11], check that the time of the modified date of Acquisition/WideCEPH /Norm or
Fast/UseParam/ZeusCEPH is the same as the time when the work is completed.
Summary of Contents for A9 PHT-30CSS
Page 1: ...vatech A9 Technical manual Model PHT 30CSS Version 1 01 English...
Page 12: ...Page 11 of 244 1 2 1 Vertical Frame Part...
Page 22: ...Page 21 of 244 1 2 3 5 Generator DG 07E22T2...
Page 26: ...Page 25 of 244...
Page 27: ...Page 26 of 244...
Page 30: ...Page 29 of 244 1 3 3 Sensor Part Connection Diagram...
Page 31: ...Page 30 of 244 1 3 4 CEPH SENSOR Part Connection Diagram...
Page 32: ...Page 31 of 244 1 3 5 Connection Diagram Total assembly...
Page 43: ...Page 42 of 244 16 Loosen ten bolts as shown in the image below...
Page 112: ...Page 111 of 244 5 Click the V Vol button Click the Ready button...
Page 180: ...Page 179 of 244 10 Select 50 in the M box and click the center of the flat washer...
Page 209: ...Page 208 of 244 8 5 Appendix 8 5 1 Main MCU Board Parameters...
Page 244: ...vatech A9 www vatech com...


