background image

250

7

Daily Control

7.3

Replacing Waste Toner 
Bottle

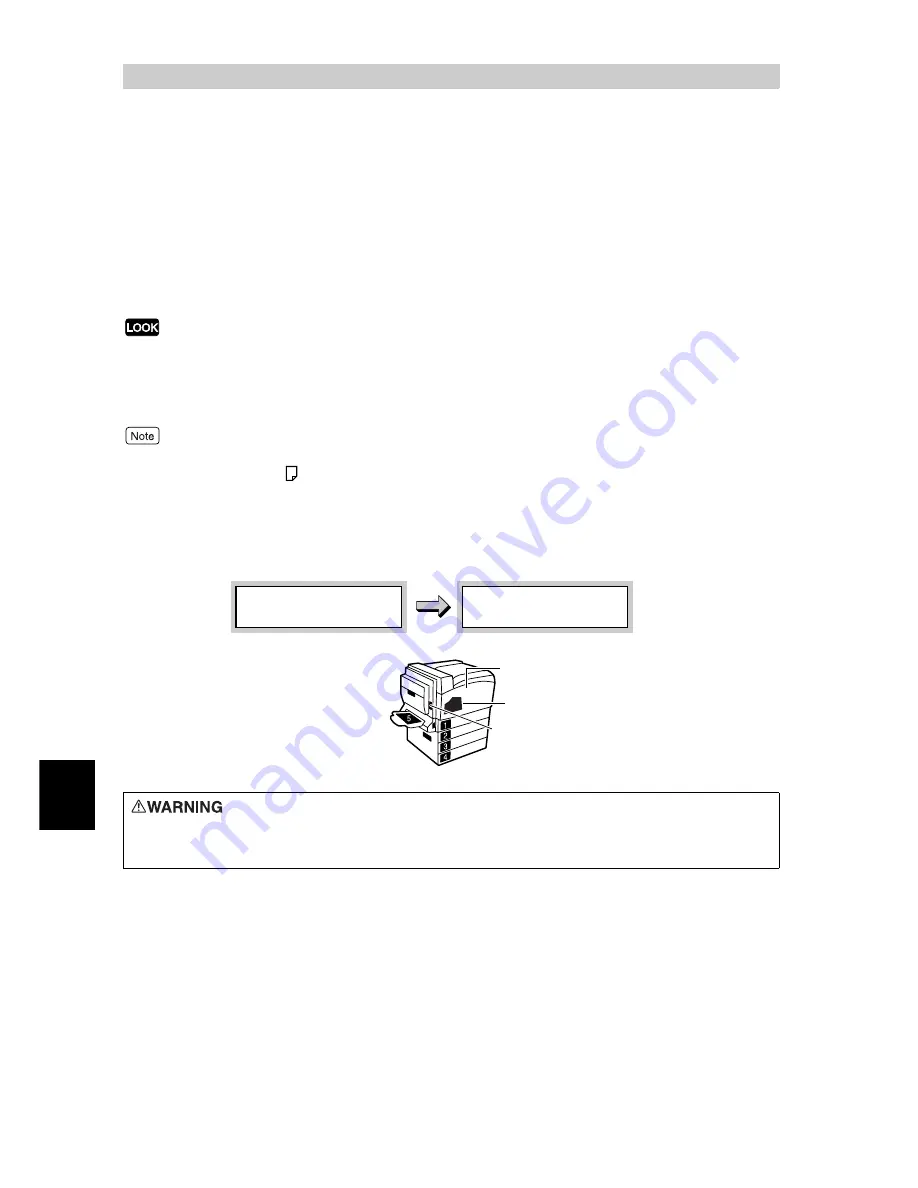
When it is almost time to replace the waste toner bottle, the message [Ready to print 
Replace UI] appears.  Even after this message appears, you can print about 1,000 pages 
normally. Check that a new waste toner bottle is in stock during this time.
You need to replace a waste toner bottle after printing about 24,000 pages. When the 
message changes to [Replace Waste TonerContainerUI], printing stops until you replace 
the old waste toner bottle with a new one. 

Bring the used waste toner bottle to us/distributor or send it back to us according to the instructions on the sheet
included.  

Replace the toner recycle bottle while the power to this printer is switched on. When the power of the printer is
switched off, print data remaining in the printer and information spooled in the memory will be erased.

The number of pages mentioned above, that you can print after the message appears applies to the case when
continuously printing A4 

-size paper with a ratio of 5%.

This number may vary depending on the print contents, paper size, environment in use, and frequency of
switching on/off the power to the printer.

When replacing the toner recycle bottle, toner may spill on the floor. It is recommended to spread a sheet of paper
on the opened front cover or floor beforehand.

Never put toner, a waste toner bottle, or the container containing toner in a fire.
Toner dust may explode, resulting in burns.

Replace Waste
TonerContainerU1 

Ready to print
Replace U1

Waste toner bottle

Cover A (left cover)

Front cover

Summary of Contents for 8124

Page 1: ...8124 User Guide Color Laser Printer ...

Page 2: ...s This software is based in part on the work of the Independent JPEG Group It may be a legal offence to print currency notes certificates of stocks and securities or any other documents of similar nature regardless of whether they will be used Data loss from the hard disk drive Saved data may be lost if hard disk of the machine breaks down due to external shocks or if the power is accidentally cut...

Page 3: ...development to disposal We have implemented a number of programs to lessen the burden on the environment For example we have totally eliminated ozonedepleting chlorofluorocarbons from our manufacturing facilities We are committed to leadership in the conservation of resources by reusing and recycling post consumer waste material such as paper cartridges and parts from our customer s copiers and pr...

Page 4: ...ng consumables Reports lists HP GL HP GL 2 Emulation Settings Guide HPGL pdf Setting items of the HP GL and HP GL 2 emulation modes Network Print Environment User Guide Network pdf Setting items of the network environment On line Help of the printer driver Descriptions of the setting items of the printer driver Guide supplied with optional products Installation procedure guides of optional product...

Page 5: ...edure 1 Click Start on the taskbar select Printers from the Settings menu and display the properties dialog box corresponding to your printer For Windows XP Windows Server 2003 click Start then select Printers and Faxes 2 Click and then the item you want to check 1 or click Help in the lower right corner 2 to display the help information 1 Click and then the item you want to check 2 Click Help ...

Page 6: ...graphics and photos have the distinctive luster of color printing through oil free fusing technology asy printer driver installation and settings E You can easily install the printer driver and do various settings ulti client environment fully supported M This speed is for one sided continuous printing Printing speeds differ depending on the image quality paper and other printing conditions In add...

Page 7: ...s on the printer drive s properties and select them for printing Printing long paper 3 Can print on long paper with a length of up to 1200 mm by using Tray 5 bypass tray 1 Security and sample printing need the Hard Disk Drive optional and 384 MB of memory or more 2 Printing on long size paper requires 384 MB of memory or more What is security printing This function allows you to send print data to...

Page 8: ...4 1 About Embedded Web Server 39 1 4 2 Using Embedded Web Server 41 1 5 Checking the Settings 42 1 6 Installing the PCL Printer Driver 44 1 6 1 After Setting up the Printer 44 1 6 2 The PCL Printer Drivers 44 1 7 Installing the AdobePS Printer Driver Windows 95 98 Me 53 1 7 1 Installation Procedure 53 1 7 2 Printer Driver Properties 58 1 7 3 How to Use Help 61 1 8 Installing the AdobePS Printer Dr...

Page 9: ...tching On the Power 106 2 2 2 Switching Off the Power 106 2 3 Canceling Sleep Mode 107 2 4 Canceling Checking Print Jobs 108 2 4 1 Canceling Printing From the Computer 108 2 4 2 Canceling Print Jobs From the Printer 109 2 4 3 Checking Print Jobs of Print Instruction 110 2 5 Loading Configuration of Options and Paper Settings of Trays 111 Chapter 3 Printing 3 1 Printing from the Computer 114 3 1 1 ...

Page 10: ...the Environment for E mail Printing 140 3 7 2 Sending E mail 143 3 7 3 Precautions for Sending Documents by E mail 144 Chapter 4 About Paper 4 1 About Paper 146 4 1 1 Paper that can be used 146 4 1 2 Paper that cannot be used 149 4 1 3 Storage and Handling of Paper 150 4 2 Loading Paper 151 4 2 1 Loading paper into Trays 1 to 4 151 4 2 2 Loading Paper into Tray 5 bypass tray 153 4 2 3 About the Au...

Page 11: ... 6 Network Related Problems 236 6 6 1 Troubleshooting When Working in a TCP IP Environment 236 6 6 2 Troubleshooting When Using Embedded Web Server 238 6 7 Mail Related Problems 239 6 8 Ejecting Remaining Data When Printing Stops Halfway Through 240 Chapter 7 Daily Control 7 1 Replacing Toner Cartridge 242 7 2 Replacing Drum Cartridge 245 7 3 Replacing Waste Toner Bottle 250 7 4 Printing Report Li...

Page 12: ...g the Adjustment Value 283 7 10 Moving the Printer 285 Appendix A Main Specifications 288 A 1 Product Specifications 288 A 2 Printable Area 291 A 3 Internal Font 292 B Optional Products and Consumables 294 B 1 Optional Products 294 B 2 Consumables 295 C Service Life of Consumables and Regular Replacement Parts 296 D Obtaining Product Information 297 E Precautions Limitations 298 E 1 Precautions Li...

Page 13: ...puter and workstation 2 The following icons are used in this guide Indicates important information which you should read Indicates additional information on operations or features Indicates reference sources 3 The following conventions are used in this guide The reference is in other manuals instead of this guide Indicates the name of a folder file application or CD ROM Indicates the name of a men...

Page 14: ...d the printer may fall over and cause injuries The printer weighs 64kg without optional trays When moving the equipment make sure that there are 3 or more persons carrying it Also make sure to remove any optional trays from the main unit Graphic symbols used throughout this guide Used for items that if not followed strictly can lead to severe or fatal injuries Used for items that if not followed s...

Page 15: ...y ventilated printer may cause excessive internal heat and fire The accompanying diagram shows the minimum clearances required for normal operation consumables replacement and maintenance to ensure your printer operates at peak performance When moving the printer be sure to unplug the power cord from the outlet If the printer is moved with the power cord connected it can cause damage to the cord w...

Page 16: ...udden temperature fluctuations can affect copy quality Rapid heating of a cold room can cause condensation inside the printer directly interfering with image transfer Do not expose the printer to direct sunlight Exposure to direct sunlight can adversely affect the machine s performance Connecting an Ethernet cable directly to outdoor may cause printer breakdown by lightning Use an Ethernet cable o...

Page 17: ...ys use the power cord provided with your printer When an extension power cord is required always use a properly rated cord In Japan 125 V 15 A In other countries Contact our Customer Support Center or your dealers If you use a cord with an unspecified current rating the printer or plug may emit smoke or become hot to the touch externally Do not attempt to rework pull bend chafe or otherwise damage...

Page 18: ...h can be ignited and explode Telephone line earth wire or lightning rod which can draw an excessive electric current if hit by lightning Water faucet or pipe whose electrical conductivity is broken by a non metal part If the power cord is broken or insulated wires are exposed ask our Customer Support Center or your dealers for a replacement Using a damaged cord can cause fire or electric shock Do ...

Page 19: ... the printer through gaps resulting in trouble Also never use anything other than mild detergent The printer has a built in circuit for protection against lightning induced surges in current If lightning strikes in your neighborhood switch off the printer Disconnect the power cord and telephone line from the printer and reconnect them only when the lightning has stopped Reception interference If t...

Page 20: ...uration or modify any parts An unauthorized modification can cause smoke or fire This equipment is certified as a Class 1 laser product under IEC60825 This means that the printer does not emit hazardous laser radiation Since radiation emitted inside the printer is completely confined within the protective housings and external covers the laser beam cannot escape from the printer during any phase o...

Page 21: ...r is wrapped around the heat roller or when clearing a jammed paper that is difficult or impossible to see do not try to remove it by yourself Doing so can cause injuries or burns Switch off the machine immediately and contact our Customer Support Center or your dealers Keep the room ventilated when using the copier for a long period of time If not you can get a headache OTHERS When clearing a pap...

Page 22: ...Contact our Customer Support Center or your dealers for disposal Follow the procedure below to give first aid If toner gets into your eyes bathe your eyes until the pain stops and submit to medical treatment if required If the toner adheres to your skin wash away the toner with soap If you breathe the toner gargle with large amounts of water If you swallow the toner vomit it and submit to medical ...

Page 23: ...23 Labels indicating Warning and Caution Warning and caution labels are attached inside the printer to ensure safe use of this printer Read and follow the instructions carefully for your safety ...

Page 24: ...wer saving feature which switches the printer to the sleep mode automatically if the printer is on and not operated for a certain period of time In this mode the machine lowers the fuser temperature and saves the power consumption The default sleep mode start time is set at 15 minutes You can change this setting from 15 to 240 minutes at 1 minute intervals For information about the procedure refer...

Page 25: ...that may be illegal to copy or print in your country Currency Banknotes and checks Bank and government bonds and securities Passports and identification cards Copyright material or trademarks without the consent of the owner Postage stamps and other negotiable instruments This list is not inclusive and no liability is assumed for either its completeness or accuracy In case of doubt contact your le...

Page 26: ...26 ...

Page 27: ...dded Web Server 39 1 5 Checking the Settings 42 1 6 Installing the PCL Printer Driver 44 1 7 Installing the Adobe PS Printer Driver Windows 95 98 Me 53 1 8 Installing the Adobe PS Printer Driver Windows NT 62 1 9 Installing the Adobe PS Printer Driver Windows 2000 XP Server 2003 72 1 10 Installing the Adobe PS Printer Driver Macintosh 82 1 11 Network Environments and Example Connections 96 ...

Page 28: ...o a computer with a USB cable Factory default setting disable Using it as a network printer The following printer environments can be set up for this printer when using it as a network printer LPD Enables direct communications with this printer using TCP IP protocol Factory default setting enable NetWare Enables shared control of this printer using the NetWare server Factory default setting disabl...

Page 29: ...pporting USB2 0 is required 5 For Windows XP SP1 and later are applicable 6 For Windows 95 Windows 98 Windows Me use our TCP IP Direct Print Utility 7 Only for Mac OS X For information about the network environment refer to the Network Print Environment Guide Connection type Local Network Port name Parallel USB1 1 USB2 0 LPD NetWare SMB IPP Port9100 EtherTalk Protocol TCP IP TCP IP IPX SPX NetBEUI...

Page 30: ...n the format of Christian year 4 digits in the range of 2000 to 2099 and 24 hours The date time set here is printed out on the list or report Enter the date in YYYY MM DD format and time in HH MM format Setting the network port protocol and spool The Setup menu allows you to set multiple ports at one time according to a series of steps SMB LPD IPP NetWare Port9100 SNMP EtherTalk optional Set the p...

Page 31: ...you press the Menu button during the setting procedure with the Quick Setup menu settings will be canceled Procedure Ready to print Printer is in the standby mode 1 Press the Menu button Menu Print Language The menu mode screen is displayed 2 Press the or button several times Menu Quick Setup 3 Press the button Setup N Y The Setup menu is displayed 4 Press the or button to select Y Setup N Y 5 Pre...

Page 32: ...ist R N Y 7 Use the or button to select R N Y Here select Y Print Settings List R N Y 8 Press the Eject Set button Print Settings Printing Tray1 Save Settings R Y Reboot 9 Use the or button to select Y and press the Eject Set button to reboot the printer Ready to Print The printer returns to the standby mode It can now receive data at any time ...

Page 33: ... For information about Embedded Web Server refer to Configuring from the Computer Embedded Web Server P 39 Depending on the network environment you may need to set the subnet mask and gateway address for the printer If your network has the DHCP BOOTP or RARP environment this printer can obtain these addresses from each of these servers By factory default setting these addresses are automatically o...

Page 34: ...ystem Settings List Checking System Settings List When neither TCP IP nor WINS address is obtained Your network has neither a DHCP server nor a WINS server Refer to 1 3 1 Setting Address P 35 to set the IP address When the address is obtained for TCP IP but not for WINS Your network has no WINS server Do not use the DHCP environment because printing may be disabled when the IP address assigned to ...

Page 35: ... Get IP Add Fail is displayed first press the Menu button to continue the procedure Setting IP address Ready to print 1 Press the Menu button Menu Print Language 2 Press the or button several times Menu Admin Menu 3 Press the button Admin Menu Network Port 4 Press the button Network Port Parallel 5 Press the or button several times Network Port TCP IP Settings 6 Press the button TCP IP Settings Ge...

Page 36: ...mask and gateway address continuously press the button and proceed to Setting the subnet mask gateway address in step 8 12 Press the Menu button to reboot the printer Ready to print The printer returns to the standby mode It can now receive data at any time Ready to print 1 Press the Menu button Menu Print Language 2 Press the or button several times Menu Admin Menu 3 Press button Admin Menu Netwo...

Page 37: ...bnet Mask 000 000 000 000 9 Enter the subnet mask using the buttons Subnet Mask XXX XXX XXX XXX 10 Press the Eject Set button Subnet Mask XXX XXX XXX XXX 11 Press the button some times TCP IP Settings Subnet Mask 12 Press the or button several times TCP IP Settings Gateway Address 13 Press the button Gateway Address 000 000 000 000 14 Enter the gateway address using the buttons Gateway Address XXX...

Page 38: ...Setting Printer Environment 1 Continued from the previous page Gateway Address XXX XXX XXX XXX 16 Press the Menu button to reboot the printer Ready to print The printer returns to the standby mode It can now receive data at any time ...

Page 39: ...use this printer as a local printer Embedded Web Server is not available The environment computer and browser that can be used for Embedded Web Server are as follows Applicable environment To use Embedded Web Server you need the network environment using TCP IP protocol as well as to set the Internet service to Enable Factory default setting Enable at the printer About Web browser settings for usi...

Page 40: ...you to set the priority for each paper type Power Saver Settings Enables you to set the duration of time until the printer switches to thesde sleep mode power saver mode Gradation Adjustment Enables you to set the grayscale offset Mail Notice Settings Enables you to set the destination notice interval when using Mail Notice services This item is displayed when Mail Notice Services in Port Status i...

Page 41: ...dure below refer to About Web browser settings for using Embedded Web Server P 39 Procedure 1 Start your computer and then the web browser 2 Enter the IP address of this printer in the address column of the web browser and then press the Enter key Example When the IP address is 192 168 1 100 Enter http 192 168 1 100 The Embedded Web Server screen will be displayed Using On line Help For details on...

Page 42: ...button Menu Print Language The menu screen is displayed 2 Press the or button several times Menu Report List 3 Press the button Report List Job History The Report List menu is displayed 4 Press the or button several times to select System Settings Report List System Settings 5 Press the button System Settings Use Set to Print 6 Press the Eject Set button System Settings Printing Tray 1 The System ...

Page 43: ...1 5 Checking the Settings 43 Setting Printer Environment 1 Check the IP address settings Check the network port settings ...

Page 44: ...r computers In several places throughout this chapter it is necessary to load the TallyGenicom 8124 CD ROM into the drive It is recommended that all other applications are closed down before inserting the CD ROM The CD will auto start and give you choose of installing PCL or Adobe Post Script drivers To install PCL drivers follow the procedures below for PS driver installation see the Installing t...

Page 45: ...computer a dialog box indicating that new hardware has been detected maybe displayed when you activate Windows 98 In this case click Cancel to close the dialog box 3 Insert the 8124 Auto Installer CD into your CD ROM drive If the CD ROM does not start automatically go to My Computer and double click the CD ROM drive icon 4 After reading the License Agreement Click the I Accept button 5 Click the I...

Page 46: ... ROM drive If the CD ROM starts automatically cancel the auto run installation by clicking on Exit 3 On the Start menu point to Settings and click Printers 4 In the Printers window double click Add Printer 5 Click Next 6 Select Local Printer and then click Next 7 Click Have Disk 8 Next browse the CD ROM to D drivers pcl win9x and then click OK And click OK again at next screen ...

Page 47: ...1 6 Installing the PCL Printer Driver 47 Setting Printer Environment 1 9 Click Next 10 Select LPT1 and click Next 11 Click Next 12 Say No to Test Page and click Finish ...

Page 48: ...size loaded in the printer trays i e A4 A3 Next select the Options tab and select all the extra options installed on the printer To confirm the printer and the computer can communicate correctly print a test page On the General tab Click Print Test Page A dialog box is displayed to confirm whether or not the test page has been printed correctly Check the print results and if the test page is print...

Page 49: ...re the printer on Windows NT 2000 XP and Win2003 you need to log on as either an administrator or power user Refer to the Network Print Environment User Guide for more details on configuring the printer over a network Procedure Auto run option 1 Power on the printer 2 Power on your computer running Windows NT 4 0 or Windows 2000 XP Windows 2003 When the printer is connected to the computer a dialo...

Page 50: ...lick Add Printer 5 Click Next 6 Select Local Printer and then click Next 7 Click Next 8 Click Have Disk 9 Next browse the CD ROM to D drivers pcl win2000 and then click OK 10 Click Next 11 Select Yes or No to Default Printer and click Next 12 Select if it s to be a Share Printer or not and click Next 13 Select No to Test Page and click Next 14 Click Finish After the installation finishes a TallyGe...

Page 51: ...an communicate correctly print a test page Click Print Test Page in the General tab A dialog box is displayed to confirm whether or not the test page has been printed correctly Check the print results and if the test page is printed correctly click Yes Click OK on the Properties dialog box This completes the installation of the printer driver Remove the CD ROM from the drive and store it safely ...

Page 52: ...ter driver can be networked over Windows NT 4 0 system it is necessary to set up TCP IP Protocol and Microsoft TCP IP Printing Refer to the manuals on Windows NT 4 0 for details You can select LPR Port or Standard TCP IP Port as the output destination for the port on a Windows 2000 system When you select LPR Port before installing the printer driver you are required to set up Print Services for UN...

Page 53: ...g Cancel in the dialog box displayed during instal lation You can also click Back to ignore the settings in that dialog box and return to the previous dialog box 1 7 1 Installation Procedure Procedure Auto Run procedure 1 Power on the printer 2 Power on your computer running Windows 98 When the printer is connected to the computer a dialog box indicating that new hardware has been detected maybe d...

Page 54: ... 8124 CD into your CD ROM drive Browse to the drivers PS folder of the CD ROM and select the appropriate language folder 3 Click on Adobe PS Setup file Icon then follow the setup process on the screen 4 Click Next 5 After reading the License Agreement click the I Accept button 6 Select Local Printer and then click Next 7 Select LPT1 and click Next 8 Select Browse ...

Page 55: ...er Driver Windows 95 98 Me 55 Setting Printer Environment 1 9 Browse to the drivers PS folder of the CD ROM and select the appropriate language folder OS Win9x Select PPD file TallyGenicom 8124 PS and click OK 10 Click OK 11 Click Next ...

Page 56: ...er can also be configured after all installation has been completed Refer to 1 7 2 Printer Driver Properties below 15 Set each item and click OK 16 Select all the options installed on the printer 17 Click Finish 18 Confirm that a printer has been added in the Printers window This completes installation of the printer driver Remove the CD ROM from the drive See 1 7 2 Printer Driver Properties P 58 ...

Page 57: ...to return to 5 and continue the operation Click the Yes button to cancel installation A printer is added in the Printers window but the printer driver is not installed properly When you right click the printer and click Properties command from the menu the Reinstall tab is added to the printer driver properties dialog box Follow the directions on that tab When you finish reinstalling the printer d...

Page 58: ...ptions Settings This section describes the settings of the Device Options tab Select the function that you want to set in Features List and change the settings in the Change box below Select all the installed opions on the printer and then click OK You can restore defaults by clicking the Restore Defaults button The settings that can be selected vary depending on which options have been installed ...

Page 59: ...Hard Disk Drive optional is mounted When the Hard Disk Drive is mounted on the machine set to Available Paper Source Sets the tray attached on the machine When 1 Tray Unit is selected Tray 2 can be used When 3 Tray Unit is selected Tray 2 Tray 3 and Tray 4 can be used Not Available 1 Tray Unit 3 Tray Unit Duplex Module Sets whether or not the Duplex Unit is mounted When the Duplex Unit is mounted ...

Page 60: ...on This setting is optimized for printing color documents vividly such as presentation documents Web Pages This setting is optimized for printing Web pages OFF The RGB Color Correction is not applied Screen You can adjust the image quality Select Gradation to print photos and gradations clearly Select Fineness to print the colors in illustrations tables or graphs evenly RGB Gamma Correction Specif...

Page 61: ... upper right or the Help button in the lower right of the printer driver properties dialog box 2 Click and a mark appears next to the pointer You can then click items for which you need explanations opening a pop up window that contains relevant information Click inside the pop up window to close it Also if you click Help an explanation of the current tab appears as Help information ...

Page 62: ...ows NT When the printer is connected to the computer a dialog box indicating that new hardware has been detected maybe displayed when you activate Windows NT In this case click Cancel to close the dialog box 3 Insert the 8124 Auto Installer CD into your CD ROM drive If the CD ROM does not start automatically go to My Computer and double click the CD ROM drive icon 4 After reading the License Agree...

Page 63: ...d select the appropriate language folder 3 Click on Adobe PS setup file Icon then follow the setup process on the screen 4 Click Next 5 After reading the License Agreement Click the Accept 6 Select Local Printer and then select Next 7 Select LPT1 and click Next 8 Select Browse 9 Browse to the drivers PS folder of the CD ROM and select the appropriate language folder and OS NT Select PPD file Tally...

Page 64: ...s NT 64 Setting Printer Environment 1 11 Click Next 12 Select shared or not shared and click Next 13 Enter the printer name specify other items as necessary and click Next 14 Click Install 15 Select whether to configure your printer now and click Next ...

Page 65: ... Options and Print Settings below 16 Set each item and click OK 17 Select all the options installed on the printer 18 Click Finish 19 Confirm that the printer has been added in the Printers window This completes installation of the printer driver Remove the CD ROM from the drive See 1 8 2 Device Options and Print Settings P 67 to configure the printer Store your CD ROM in a safe place ...

Page 66: ... button to return to step 5 and continue the operation Click the Yes button to cancel the installation A printer is added in the Printers window but the printer driver is not installed properly Select the printer and click Properties command on the File menu The Reinstall tab is added to the printer driver properties dialog box Follow the directions on that tab When you finish reinstalling see 1 8...

Page 67: ...s tabs select the printer icon in the Printers window then click Document Defaults on the File menu Device Settings Tab This section describes Installable Options in the Device Settings tab To print correctly it is necessary to make appropriate settings in this tab Select the items in Installable Options and change the settings in the Change Setting box at the bottom of the tab Settings Memory Spe...

Page 68: ...selected vary according to whether the Face Up Tray has been installed Feed Separators from Set the destination where the separators are to be fed to when the transparency separator function is used When Auto is selected the tray set on the machine is used as the feed destination None Auto Tray 1 Tray 2 Tray 3 Tray 4 Print on Separators Sets whether or not to print the details printed on the trans...

Page 69: ...ality Select Gradation to print photos and gradations clearly Select Fineness to print the colors in illustrations tables or graphs evenly Image Enhancement Specify whether to use the Image Enhancement function Selecting On smooths out boundaries when printing This reduces jagged edges thereby artificially increasing the resolution of the image When printing an image bitmap composed of coarse half...

Page 70: ... an equal size Automatically reduces images for printing as necessary Use Nearest Size No Zoom Select the nearest paper size and prints in equal size Use Larger Size With Zoom Print in an equal size on paper larger than the original Automatically reduces images for printing as necessary Use Larger Size No Zoom Print in an equal size on paper larger than the original Feed from Bypass Tray Uses pape...

Page 71: ... to use Help Procedure 1 The Help button in the figure below appears on the upper right of the printer driver properties dialog box 2 Click and a mark appears next to the pointer You can then click items for which you need explanations opening a pop up window that contains relevant information Click inside the pop up window to close it ...

Page 72: ...lso click Back to delete the settings in that dialog box and return to the previous dialog box 1 9 1 Installation Procedure Procedure 1 Start Windows 2000 Log on as a Power User group member or an Administrator Refer to the Windows 2000 documentation for details about the Power User group 2 Insert the 8124 CD into your CD ROM drive Browse to the drivers PS folder of the CD ROM and select the appro...

Page 73: ...river Windows 2000 XP Server 2003 73 Setting Printer Environment 1 8 Select Browse 9 Browse to the drivers PS folder of the CD ROM and select the appropriate language folder and OS Win2000 Select PPD file TallyGenicom 8124 PS and click OK ...

Page 74: ...d or not shared If shared is selected then Enter the printer name and click Next 13 Enter the printer name and click Next 14 Click Install 15 Select whether to configure your printer now and click Next The printer can also be configured after all installation has been completed Refer to Device Options and Print Settings section below for details ...

Page 75: ...ng the Adobe PS Printer Driver Windows 2000 XP Server 2003 75 Setting Printer Environment 1 16 Select the correct paper size loaded in the trays 17 Select the installable options fitted on the printer then click OK ...

Page 76: ...000 XP Server 2003 76 Setting Printer Environment 1 18 Click Finish 19 Confirm that the printer has been added in the Printers window This completes the installation of the printer driver Remove the CD ROM from the drive Store your CD ROM in a safe place ...

Page 77: ...nced in the Layout screen Device Settings Tab Settings This section describes Installable Options in the Device Settings tab To print correctly it is necessary to make the appropriate settings in this tab Select the items in Installable Options and change the settings in the menu that appears on the right Settings Memory Specify the amount of printer memory Hard Disk Specifies whether or not the H...

Page 78: ...d as the feed destination None Auto Tray 1 Tray 2 Tray 3 Tray 4 Print on Separators Sets whether or not to print the details printed on the transparencies on the separators as well when the transparency separator function is used Blank Separators Printed Separators Bypass Feed Orientation Specify the paper orientation when printing from the bypass tray When you set the short edge of the paper in t...

Page 79: ...he printer control panel Display Message Display paper supply messages on the printer control panel Printing is unavailable until paper is supplied Use Nearest Size With Zoom Select the nearest paper size and prints Automatically reduces images for printing as necessary Use Nearest Size No Zoom Select the nearest paper size and prints in an equal size Use Larger Size With Zoom Print in an equal si...

Page 80: ...hoto This setting is optimized for printing photos or images with gradations Select this setting when printing images in RGB Presentation This setting is optimized for printing color documents vividly such as presentation documents Web Pages This setting is optimized for printing Web pages OFF The RGB Color Correction is not applied Screen You can adjust the image quality Select Gradation to print...

Page 81: ...scribes how to use Help Procedure 1 The Help button as shown below appears on the upper right of the printer driver properties dialog box 2 Click and a mark appears next to the pointer You can then click items for which you need explanations opening a pop up window that contains relevant information Click inside the pop up window to close it ...

Page 82: ...ure to install AdobePS 8 8 as an example Procedure 1 Insert the 8124 CD into your CD ROM drive 2 Browse to the drivers PS folder of the CD ROM and select the appropriate Mac OS9 folder Click on Adobe PS Installer file Icon then follow the setup process on the srceen 3 Double click AdobePS Installer 8 8 4 Click Continue 5 Read through the license agreement carefully and if you have no objections to...

Page 83: ...on in the PPD file Procedure 1 Make sure that the machine is on 2 Check that the machine s EtherTalk port is set to Enable 3 Select the Chooser on the Apple menu then click AdobePS 4 Select your printer from the Select a PostScript Printer list box which appears to the right of the Chooser then click Create It automatically searches for the printer and sets the PPD file If the PPD file is not foun...

Page 84: ...ou can change the print settings after you install the printer driver To use the function of the options it is necessary to set Configure Always set this according to the configuration of your machine Also installable Options should normally be set automatically according to the bi directional communications with this machine You do not have to change the settings 6 Click OK Click OK once more in ...

Page 85: ... is provided with the OS Procedure 1 Insert the 8124 CD into your CD ROM drive 2 Browse to the drivers PS folder of the CD ROM and select the appropriate Mac OSX folder Double click on TallyGenicom PPD Installer Icon then follow the setup process on the srceen 3 Enter the Administrator s user name and password then click OK The License screen opens 4 Read through the license agreement carefully an...

Page 86: ...nctions based on the information in the PPD file This section describes how to add a printer on a Mac OS X v10 2 4 as an example Procedure 1 Make sure that the machine is on 2 Check that the machine s port is set to Enable When using AppleTalk set the EtherTalk port to Enable When using IP Printing set the LPD port to Enable 3 Start Print Center You can find Print Center in the Utilities folder in...

Page 87: ...r When using Apple Talk Select Apple Talk from the menu and specify the zone for the printer being used Select the printer you are using from the list Select Auto Select from Printer Model Click Add When using IP Printing Select IP Printing from the menu and enter the IP address for the printer being used in Printer s Address 1 2 3 4 1 ...

Page 88: ...TG from Printer Model and then select TallyGenicom 8124 Click Add This completes the addition of a printer Regarding printer options Click Printers on the Print Center menu bar and select Show Info Next select Installable Options and select the options that have been installed to the printer 2 3 ...

Page 89: ...llable Options for operating systems earlier than Mac OS 9 x Normally Installable Options are automatically set according to the bi directional communications with this machine You do not have to change the settings Procedure 1 Select the printer using the Chooser and click Setup The Current Printer Description File PPD Selected dialog box appears 2 Click Configure The Installable Options list app...

Page 90: ...e been installed on the printer Settings This section describes the items to set in Installable Options Memory Specify the amount of printer memory Hard Disk Specifies whether1 or not the Hard Disk Drive optional is mounted When the Hard Disk Drive is mounted on the machine set to Available Paper Source Sets the tray attached on the machine When 1 Tray Unit is selected Tray 2 can be used When 3 Tr...

Page 91: ...en the Duplex Unit is mounted on the machine set to Available Side Output Tray Specify whether an optional Face Up Tray is installed Printer Driver Settings This section describes the printer driver settings Procedure 1 On the File menu of the application click Print The Print dialog box appears 2 Select Printer Specific Options If your operating system is Mac OS X select Printer Features ...

Page 92: ...1 10 Installing the Adobe PS Printer Driver Macintosh 92 Setting Printer Environment 1 3 Specify the functions that you want to set ...

Page 93: ...set Copies Pages Feed Separators from Set the destination where the separators are to be fed to when the transparency separator function is used When Auto is selected the tray set on the machine is used as the feed destination None Auto Tray 1 Tray 2 Tray 3 Tray 4 Print on Separators Sets whether or not to print the details printed on the transparencies on the separators as well when the transpare...

Page 94: ...Screen You can adjust the image quality Select Gradation to print photos and gradations clearly Select Fineness to print the colors in illustrations tables or graphs evenly Image Enhancement Specify whether to use the Image Enhancement function Selecting On smooths out boundaries when printing This reduces jagged edges thereby artificially increasing the resolution of the image When printing an im...

Page 95: ...ints Automatically reduces images for printing as necessary Use Nearest Size No Zoom Select the nearest paper size and prints in an equal size Use Larger Size With Zoom Print in an equal size on paper larger than the original Automatically reduces images for printing as necessary Use Larger Size No Zoom Print in an equal size on paper larger than the original Feed from Bypass Tray Uses paper from ...

Page 96: ...ort on the printer and registering the printer on the network on each of the Windows 95 Windows 98 Windows Me Windows NT 4 0 Windows 2000 Windows XP Windows Server 2003 operating system OS Also you can use NetBEUI and TCP IP as the transport protocol for SMB You will need to set up the IP address on the printer and the computer if you are using TCP IP Windows XP Windows Server 2003 does not suppor...

Page 97: ...ndows 2000 Windows XP Windows Server 2003 Mac OS X computer through the OS standard LPR port standard TCP IP port for Windows 2000 Windows XP Windows Server 2003 To do this you will need to set up the IP address on the printer and the Windows NT 4 0 Windows 2000 Windows XP Windows Server 2003 Mac OS X computer And once the printer registered on the Windows NT 4 0 Windows 2000 Windows XP Windows Se...

Page 98: ...r through the OS standard TCP IP port To do this you will need to set up the IP address on the printer and the Windows 2000 Windows XP Windows Server 2003 computer Network Print Environment User Guide Chapter 2 Printing through LPD or Port Internet printing The printer supports Internet Printing Protocol IPP As Windows 2000 Windows XP Windows Server 2003 Windows Me is installed with the client sof...

Page 99: ...r can be used in an environment using Novell NetWare as a network OS Network Print Environment User Guide Chapter 5 Printing throug NetWare EtherTalk As the printer supports EtherTalk protocol you can print from Macintosh Network Print Environment User Guide Chapter 7 Printing from a Macintosh Computer ...

Page 100: ......

Page 101: ...ns 2 1 Main Components and Their Functions 102 2 2 Switching On Off the Power 106 2 3 Canceling Sleep Mode 107 2 4 Canceling Checking Print Jobs 108 2 5 Loading Configuration of Options and Paper Settings of Trays 111 ...

Page 102: ...er C lower left cover If a paper jam occurs when the printer has more than two paper trays installed open this cover to clear the paper jam 8 Power switch The switch to turn the printer on and off 9 Tray 5 bypass tray The tray used when printing with special paper Special paper such as transparencies are loaded into Tray 5 bypass tray 10 Cover A left cover Open this cover when replacing consumable...

Page 103: ...ng four colors of toner black K cyan C magenta M and yellow Y 22 Waste toner bottle The bottle to collect used toner for recycling 23 IDT unit The unit to integrate images individually created with each of four photo conductors into one so that the transfer unit can print the four color image on paper Drum cartridge The cartridge containing four photo conductors black K cyan C magenta M and yellow...

Page 104: ...r on line the printer is enabled to receive data from the computer In this guide this button is indicated as the Online button 7 Up down left right buttons Scroll through the menus setting items and option values In this guide these buttons are indicated as the buttons When using the secure sample print feature press the button buttons can scroll faster when kept down Also pressing the and buttons...

Page 105: ...he print mode screen The print mode screen displays the following Menu mode screen This is the screen to configure the settings on the printer To display the menu mode screen press the Menu button The following is the first screen of the menu mode screen For more information about the menu screen refer to Chapter 5 Setting Control Panel P 155 Name Description Printer status Indicates the status of...

Page 106: ...n the power is switched on Please wait will be displayed in the LCD on the control panel Confirm that the LCD displays Ready to print When Please wait is displayed the printer is warming up You cannot print while the printer is in this state In about 30 seconds Ready to print will be displayed instead indicating the printer is ready to print If an error message is displayed refer to 6 5 List of Me...

Page 107: ... sleep mode and starts printing The sleep mode is indicated as Power Saver mode on the control panel of the printer For information about the procedure for changing the settings of the sleep mode refer to Example Changing the power saver mode settings P 159 This printer has the low power mode besides the sleep mode The low power mode automatically decreases the temperature of the fuser unit to sav...

Page 108: ...dures to cancel print instructions from the computer Canceling with Windows The procedure to cancel print instructions from Windows is as follows Procedure 1 Click Start then select Printers and Faxes or Settings Printers depending on OS 2 Double click the icon corresponding to the printer 3 In the window displayed click any document name and then press Delete key on the keyboard Canceling with Em...

Page 109: ... follows Through this procedure you can interrupt reception of print jobs and empty the buffer Buffer is the location to store data sent from the computer You can also empty the buffer by interrupting reception of any more print jobs and printing all the print jobs spooled in the printer For more information refer to 6 8 Ejecting Remaining Data When Printing Stops Halfway Through P 240 Procedure P...

Page 110: ...lows Procedure 1 Click Start then select Printers and Faxes or Settings Printers depending on OS 2 Double click the icon corresponding to the printer 3 Check Status in the displayed window Checking with Embedded Web Server You can also use Embedded Web Server to check print jobs sent to the printer For information about Embedded Web Server refer to the On line Help for Embedded Web Server ...

Page 111: ...ppropriate settings of the printer driver manually For Windows NT 4 0 Windows 2000 Windows XP Windows Server 2003 only users with Administrator s rights can change these settings Without Administrator s rights you can only view the settings Procedure 1 Click Start on the taskbar select Printers and Faxes or Settings Printers depending on OS and display the properties dialog box corresponding to th...

Page 112: ...of Trays 112 2 Basic Operations The paper size and orientation in the Paper Tray Attributes list box are automatically updated with the detected values For the paper type in the Paper Tray Attributes list box the paper type set on the control panel is loaded ...

Page 113: ...rinting Transparencies 116 3 3 Printing Non Standard Long Paper Sizes 119 3 4 Changing Paper Types 128 3 5 Printing Confidential Documents Secure Print 130 3 6 Printing after Checking Output Result Sample Print 135 3 7 Printing E Mail E Mail Print 140 ...

Page 114: ...or information about the process refer to the manual of the application program Check the paper When you change the type of paper loaded make either of the following settings depending on the paper tray used For Trays 1 to 4 Change the paper type for the appropriate tray on the control panel For Tray 5 bypass tray Change the paper type for Tray 5 bypass tray on the printer driver 3 4 Changing Pape...

Page 115: ...es are not available when the settings for the optional accessories installed are not configured on the Options tab Unavailable features appear in gray and cannot be set Properties dialog box Example For Windows XP Tabs which appear in the Properties dialog box vary depending on the item selected from the File menu of the Printers window for Windows NT 4 0 and Windows 2000 and from the File menu o...

Page 116: ... color transparencies cannot be used Procedure For Tray 5 bypass tray 1 Load the transparencies with the side to be printed facing down 2 Fan transparencies in small amounts before loading For Tray 1 The procedure of loading transparencies into Tray 1 is the same as the procedure for loading standard size paper Refer to 4 2 1 Loading paper into Trays 1 to 4 P 151 Also you must set the paper type f...

Page 117: ...parencies may stick to each other To prevent this remove about 20 sheets from the output tray and then fan well to lower the temperature Procedure 1 Select Print from the File menu 2 Check Select Printer and then click Preferences 3 Click the Tray Output tab and then select the tray from Paper Source For transparencies you can also select Tray 1 or Tray 5 bypass tray To select Tray 1 you must set ...

Page 118: ...3 2 Printing Transparencies 118 Printing 3 5 Click the Paper tab and then select any desired size from Paper Size 6 From Output Size select the transparency size 7 Click Print to start printing 5 6 ...

Page 119: ...er Tray optional refer to When using the Banner Tray optional P 120 Procedure 1 Load long size paper in Tray 5 bypass tray with the side to be printed facing down and the end of the paper curled as shown in the figure Curl the end of the long size paper at the location as far as possible from the paper supply section Otherwise the curled end may be caught in the paper supply section resulting in c...

Page 120: ...et by one When using the Banner Tray optional Attaching the Banner Tray optional to Tray 5 bypass tray allows you to load up to 10 sheets of paper with a maximum long side length of 1200 mm Procedure 1 Spread the paper guide of Tray 5 Bypass tray to both sides 2 Insert the Banner Tray into Tray 5 bypass tray Insert it firmly to the end 3 Stand the paper holder against the printer ...

Page 121: ... edge curled as shown in the diagram 6 Adjust the paper guide of Tray 5 bypass tray to fit the paper that is loaded To prevent paper jams remove the output paper from the tray one sheet at a time After printing be sure to remove the Banner Tray and keep it in a safe place For Trays 1 to 4 The procedure for loading non standard paper sizes into Trays 1 to 4 is the same as the procedure for loading ...

Page 122: ...ng paper of non standard sizes into Tray 5 bypass tray you do not need to set the paper type on the control panel To change the paper type loaded in Trays 1 to 4 see 3 4 2 Printing after Changing the Paper Type in Trays 1 to 4 P 129 Ready to print Printer is in the standby mode 1 Press the Menu button Menu Print Language The menu screen is displayed 2 Press the or button several times Menu Admin M...

Page 123: ...o 9 Press the button Paper Size Tray 1Non Std 10 Press the Eject Set button Tray 1 Non Std X 182 Y 148 11 Enter the value using buttons and move the cursor using buttons Tray 1 Non Std X 200 Y 300 12 Press the Eject Set button Tray 1 Non Std X 200 Y 300 13 Press the Menu button the machine will be rebooted when you change Auto to Non Std and vice versa in step 10 Ready to print The printer returns...

Page 124: ...dows NT 4 0 Windows 2000 Windows XP Windows Server 2003 will affect other printers used by the computer For network printer using the form database of the server with print queue will also affect the shared printer on the same network of other computers For Windows 95 Windows 98 Windows Me defining customized paper sizes for each printer icon will not affect settings of other printers used by the ...

Page 125: ...rter than the short edge even if it is still within the allowable range 6 To name the paper size check the Name the Paper Size check box and then enter the name at the Name text box You can enter up to 14 characters for the name 7 If necessary repeat steps 4 to 6 to set the paper size 8 Click OK 9 Click Apply on the Configuration tab 10 When you customize custom sizes for Trays 1 to 4 on the contr...

Page 126: ...nding on the application program the way to display the printer properties dialog box might differ Refer to the guide of the application program used Procedure 1 Select Print from the File menu 2 Check Select Printer and then click Preferences 3 Click the Tray Output tab 4 Select the appropriate tray from Paper Source 5 For Tray 5 bypass tray select the paper type from Paper Type Bypass Tray 6 Cli...

Page 127: ...rinting Non Standard Long Paper Sizes 127 3 Printing 7 Select the document size from Paper Size 8 From Output Size select the non standard paper size which was registered 9 Click Print to start printing 7 8 ...

Page 128: ...ght differ Refer to the guide for the application program used For information about using Tray 5 bypass tray refer to 4 2 Loading Paper P 151 To print on special paper using Trays 1 to 4 3 4 2 Printing after Changing the Paper Type in Trays 1 to 4 P 129 For information about paper that can be used refer to 4 1 About Paper P 146 Procedure 1 Load special paper in Tray 5 bypass tray 2 Select Print f...

Page 129: ...For information about using Trays 1 to 4 refer to 4 2 Loading Paper P 151 To print on special paper using Tray 5 bypass tray refer to 3 4 1 Printing after Changing the Paper Type in Tray 5 bypass tray P 128 For information about paper that can be used refer to 4 1 About Paper P 146 Here we explain printing on A4 size heavyweight paper which is loaded in Tray 1 as an example Procedure 1 Select Prin...

Page 130: ...re Print You can also store print data in the printer without security Saving the frequently used document in the printer allows you to print directly from the printer without having to send print instructions from the computer You may select whether to delete the secure print data after printing during the steps for executing the secure print feature Refer to 3 5 2 Printing Secure Print Jobs Oper...

Page 131: ... Printers depending on OS and display the properties dialog box corresponding to the printer 2 Click the Configuration tab 3 Select Secure Print Sample Print User ID from the Print Features list box 4 Enter the user name consisting of up to eight alphanumeric characters in the Secure Print Sample Print User ID text box 5 When setting a password enter the password in the Password text box You can e...

Page 132: ...a At the computer Here we use Wordpad of Windows XP as an example The procedure is the same when using other OSs Depending on the application program the way to display the printer properties dialog box might differ Refer to the guide of the application program used Procedure 1 Select Print from the File menu 2 Check Select Printer and then click Preferences 3 Click the Tray Output tab 4 Click Sec...

Page 133: ...for document name 7 Click OK 8 Click Print in the General tab to start printing Operation on the control panel This section describes the procedure to output print data stored inside the machine using the Secure Print feature You can also delete the secure print data stored in the printer without printing For more information refer to Stored Documents P 190 Procedure Ready to print 1 Press the but...

Page 134: ... up to 12 bytes Continued from the previous page Select User ID 1005 User1 4 Press the button Enter Password Press Set 5 Move the cursor with the button and enter the password within four digits with the or button Enter Password Press Set 1111 6 Press the Eject Set button Select Document All documents 7 Press the or button several times to select the document Select Document 1 Report 8 Press the b...

Page 135: ...re When printing multiple copies of a document this feature saves the print data on Hard Disk Drive and then prints out only one copy first You can start printing the remaining copies on the control panel after checking the print result This feature is known as Sample Print You can delete the sample print data that is no longer necessary using the control panel Refer to 3 6 2 Printing Sample Print...

Page 136: ...lick Start on the taskbar select Printers and Faxes or Settings Printers depending on OS and display the properties dialog box for the printer 2 Click the Configuration tab 3 Select Secure Print Sample Print User ID from the Print Features list box 4 Enter the user name consisting of up to eight alphanumeric characters in the Secure Print Sample Print User ID text box 5 Click OK 3 4 5 ...

Page 137: ...a At the computer Here we use Wordpad in Windows XP as an example Depending on the application program the way to display the printer properties dialog box might differ Refer to the guide for the application program used Procedure 1 Select Print from the File menu 2 Check Select Printer and then click Preferences 3 Click the Paper tab and set Copies to at least two 4 Click the Tray Output tab 5 Cl...

Page 138: ... Name text box If the document name exceeds 12 bytes the remaining is truncated If you select Auto Retrieve you can enter up to 12 alphanumeric characters for the document name 8 Click OK 9 Click Print in the General tab to start printing Operations on the control panel This section describes the procedure to output delete print data stored inside the printer using the Sample Print feature Procedu...

Page 139: ... 2002 yamada 4 Press the or button several times to select the user ID Select User ID 2005 User1 5 Press the button Select Document All documents 6 Press the or button several times to select the document to select all documents press the button Select Document 1 Report1 7 Press the button 1 Report1 Print To delete the sample print data saved press the or button to select Delete and then press the...

Page 140: ...up of important documents stored on the Hard Disk Drive 3 7 1 Setting up the Environment for E mail Printing To use the e mail Print feature you need to configure the settings for the feature also on each server SMTP server or POP3 server in your network environment Setting up the mail environment incorrectly may cause serious trouble on the network The network administrator should set up the mail...

Page 141: ...ddress within 128 characters that can be registered as an e mail address Machine E mail Address Sets the e mail address of this machine This address is displayed at the From box on e mail Port Status Receive E mail Sets to enable receiving of e mails Protocol Settings TCP IP Host Name Sets the host name of this machine Enter any characters within 32 bytes Get DNS Address When set to ON the machine...

Page 142: ... Sets the interval to check mail in the POP3 server 1 120 minutes 10 minutes POP User Name Sets the user name for connecting to the POP3 server Only one user can be set Enter a mail address within 64 characters that can be registered as an e mail address POP User Password Set the password for each POP user name and enter the same password again at the Confirm Password box Enter a password within 6...

Page 143: ...file format of the attached document is not tif or pdf the attached document may be printed incorrectly Up to 31 documents can be attached 2 Enter the e mail address of this printer in the destination field 3 Send the e mail After the e mail has been received at the printer it will be automatically printed The e mail itself and the attached document will be printed at the printer based on the foll...

Page 144: ...o the On line Help of Embedded Web Server Precautions for using the e mail feature with this printer connected to the Internet If you do not make a flat rate contract with the Internet provider the calling rate is charged every time the printer periodically retrieves the data received Use this machine in the IP masqueraded environment If you use this machine with global IP address assigned the ope...

Page 145: ...4About Paper 4 1 About Paper 146 4 2 Loading Paper 151 ...

Page 146: ...rent from the selection on the printer driver or if the paper is loaded in an unsuitable paper tray it may cause paper jam To print correctly select the correct paper size and type as well as the paper tray Moisture derived from water rain or steam may remove the image from the printed side For details contact our Customer Support Center or your dealers G S M is the weight of a sheet of paper with...

Page 147: ...ls or general office use Paper G S M unit g m2 Paper type selection Features of the paper and precautions for use Printer driver Control panel C2 70 Plain Plain Paper with less ink penetration for general office use that is suitable for black and white as well as color printing C2r 70 Recycled Recycled Recycled paper mixed with 70 used paper pulp that is suitable for black and white as well as col...

Page 148: ...paper widely used for color printing for normal office documents Heavyweig ht paper 106 to 169 Heavyweight 1 Heavyweight 1 Regular heavyweight paper widely used for color printing of posters or catalogs 170 to 216 Heavyweight 2 Heavyweight 2 Coated paper 106 to 169 Coated 1 Coated 1 Coated paper used for printing posters or catalogs 170 to 216 Coated 2 Coated 2 Transpare ncies Transparency Transpa...

Page 149: ...convexity or catches Wrinkled creased or torn paper Paper which was printed once by an other printer or copy machine Treated colored paper Paper which is tightly stuck together due to static electricity Paper with non smooth face such as rough printing paper or fibered paper Specially coated paper Paper with staples clips ribbons or tape Bonded or glued paper Paper which has been previously printe...

Page 150: ...to put a moisture exclusion agent together in the package To prevent paper from being creased or curled lay it down on its side rather than standing it up Observe the following precautions before loading the paper into the tray Do not use a paper stack which was once scattered and collected up Do not use creased or wrinkled paper Do not use waved or curled paper Do not load different paper types t...

Page 151: ...es P 119 Procedure 1 Pull out the paper tray until it no longer comes out 2 Adjust the head of the paper guide to the desired paper size scale by using the two clips on the paper guide 1 2 Check that the paper guide is properly fixed into the hole at the scale If the paper guide is not adjusted to the size scale the paper size may not be automatically detected If so move the paper guide and then a...

Page 152: ...back in Be careful not to push the paper tray too strongly 5 If you changed the type of the paper to be loaded change the paper type on the control panel For information about paper type refer to 4 1 About Paper P 146 For information about paper type settings refer to 3 4 Changing Paper Types P 128 After changing the paper type refer to 2 5 Loading Configuration of Options and Paper Settings of Tr...

Page 153: ... stages 2 Check the position of the paper guide located in front of Tray 5 bypass tray 3 Insert paper with the side to be printed facing down and push it right to the end Different size or type paper cannot be loaded together It may cause paper jams Do not load paper exceeding the maximum fill line It may cause paper jams or machine breakdown If thick paper such as postcards are curled uncurl them...

Page 154: ... paper type If multiple paper types have the same priority the tray is selected according to the priority for the tray Auto Tray Switch is not applied to the paper type for which the priority for the paper type is not set If no appropriate tray is found in Auto Tray Switch mode a message prompting you to feed paper will appear You can also select the setting for printing to the paper of almost the...

Page 155: ...5Setting Control Panel 5 1 Outline of Common Menu 156 5 2 Description of Common Menu 161 5 3 List of Common Menu 192 ...

Page 156: ...shown below is a part of the Common Menu configuration Ready to print Menu Print Language Menu Report List Menu Meter Reading Menu Quick Setup Menu Admin Menu Common Menu Press the Menu button Mode Menu HP GL Extended settings PCL Extended settings PDF Extended settings Print Language HPGL Print Language PDF Print Language PCL Menu Meter Reading Admin Menu Network Port System Settings Parallel Por...

Page 157: ...ttings for emulation mode when optional accessories are installed printer settings error history job history font output summary 7 4 Printing Report List P 253 Meter Reading The menu for displaying the number of printed sheets in the LCD on the control panel 7 7 Check Meter P 267 Admin Menu The menu for configuring the settings for network port system such as alarm sound power saver mode printing ...

Page 158: ... the process to reset the setting completes the factory default setting is displayed Press the Eject Set button to apply the value Ready to print To display the menu setting screen Press the Menu button in the standby mode Menu Print Language To move between items Press the or button Menu Admin Menu To move between layers Press the button to move to the layer below Press the button to return to th...

Page 159: ...utton System Settings Alert Tone System Settings is displayed 6 Press the or button several times to select Power Save Mode System Settings Power Saver Mode 7 Press the button Power Saver Mode Disable The power saver mode setting screen is displayed 8 Press the or button several times to select whether to use the power saver mode or not Power Saver Mode Enable 9 Press the Ejece Set button The sett...

Page 160: ...ower save timer is displayed 13 Press the or button to set the time to switch the printer to the power saver mode in the range of 15 to 240 minutes incremented by 1 minute Power Save Timer 60Mins 14 Press the Eject Set button The time to switch the printer to the power saver mode is set and is displayed Power Save Timer 60Mins 15 Press the Menu button Ready to print The printer can receive data an...

Page 161: ...etailed settings For more information refer to 1 4 Configuring from the Computer Embedded Web Server P 39 5 2 1 Print Language Setting Print Language enables you to configure settings for HP GL HP GL 2 PDF and PCL emulation mode and settings related to the function to directly print PDF files This setting is adjusted on the Mode Menu screen HP GL HP GL 2 For information about setting items for HP ...

Page 162: ... Disable 2 sided print Long Edge Flip Enable 2 sided print with the correct orientation for documents bound on the long edge Short Edge Flip Enable 2 sided print with the correct orientation for documents bound on the short edge Print Mode Set whether to put the priority on image quality or printing speed Normal default Print at standard speed and with standard image quality High Quality Print at ...

Page 163: ...ize Set the output paper size A4 default Print on A4 size paper Auto Automatically selects the output paper size according to the document size and settings of the PDF file to be printed Output Color Set whether to print in color or black and white Color Auto default Automatically detects if the document is color or black and white by each page When any color is used the page is printed in color a...

Page 164: ...fferent orientations in multiple trays the paper loaded in landscape is given priority When the optional trays are installed Tray 2 to Tray 4 are appear in the display Output Size Sets the size of printing paper This setting can be made only when Paper Tray is set to Auto This setting can be made only for cut sheets Candidate values are shown below A4 default A3 A5 B4 B5 11 17 8 5 14 8 5 13 8 5 11...

Page 165: ...paper orientation Candidate values are shown below Long Edge Flip default Printing is done from left to right Short Edge Flip Printing is done from top to bottom Long Edge Flip and Short Edge Flip can be set when the Duplex Unit is installed Font Sets the font to be the default Candidate values are shown below CG Times CG Times Italic CG Times Bold CG Times Bold Italic Univers Medium Univers Mediu...

Page 166: ...thic Letter Gothic Italic Letter Gothic Bold Albertus Meduim Albertus Extra Bold Clarendon Condenced Coronet Marigold Arial Arial Italic Arial Bold Arial Bold Italic Times New Times New Italic Times New Bold Times New Bold Italic Symbol Wingdings Line Printer Times Roman Times Italic Times Bold Times Bold Italic Helvetica Helvetica Oblique Helvetica Bold Helvetica Bold Oblique CourierPS CourierPS ...

Page 167: ...olbook Italic New Century Shoolbook Bold New Century Shoolbook Bold Italic ITC Avant Grade Book ITC Avant Grade Book Oblique ITC Avant Grade Demi ITC Avant Grade Demi Oblique ITC Zapf Chancery Medium Italic ITC Zapf Dingbats Symbol Set Sets the specific set of symbols provided by a font with each symbol set defined with a specific application in mind Candidate values are shown below ROMAN 8 defaul...

Page 168: ...Bistream Dutch 801 SWC CG Times the four Bistream Swiss 742 SWC Univers the four Bistream Fixed Pitch 810 Courier SWC Courier and the three Fixed Pitch 850 Letter Gothic 12 pitch text SWC Letter Gothic typefaces Font Size Sets the height of the font in points Set the font size from 4 00 to 50 00 in 0 25 increments Default is 12 00 The point size item available depends on the fonts source and font ...

Page 169: ...pecified output from Netware LPD and AppleTalk cannot be changed to the operator panel If there is instruction from the host device regarding the number of output copy that value will be reflected and printed After printing the setting of the control panel will be overwritten by that value However for number of output copy specified by Netware LPD AppleTalk port the value of the control panel will...

Page 170: ...an be used to print draft quality documents so as to extend the life of your toner cartridge Draft mode will not affect the speed or performance of your printer The setting takes on default value when the NVM is initialized Color Mode Sets the color mode Auto default Automatically detects if the document is color or black and white by each page When any color is used the page is printed in color a...

Page 171: ...se of the parallel interface Set the status of ports that are not used to Disabled or change the memory allocation capacity in case of insufficient memory Print Mode 1 P 191 Set the process method targeted print language of the print data Auto default The proper process is automatically selected according to the language of the data received from the computer PS HP GL 2 PCL TIFF PJL 2 P 191 You ca...

Page 172: ...3 P 191 Set the time to output the remaining data in the printer in case data transmission is interrupted You can select from 5 to 1275 seconds per 5 seconds Default is 30Secs When the next data is not received during this time it is recognized as the end of the job Bi directional Enable or disable bi directional communications IEEE1284 for the parallel interface Default is Enable Input Prime Set ...

Page 173: ...o the language of the data received from the computer PS HP GL 2 PCL TIFF PJL 2 P 191 With this printer you can use the PJL command which does not depend on any print language The PJL command controls the print job and is necessary when you use the printer driver Setting the status of the PJL command sent from the computer enables or disables it By using the PJL command you can select the print la...

Page 174: ...age of the print data Auto default The proper process is automatically selected according to the language of the data received from the computer PS HP GL 2 PCL TIFF PJL 2 P 191 You can use the PJL command with this printer which does not depend on any print language The PJL command controls the print job and is necessary when you use the printer driver Setting the status of the PJL command sent fr...

Page 175: ...nd the printer to use TCP IP Print Mode 1 P 191 Set the process method targeted print language of the print data Auto default The proper process is automatically selected according to the language of the data received from the computer PS HP GL 2 PCL TIFF PJL 2 P 191 You can use the PJL command with this printer which does not depend on any print language The PJL command controls the print job and...

Page 176: ...rint job and is necessary when you use the printer driver Set the status of the PJL command sent from the computer to enabled or disabled By using the PJL command you can select the print language for the next data even if the machine is under another process in any print language Set Enable for normal use Default is Enable Access Control Set the access control to enabled or disabled when cancelin...

Page 177: ...he USB port to enabled or disabled when switching off the power Default is Disable Set Enable when you use the USB port Set the status of the unused port to Disable or change the memory allocation capacity in case of insufficient memory Print Mode 1 P 191 Set the process method targeted print language of the print data Auto default The proper process is automatically selected according to the lang...

Page 178: ...us of the unused port to Disable or change the memory allocation capacity in case of insufficient memory To activate the port9100 port you will need to set the IP address Print Mode 1 P 191 Set the process method targeted print language of the print data Auto default The proper process is automatically selected according to the language of the data received from the computer PS HP GL 2 PCL TIFF PJ...

Page 179: ...nformation MIB on the printer You can set 1 12 alphanumeric characters Default is Unregistered Community Trap 4 Characters listed in No 1 to 3 P 191 can be used Set a community name for the Trap using 1 12 alphanumeric characters Default is Unregistered TCP IP Setting Get IP Address Set to obtain necessary information in order to use TCP IP IP address subnet mask gateway address from the Dynamic H...

Page 180: ...ss 3 P 191 You can use these features to check the IP Address which has been obtained automatically and to set the IP Address manually Enter the IP address in a xxx xxx xxx xxx format xxx refers to the value between 0 to 255 In case the primary IP address is invalid the secondary IP address will also be invalid A wrong IP address may cause trouble to the entire network Ethernet Set the communicati...

Page 181: ... 000 the command is disabled even if On is selected IP Address 3 P 191 To limit acceptable IP addresses register the IP address from which to receive print jobs Up to 10 IP addresses can be registered The address mask is set for the registered IP address Enter the IP address and the address mask in a xxx xxx xxx xxx format xxx refer to the value between 0 to 255 For example if you set the IP Addre...

Page 182: ...ed as a password Change Password You can change the password when use of the control panel is limited Enter the present password 4 digits the setting screen for the password appears Set the new password Unless you set On for limitation of the control panel you cannot change the password OfflineAutoClear 3 P 191 Set whether to release the offline mode automatically You can set not to release or set...

Page 183: ...ut form You can select any form output on the top of the document output on the end of the document or output on each of them Banner Tray Select the tray to output the banner sheet from the Trays 1 to 4 Secure Print Set whether to use the secure print feature Enable default The secure print feature is on Disable You cannot print secure print jobs This item is available when the Hard Disk Drive opt...

Page 184: ...rly empty After the message is displayed you can normally print about 750 sheets Select whether to cancel print operation when replacing the drum cartridge Cancel Print default When the message is displayed the printing job is cancelled until the drum cartridge is replaced with a new one Continue Print The printing job will be continued even if the drum cartridge is empty This may affect the print...

Page 185: ...ayed as Custom 1 to Custom 5 Tray 1 Select from Plain Recycled Bond Heavyweight 1 Heavyweight 2 Transparency Coated 1 Coated 2 Envelope or Custom 1 to Custom 5 Loading coated paper into the Tray 5 bypass tray is recommended Trays 2 to 4 Select from Plain Recycled Bond Heavyweight 1 Coated 1 or Custom 1 to Custom 5 Loading coated paper into the Tray 5 bypass tray is recommended Tray 5 bypass tray I...

Page 186: ... Trays 1 to 4 Auto default Select when loading paper of standard size Non Std Select Non Std when printing with non standard paper size and specify its long edge and short edge by 1 mm Paper Image Qty Specify printing image quality for user number 1 to 5 from B plain paper C recycled paper S not used T not used A high quality For example if you use blue plain paper specify the name Plain Blue on t...

Page 187: ...r through the touch panel display or in Embedded Web Server This is the area for drawing the actual print image The area to be allocated to print page buffer will be the remaining area after all other memory types have been allocated As such the capacity of the print page buffer cannot be changed directly The actual capacity allocated for the print page buffer can be checked under Memory on the Sy...

Page 188: ...ory capacity of the receiving buffer specified for LPD and SMB in the range of 64 to 1024 KB incremented by 32 KB Default is 256K If the memory is greater than 384 MB the LPD is in a range of 1024 to 2048 Hard Disk Spool processing is done The receiving buffer for the spool process uses the Hard Disk Drive This item is available when the Hard Disk Drive optional is installed Memory Spool process i...

Page 189: ... is not out and then check the adjusting value Fast Scan Adjust Set the adjusting value 7 9 Adjusting Color Registration P 281 Init Del Data You can initialize the value set in the printer features stored in the NV memory the internal Hard Disk Drive and report data and delete the data such as registered forms in the printer Each value is set to a default by the initialization For information abou...

Page 190: ...meter report After the initialization the meter value is set to 0 Stored Documents Delete the document data stored as the secure print If no document is available the No stored documents message is indicated on the LCD This item is available when the Hard Disk Drive optional is installed ...

Page 191: ...ty Special cleaning only starts if the printer detects a hot and humid environment If the printer does not detect that the environment is hot and humid Cleaning not required is displayed 1 When the Auto is specified data may be deleted in case the automatically distinguished language of the original document is not applicable to the internal print language or the language is not applicable to the ...

Page 192: ...t layer Press the or button to switch the layer in a menu or to scroll the cursor _ to the right or left Press the button in the menu screen to shift one layer back and press the button to shift to the next layer Press the Eject Set button Shift to the first layer down Or configure the settings the configured value is indicated by the sign Optional Signs These signs are indicated when an optional ...

Page 193: ...5 3 List of Common Menu 193 5 Setting Control Panel To the next page ...

Page 194: ...5 3 List of Common Menu 194 5 Setting Control Panel Continued from the previous page To the next page ...

Page 195: ...5 3 List of Common Menu 195 5 Setting Control Panel Continued from the previous page To the next page ...

Page 196: ...5 3 List of Common Menu 196 5 Setting Control Panel Continued from the previous page To the next page ...

Page 197: ...5 3 List of Common Menu 197 5 Setting Control Panel Continued from the previous page ...

Page 198: ......

Page 199: ...0 6 2 Clearning Paper Jams 201 6 3 Unusual Conditions 213 6 4 Poor Print Quality 217 6 5 List of Messages 222 6 6 Network Related Problems 236 6 7 Mail Related Problems 239 6 8 Ejecting Remaining Data When Printing Stops Halfway Through 240 ...

Page 200: ...ity bad 6 4 Poor Print Quality P 217 Is a message displayed on the control panel display If a message is displayed 6 5 List of Messages P 222 Is the machine that is your computer or server set up correctly for network environment use To check the settings 6 6 Section that describes settings for each network environment Notes and restrictions on the use of this machine may be applied For a TCP IP e...

Page 201: ...ay cause the printer to break down If any pieces of paper are left in the printer the paper jam message will not disappear Clear the jammed paper while the printer is switched on If the printer is switched off print data left in the printer and information spooled in the memory will be erased Do not touch any parts inside this printer Doing so may cause poor printing When removing jammed paper mak...

Page 202: ...e jammed paper according to the steps below This section uses paper tray 1 for the explanation A paper jam message for trays 2 to 4 appears when the 3 Tray Module optional or 1 Tray Module optional is installed Procedure 1 Pull out the tray with the paper jam that is indicated on the display 2 Remove the jammed paper If the paper is torn check whether any pieces of paper are left inside the printe...

Page 203: ...ow Procedure 1 Check the back behind the paper supply section of paper tray 5 bypass tray and remove the jammed paper if there is any If multiple sheets of paper are loaded remove all the sheets at once It is recommended to load coated paper labels or envelopes one by one 2 Adjust the sheets and insert them carefully into the paper supply section with the side that is to be printed on facing down ...

Page 204: ... paper according to the steps below A paper jam message for cover C lower left cover is displayed if a 3 Tray Module optional or 1 Tray Module optional is installed 3 Tray Module Procedure 1 Slowly open cover C lower left cover while pulling the release lever 2 Remove the jammed paper If the paper is torn check whether any pieces of paper are left inside the printer 3 Slowly close cover C by pushi...

Page 205: ...e Procedure 1 Slowly open cover C lower left cover while pulling the release lever 2 Remove the jammed paper If the paper is torn check whether any pieces of paper are left inside the printer 3 Slowly close cover C lower left cover by pushing its center part ...

Page 206: ... duplex unit cover is displayed when the Duplex Unit optional is installed Procedure 1 Open paper tray 5 bypass tray 1 and slowly open cover B duplex unit cover 2 2 Push up the lever as shown in the illustration 1 and remove the jammed paper 2 If the paper is torn check whether any pieces of paper are left inside the printer 3 Return the lever to the original position 1 and close cover B duplex un...

Page 207: ...uries The image may be on the transfer rolls black rubber rollers of the BTR unit and the IDT unit When removing the jammed paper do not touch these transfer rolls Otherwise the image quality may be affected or the transfer roll may be damaged requiring replacement Procedure 1 Slowly open cover A left cover 1 while pushing up the release lever 2 2 Push down the green lever as shown in the diagram ...

Page 208: ...er 5 Return the green lever to its original position 6 Slowly close cover A left cover by pushing its center part 1 If necessary fold tray 5 bypass tray 2 Never touch the area the fuser unit and surroundings labelled High Temperature You may suffer burns If a sheet of paper is wrapped around the fuser unit or the roller do not try to remove it by yourself You may get injured or suffer burns Instea...

Page 209: ...rolls Otherwise the image quality may be affected or the transfer roll may be damaged requiring replacement Procedure 1 Slowly open cover A left cover 1 while pushing up the release lever 2 If the Banner Tray optional is installed pull it down as shown in the diagram 2 If you cannot see or reach the head of the jammed paper when opening cover A left cover pull it out in the direction indicated by ...

Page 210: ...R unit release the green lever as shown in the diagram Do not move the khaki lever 5 Pull the head of paper in the direction indicated by the arrow as shown in the diagram Make sure that the paper does not touch the chute Never touch the area the fuser unit and surroundings labelled High Temperature You may suffer burns If a sheet of paper is wrapped around the fuser unit or the roller do not try ...

Page 211: ...d of the paper with both hands and pull it out in the direction indicated by the arrows as shown in the diagram You may feel that the paper is slightly heavy when pulling it out If you do not pull the paper out straight in the direction indicated by the arrows paper may be torn and left inside the printer causing it to break down Never touch the area the fuser unit and surroundings labelled High T...

Page 212: ...roubleshooting 9 Return the green lever to its original position 10 Slowly close cover A left cover by pushing its center part 1 If necessary fold tray 5 bypass tray 2 If the Banner Tray optional is installed raise against the printer ...

Page 213: ...or remove printer covers that are secured with screws unless specifically instructed in the User Guide A high voltage component can cause electric shock Do not try to alter the printer configuration or modify any parts An unauthorized modification can cause smoke or fire Symptom Cause Action The power is not switched on Is the power switch turned off Switch on the printer 2 2 Switching On Off the ...

Page 214: ...communication connection with a parallel interface cable By default bi directional communication is set to Enable You cannot print unless your computer is set up for bi directional communication If that is the case set bi directional communication to Disable and then start printing Parallel P 171 Is the memory capacity insufficient Try to print again in the following way When Print Mode is set to ...

Page 215: ...er cord and then contact our Customer Support Center or your dealers Printing is displayed even though you did not give any printing instructions while using the parallel interface Did you switch on your computer after switching on this printer Press the Cancel Job button to cancel print Make sure that the computer is switched on before switching on this printer Print quality is bad Image data may...

Page 216: ...ty according to the print data volume For ports that are not in use it is recommended to disable them and allocate their memory for other uses Memory Settings P 187 Is High Quality or High Resolution selected in Print Mode If the settings in Print Mode are changed to Standard the printing time might be shortened On line Help for the printer driver Printing time may be long depending on the printin...

Page 217: ...amp Replace with new paper 4 2 Loading Paper P 151 Drum cartridge has deteriorated or is damaged Replace with new drum cartridge 7 2 Replacing Drum Cartridge P 245 Toner cartridge is out of toner Replace with new toner cartridge 7 1 Replacing Toner Cartridge P 242 Color dots are printed Drum cartridge has deteriorated or is damaged Replace with new drum cartridge 7 2 Replacing Drum Cartridge P 245...

Page 218: ... smeared with finger Toner is not fused Paper is stained by toner The Paper loaded in the tray is not consistent with the paper type specified on the control panel Specify the appropriate paper type for the paper that is loaded in the paper tray from the control panel 4 1 About Paper P 146 The paper is damp Replace with new paper 4 2 Loading Paper P 151 Unsuitable paper is being used Load suitable...

Page 219: ... Load suitable paper 4 2 Loading Paper P 151 Paper is wrinkled or characters are blurred Unsuitable paper is being used Load suitable paper 4 2 Loading Paper P 151 You added paper before the tray ran out of paper Do not add paper before the tray has run out of paper Remove the paper from the tray and fan it well before loading it into the tray again Add paper after the paper tray runs out of paper...

Page 220: ... 151 Print outs are too light The paper size selected on the printer driver differs from the paper that is loaded Or multiple sheets are fed at the same time Load the correct size paper or fan the paper well 4 2 Loading Paper P 151 Is the Draft Mode on Set the Draft Mode to off in the Detailed Settings of the Graphics tab of the printer driver On line Help for the printer driver Symptom Cause Acti...

Page 221: ...nd full color transparencies cannot be used Is the paper type set to Transparency If a transparency is loaded in tray 5 bypass tray Set the paper type to Transparency in the Properties dialog box of the printer driver 3 2 2 Printing Transparencies P 117 If a transparency is loaded in tray 1 Set the paper type to Transparency in the control panel Print outs are defective Is the Draft Mode feature o...

Page 222: ...ge Cause action Add paper xxxx XXXX Cause Paper tray is out of the paper of size and orientation xxxx and paper type XXXX Action Load paper of size and orientation xxxx and paper type XXXX in tray 4 2 Loading Paper P 151 All data Canceling Status Print data left in this printer is being discarded Print data cannot be received by the computer All data Ejecting Tray Status Print data left in this pr...

Page 223: ...e optional is installed data on the Hard Disk Drive may be destroyed because the power goes off due to a power failure while the printer is operating Action Press the Eject Set button Hard Disk Drive will be initialised When the Hard Disk Drive is initialized registered forms logos and secure print data are deleted When the PostScript Software Kit optional is installed the PostScript download font...

Page 224: ... Toner Bottle P 250 Load Tray xxxx XXXX Cause Paper tray is out of the paper of size and orientation xxxx and paper type XXXX Action Load paper of size and orientation xxxx and paper type XXXX in tray 4 2 Loading Paper P 151 Off line Status You pressed the Online button and the printer is in the off line state To exit the off line state press the Online button again In the off line state print dat...

Page 225: ... xxx xxx Cause Some error occurred Action Switch the printer off and on again after the display on the control panel is off If the same message appears again switch it off and unplug the power cord after the display on the control panel is off and contact our Customer Support Center or your dealers Please wait Status The system status of this printer is being diagnosed initialised This message app...

Page 226: ...eceiving from the computer are enabled 7 1 Replacing Toner Cartridge P 242 Ready to print Add Toner M Status Magenta toner cartridge has almost run out of toner Prepare a new magenta toner cartridge Print processing and print data receiving from the computer are enabled 7 1 Replacing Toner Cartridge P 242 Ready to print Add Toner Y Status Yellow toner cartridge has almost run out of toner Prepare ...

Page 227: ...B host name already exists Action Change the host name Ready to print Cause Failure occurs in this printer Action Switch the printer off and on again after the display on the control panel has turned itself off If this message appears again check error code on the display and take appropriate actions 6 5 2 List of Error Codes P 230 Replace xxx xxx See User Guide Cause Some parts need to be replace...

Page 228: ...specified Bypass wait User Action Load paper of size and orientation xxxx and paper size XXXX in tray 5 bypass tray or check that this paper is loaded in tray 5 bypass tray Then press the Eject Set button on the control panel Printing will start 4 2 Loading Paper P 151 Storing image xxxx HDD Status Secure print job is being saved Print data can be received from the computer Time to replace TonerCo...

Page 229: ...ng Tray Status Report List is being printed Print data cannot be received by the computer while a report list is being printed xxxx xxxx Printing Tray Status Secure print job is being printed Print data can be received by the computer Message Cause action ...

Page 230: ... Action Check the printing instruction 007 250 Cause Communication error occurred between this machine and the optional tray tray 2 or trays 2 to 4 Action Switch off the printer and check if the connector cables of the trays are connected correctly to the slots on the rear of the printer If the problem still persists after switching on the printer again contact our Customer Support Center or your ...

Page 231: ... with Embedded Web Server Also check the settings for the DNS server 3 7 1 Setting up the Environment for E mail Printing P 140 016 502 Cause Log in to POP3 server failed Action Check if the user name and password used by POP3 are correct with Embedded Web Server 3 7 1 Setting up the Environment for E mail Printing P 140 016 503 Cause SMTP server name is not set correctly Action Check if the SMTP ...

Page 232: ...about Print Mode refer to the On line Help for the printer driver 016 705 Cause Secure print document cannot be registered because no Hard Disk Drive optional is installed Action To use the Secure Print feature you need to install the Hard Disk Drive optional 3 5 Printing Confidential Documents Secure Print P 130 016 706 Cause The number of Secure Sample Print users exceeds the upper limit Action ...

Page 233: ...mpt to print with Auto Tray Switch specified Note that Paper Priority is automatically set to Not Selected if Custom Paper Size is selected Paper Priority P 185 016 726 Cause Though Print Mode is set to Auto the print language cannot be automatically selected It may be caused by the following PDF file is sent to this printer by using LPR when PostScript Software Kit optional is installed but no Ha...

Page 234: ... the memory used by PS For information about Print Mode refer to the On line Help for the printer driver 016 761 Cause An error occurred during image processing Action If Print Mode is set to High Resolution change it to High Quality and try to print again If the problem still persists set Print Page Mode to On and try to print For information about Print Mode and Print Page Mode refer to the On l...

Page 235: ...g P 140 016 796 Cause When you configure settings to print only the attached document an e mail without an attached document is received and discarded Action To print an e mail itself and the e mail header information as well change the setting on the Properties screen of Embedded Web Server 016 797 Cause Destination address of the mail sent to this printer by using the E mail Print feature is not...

Page 236: ... network by connecting the host device An error has occurred in the network between the host device and this printer and the connection cannot be established Unable to print Network Error is displayed Ask the network system administrator to check the network for errors Incorrect IP address for this printer is entered Unable to print Network Error is displayed Select Properties from the File menu o...

Page 237: ...tor to check if the IP address of this machine is correct Set the correct IP address for this printer When LPD Spool is set to Memory the print data sent by the host device in one print request has exceeded the upper limit of the receiving capacity Check the memory capacity of LPD Spool and then compare it with the print data that was sent in one print request 1 If the print data is a single file ...

Page 238: ...thing happens try clicking the Refresh button of the browser If nothing happens check if the printer is working properly The Refresh Status button is not working Are you using the specified OS and browser Refer to 1 4 1 About Embedded Web Server P 39 to check if your OS and browser are compatible Selecting the menu in the left frame does not change the right frame contents The screen display is di...

Page 239: ...ministrator Unable to print attached PDF files with the E mail Print feature Insufficient memory capacity may disable files that are to be printed It is recommended to add memory if you intend to print large files frequently The printer s status is not notified with the Mail Notice Service Is the printer s e mail address set Verify the setting with Embedded Web Server Is Mail Notice Service set to...

Page 240: ...isabled When you use parallel interfaces or a USB interface the print data may be received during the processing of the job depending on when you press the Online button in step 1 In this case the print data received after that is recognized as a new print job when you press the Eject Set button and is processed as a new print job after exiting the off line state in step 3 When you use parallel in...

Page 241: ...dge 245 7 3 Replacing Waste Toner Bottle 250 7 4 Printing Report List 253 7 5 Checking Printer Status by Web Browser 264 7 6 Checking Printer Status by E Mail 265 7 7 Check Meter 267 7 8 Adjusting Gradation 271 7 9 Adjusting Color Registration 281 7 10 Moving the Printer 285 ...

Page 242: ...he replacement time is coming close If so replace the toner cartridge of the color indicated in the message to continue printing Replace the toner cartridge with the power of this machine switched on When the power of the printer is switched off print data remaining in the printer and information spooled in the memory will be erased The above number of pages you can print after the message appears...

Page 243: ...rk position K means black C cyan M magenta and Y yellow 3 Pull out the toner cartridge gently Pull out the toner cartridge slowly Otherwise toner may spatter Bring the used toner cartridge to us distributor or send it back to us according to the instructions on the sheet included 4 Prepare the new cartridge containing toner of the same color as cartridge removed and shake it from side to side and ...

Page 244: ...oner cartridge to the key mark mark position and push it in to the end 6 Turn the toner cartridge clockwise until it comes to the key mark mark position and fix it The toner cartridge will not turn unless inserted to the correct position 7 Close the front cover Ready to print appears ...

Page 245: ...usly printing A4 size paper with a ratio of 5 This number may vary depending on the print contents paper size environment in use and frequency of switching on off the power of the printer You can make the printer not stop printing even when the replacement time comes For information about settings refer to Drum Life End P 184 If you continue printing without replacing the drum cartridge beyond the...

Page 246: ...de 1 and open the cover 2 2 Open the font cover 3 Pull out the waste toner bottle as shown in the diagram Toner will spill out if you tilt the removed waste toner bottle To prevent this stand it as shown in the diagram Bring the used waste toner bottle to us distributor or send it back to us according to the instructions on the sheet included ...

Page 247: ...rtridge and remove it by lifting it up slightly Be careful not to drop the drum cartridge on the floor when removing it Be careful not to touch any toner stock to the drum cartridge Lay the used drum cartridge as shown in the diagram so that you do not carelessly touch it Bring the used drum cartridge to us distributor or send it back to us according to the instructions on the sheet included 7 Tak...

Page 248: ... protective sheet on the drum cartridge 11 Pull out the protective sheet as shown in the diagram 12 Push the IDT unit slowly in to the end Do not touch the transfer roll of the IDT unit or the drum of the drum cartridge It may lower the print quality When the IDT unit is installed correctly the tab shown in the diagram also returns to the original status ...

Page 249: ...on 14 Get out a new waste toner bottle from the bag 15 Attach the waste toner bottle as shown in the diagram If the waste toner bottle is not correctly attached the front cover may not be closed or a message may appear on the front panel Attach a waste toner bottle in the frame of this machine correctly as shown in the diagram 16 Press the center of cover A left cover and close cover A slowly 1 If...

Page 250: ... the power to this printer is switched on When the power of the printer is switched off print data remaining in the printer and information spooled in the memory will be erased The number of pages mentioned above that you can print after the message appears applies to the case when continuously printing A4 size paper with a ratio of 5 This number may vary depending on the print contents paper size...

Page 251: ... the waste toner bottle as shown in the diagram Toner will spill out if you tilt the removed waste toner bottle To prevent this stand it as shown in the diagram Bring the used waste toner bottle to us distributor or send it back to us according to the instructions on the sheet included 3 Attach a waste toner bottle as shown in the diagram ...

Page 252: ...waste toner bottle is not correctly attached the front cover may not be closed or a message may appears on the front panel Attach a waste toner bottle to the frame of this printer correctly as shown in the diagram 4 Close the front cover Ready to print appears ...

Page 253: ...st Use the control panel to print these reports and lists For how to use the control panel refer to 7 4 2 Printing Report List P 254 For information about HP GL 2 Settings List HP GL 2 Logical Printers Stored Jobs List and HP GL 2 Pallet List refer to HP GL HP GL 2 Emulation Setting Guide System Settings List HP GL 2 Logical Printers Stored Jobs List Job History Report HP GL 2 Palette List Error H...

Page 254: ...nt Language The menu screen is displayed 2 Press the or button several times Menu Report List 3 Press the button Report List Job History The Report List menu is displayed 4 Press the or button several times to select Fonts List Report List Fonts List 5 Press the button Fonts List Use Set to Print 6 Press the Eject Set button Fonts List Printing Tray Fonts List will be printed Fonts List Use Set to...

Page 255: ...optional is installed current settings of 2 sided print of report lists are also printed General The number of pages printed Page Description Language and the status of fonts installed The number of pages printed indicates the respective number of color black and white pages which have been printed and total number of pages printed Page Description Language indicates the print language that can be...

Page 256: ...nt Mode specified PJL Adobe communication protocol and auto eject time NetWare Port status Print Mode specified PJL transport protocol TBCP filter operation mode device name network address tree name only for directory mode context name only for directory mode file server name only for bindery mode notification language queue search interval search times active discovery and status information LPD...

Page 257: ...d print or N Up and type the printer driver used Page Info Setting of whether color or black white print output paper size and paper type Pages Number of pages printed Sheets Number of sheets of paper printed Job Status Whether print ended normally Abnormal end message may be displayed Job History Report TallyGenicom 8124 Date Time 2003 07 11 03 07 PM Page 1 Last Page Date Time Input Source Output...

Page 258: ...High Quality If the status is still not improved set it to Standard Use Print Page Mode Increase the capacity of print page buffer Add memory For information about Print Mode and Print Page Mode refer to the On line Help for the printer driver Other Error Cause An error occurred during print processing It may be caused by the following When Paper Priority of Print Settings in the Common Menu is se...

Page 259: ... High Quality and instruct print again If the problem still persists print in Print Page Mode For information about Print Mode and Print Page Mode refer to the On line Help for the printer driver PJL Syntax Error Cause A syntax error of the PJL command occurred Action Check settings for print or correct the PJL command Invalid Page Margin Cause Page margin value is too large for valid coordinate a...

Page 260: ...cause the value larger than the printer limit was used in the print data Action Check the print data HP GL 2 Command ERR Cause An HP GL 2 command error occurred Action Check the print data Secure Print Fail Cause Secure print document cannot be registered because the Hard Disk Drive optional is not installed Action For using the secure print feature the Hard Disk Drive optional is required 3 5 Pri...

Page 261: ...used by PCL is printed Contents of the List The fonts list shows the name of the font that can be used in the standard PCL and optional emulation mode together with a sample character string Date Date when an error occurred Time Time when an error occurred Error Code Error code is printed 6 5 2 List of Error Codes P 230 Error Type Brief explanation of error Job Owner Name Name of the user who inst...

Page 262: ...t and Output Color PCL Settings List Setting on the control panel for PCL Contents of the List The following items are printed on the PCL Settings List Paper Tray Output Size Paper Size Bypass Tray Output Destination Orientation 2 Sided Print Font Symbol Set Font Size Font Pitch FormLines Quantity Image Enhancement HexDump Output Color Line Termination Draft Mode Format Settings of document size p...

Page 263: ...d Print feature 3 5 Printing Confidential Documents Secure Print P 130 3 6 Printing after Checking Output Result Sample Print P 135 Contents of the List Printer Number Registration No of logical printer Format Settings of paper size tray paper type and color mode Option Settings for 2 sided print and output tray Print Control Settings for the waiting of paper feeding confirmation for Tray 5 bypass...

Page 264: ... or configure settings of the printer by using the Web browser in the computer connected to the network This feature is called Embedded Web Server Embedded Web Server also allows you to check the remaining amount of consumables and paper in this printer 1 4 Configuring from the Computer Embedded Web Server P 39 Click the desired item to see the status ...

Page 265: ...ings have been configured Network environment Register the user account Type Description Regular notification Notifies the user that an error occurred which requires some action by the user Notice of IP address rejection Notifies that the print request is issued from an unauthorized user when printing is allowed for only certain users Notifies the IP address of the client rejected by this machine ...

Page 266: ...of 3 7 1 Setting up the Environment for E mail Printing P 141 Port Status Mail notice Service Set to Enable Protocol Settings TCP IP Specify host name how to obtain DNS server address DNS Server addresses 1 to 3 and DNS domain name Refer to Protocol Settings TCP IP of 3 7 1 Setting up the Environment for E mail Printing P 141 Protocol Settings E Mail Specifies receiving protocol POP3 server addres...

Page 267: ...ied by color mode When you print the print data which is applied to color conversion with an ICC profile on application with Auto Color Black selected the document is printed in color even if it looks black white on the monitor In this case Meter 3 color print is counted Steps for checking the meter are as follows Procedure Meter 1 Black white print Meter 2 Usually not used Meter 3 Color print Rea...

Page 268: ...rint job with no job owner specified or that performed by the 201st and subsequent user is counted in second last UnkownUser box Print of the report list is counted in last Report List box Number of color A3 size pages Number of pages printed to A3 or larger size paper in color Number of color A4 size pages Number of pages printed to A4 size paper in color Number of color B4 size pages Number of p...

Page 269: ...enu button Menu Print Language The menu screen is displayed 2 Press the or button several times Menu Report List 3 Press the button Report List Job History The Report List menu is displayed 4 Press the or button several times to select Print Meter Report List Print Meter 5 Press the button Print Meter Use Set to Print 6 Press the Eject Set button Print Meter Printing Tray1 The Printer Meter Report...

Page 270: ... Port The System Administrator Menu is displayed 4 Press the or button several times Admin Menu Init Del Data 5 Press the button Init Del Data NVM Initialization Data deletion is displayed 6 Press the or button several times Init Del Data Print Meter 7 Press the button Print Meter Use Set to Init 8 Press the Eject Set button Print Meter Initializing Print Meter Use Set to Init 9 Press the Menu but...

Page 271: ... reproduction tuning included with the printer to get the value for Lighter Darker settings and set this value for the printer You can specify low density Low middle density Mid high density High for C cyan M magenta Y yellow K black To reset the value in Lighter Darker to the default value after gradation adjustment set all values to 0 If all values are set to 0 gradation adjustment is disabled I...

Page 272: ...s in the standby mode 1 Press the Menu button Menu Print Language The menu screen is displayed 2 Press the or button several times Menu Admin Menu 3 Press the button To the next page Load A4 paper into tray 5 bypass tray Print the gradation adjustment chart Get the Lighter Darker setting Set the value in the Web browser Using CentreWare Internet Services When the network cannot be used Set the val...

Page 273: ...ment menu appears 6 Press the button Adjust Gradation Text Adjust Gradation menu appears 7 Press the or button to select the desired chart Text or Photo Text Gradation Chart 8 Press the button Load A4LEF in Bypass Press Set 9 Press the Eject Set button Gradation Chart Printing Chart will be printed Load A4LEF in Bypass Press Set 10 Press the Menu button Ready to print The printer returns to the st...

Page 274: ...all 0 Procedure 1 Fold the printed gradation adjustment chart along the guide dotted line for the desired color as shown in the diagram 2 Adjust the part of the chart with desired density to the part of the color sample with the same position For adjustment of low density L adjust Low to Low C CL Margin M ML Margin Fold Y YL Margin Fold K Fold Cyan Magenta Yellow Black Process Gray KL Margin C C C...

Page 275: ...or sample falls between two colors of adjustment patch on gradation adjustment chart read the scale on the boundary in example shown at the right 1 If the difference exceeds the specified range 6 to 6 adjust gradation assuming that difference is 6 or 6 and then adjust the gradation again 4 Write the difference in the appropriate Margin box 5 For the remaining two densities read the differences in ...

Page 276: ...ors transcribe it to the appropriate Margin box in the Computation Table at the left the chart Here we use cyan as example 8 Obtain the value based on the expression in Computation Table and write it down in Adjustment Value The value entered at the previous adjustment is displayed in Current Value ...

Page 277: ... TCP IP environment enter the value from Web browser through Embedded Web Server Otherwise use the control panel Entering the Value from a Web Browser 1 4 Configuring from the Computer Embedded Web Server P 39 Procedure 1 Start the browser on the computer 2 Enter the IP address or URL of this printer at the address column of the Web browser and then press the Enter key The Embedded Web Server scre...

Page 278: ...rol 3 Click Properties The Properties tab will be displayed 4 Click Gradation Adjustment in the area to the left The following screen will be displayed in the area to the right 5 Select the value from the density menu of the appropriate color ...

Page 279: ... to print Printer is in the standby mode 1 Press the Menu button Menu Print Language The Menu is displayed 2 Press the or button several times Menu Admin Menu 3 Press the button Admin Menu Network Port System administrator menu is displayed 4 Press the or button to select desired mode Admin Menu Image Quality 5 Press the button Image Quality Adjust Gradation Image quality adjustment menu is displa...

Page 280: ...splayed 11 Press the or button to select desired color Photo Cyan 12 Press the button Cyan Photo L 0 M 0 H 0 13 Press the button to select desired density L Low Density M Middle Density H High Density Underline appears below the selected value is displayed at the right edge until you change the value 16 To adjust other colors press the button several times until the display returns to Photo and re...

Page 281: ...splayed 2 Press the or button several times Menu Admin Menu 3 Press the button Admin Menu Network Port System administration menu is displayed 4 Press the or button several times to select Image Quality Admin Menu Image Quality 5 Press the button Image Quality Adjust Gradation Image quality adjustment menu is displayed 6 Press the or button several times Image Quality Adjust ColorRegi 7 Press the ...

Page 282: ... value read is the adjustment value Refer to 7 9 3 Entering the Adjustment Value P 283 and set the adjustment value After setting is finished print the color registration chart to read the value again If the value read is 0 Proceed to step 2 2 Read the most remarkable values of CY CM and CC in Center from Test B Read values of Left and Right in the same way Continued from the previous page Load A4...

Page 283: ...d 6 Press the or button several times To the next page Note Refer to User Guide for details LY LM LC 100 90 80 70 60 50 40 30 20 10 0 10 20 30 40 50 60 70 80 90 100 CY CM CC 100 90 80 70 60 50 40 30 20 10 0 10 20 30 40 50 60 70 80 90 100 RY RM RC 100 90 80 70 60 50 40 30 20 10 0 10 20 30 40 50 60 70 80 90 100 Test B From the shades of Y Yellow M Magenta and C Cyan record the values of the darkest ...

Page 284: ...button Enter CY CM CC 000 000 000 12 Press the button to select desired field Enter CY CM CC 000 000 000 15 To adjust other main scanning direction repeat steps 10 to 14 13 Press the or button several times Enter CY CM CC 000 100 000 14 Press the Eject Set button Fast Scan Adjust Enter CY CM CC 16 Press the or button several times Fast Scan Adjust Start Adjustment 17 Press the button Fast Scan Adj...

Page 285: ...o have more than three persons move the printer When moving the printer be sure to remove the optional tray When lifting the machine get a firm footing and bend your knees to avoid possible injuries to your back When lifting the machine face the front and rear and firmly grip the recessed areas provided on both sides and the bottom of the rear Never try to lift the printer by gripping any other ar...

Page 286: ...toner cartridge cannot be used again Replace it with a new one 7 3 Replacing Waste Toner Bottle P 250 7 2 Replacing Drum Cartridge P 245 7 If the 1 tray module or 3 tray module is installed remove it 1 Tray Module 3 Tray Module Installation Procedure Guide 8 Pack this printer so that it can be prevented from damage when transporting it ...

Page 287: ...ppendix A Main Specifications 288 B Optional Products and Consumables 294 C Service Life of Consumables and Regular Replacement Parts 296 D Obtaining Product Information 297 E Precautions Limitations 298 ...

Page 288: ...ed 20 sheets minute A4 9 5 sheets minute A4 8 5 sheets minute B4 7 8 sheets minute A3 Heavyweight 1 Heavyweight 2 1 sided 12 sheets minute A4 6 5 sheets minute A3 Feeding paper from Tray 5 bypass tray Transparencies 1 sided 6 sheets minute A4 Post cards 12 sheets minute Envelopes 12 sheets minute Resolution Output resolution 1200 dpi 47 2 dots mm 600 dpi multi value 23 6 dots mm Data resolution 12...

Page 289: ... 1200 mm Duplex Unit optional Standard size A3 B4 A4 A4 B5 B5 A5 8 5 11 Letter 8 5 11 Letter 8 5 14 Legal 8 5 13 Folio 11 17 Ladger 8K 267 388 mm 16K 194 267 mm Non standard sizes Short edge 182 to 297 mm long edge 148 to 431 8 mm However except for sizes with a short edge less than 182 mm and long edge exceeding 297 mm Paper supply For A4 paper size p paper Standard mode Tray 1 500 sheets Tray 5 ...

Page 290: ...P IPX SPX NetBEUI and UDP IP Network services LPD SMB NetWare EtherTalk SNMP HTML HTTP DHCP WinsClient DNS IPP and Port9100 Driver supporting OS Windows 95 Windows 98 Windows Me Windows NT 4 0 Windows 2000 Windows XP Windows Server 2003 Macintosh Operating noise In operation 6 3 B A 51 dB A In the standby mode 4 0B A 25 dB A Based on ISO7779 standards Unit B A Sound power level Unit dB A Emission ...

Page 291: ...nting command is as follows This may vary according to control language of each printer or plotter used Machine space required Standard 1128 W 1656 D mm Weight including consumables Standard 59 4 kg Standard 1 tray module 73 4 kg Standard 3 tray module 91 4 kg Item Description Top 4 1mm Right 4 1mm Bottom 4 1mm Left 4 1mm Printable area Non printable area ...

Page 292: ... as follows In addition the internal outline fonts cannot be used for PostScript Equipped Name PCL HP GL HP GL 2 Stroke fonts CS Times Roman CS Times Bold CS Times Bold Italic CS Times Italic CS Courier Medium CS Courier Bold CS Courier Bold Oblique CS Courier Oblique CS Triumvirate CS Triumvirate Bold CS Triumvirate Bold Italic CS Triumvirate Italic CS Symbol ITC ZapfDingbats Arial Arial Bold Ari...

Page 293: ...A Main Specifications 293 Appendix Times New Roman Times New Roman Bold Times New Roman Italic Times New Roman Bold Italic Century Symbol Wingdings OCRB Name PCL HP GL HP GL 2 ...

Page 294: ... print on long paper size 1 Tray Module 043609 The paper tray which can be loaded with up to 500 sheets of plain paper P paper 3 Tray Module 043608 This cabinet consists of three paper trays each of which can be loaded with up to 500 sheets of plain paper P paper Duplex Unit 043610 This module enables 2 sided print Available memory of 384 MB or more is required to use it Face Up Tray 043611 This t...

Page 295: ...m near a source of fire Exposing consumables to direct sunlight Storing consumables in a dusty environment Before using consumables carefully read the Handling Instructions provided in the package or in their container It is recommended that you keep spare consumables For purchase orders contact our Customer Support Center or your dealers or our distributor with the item code Product name Product ...

Page 296: ... replacement Maintenance performance parts We stock expendable accessories and the maintenance performance parts parts that are necessary for printer maintenance for machines for 7 years after The machines become obsolete Product name The number of printable pages Toner Cartridge Black Starter pack About 7 500 pages Toner Cartridge HC Black About 15 000 pages Toner Cartridge Cyan Starter pack Abou...

Page 297: ...lowing information is provided on our internet home page Latest product information Latest software Recommended applications Limitations of applications URL http www tallygenicom com The company will not be responsible for any communications fee incurred ...

Page 298: ...nd logs will not be deleted When the print result is different from the settings Insufficient capacity of the print page buffer may cause unexpected print results such as the following In this case it is recommended to add memory capacity Printed only on one side of the paper when 2 sided print is specified The job is cancelled when the data cannot be stored in the print page buffer the job includ...

Page 299: ...nment used it may be necessary to set the subnet mask and gateway Consult your network administrator before defining the needed item If setting the port to Enable leads to insufficient memory the port status may be set to Disable automatically In this case either set the port to Disable when it is not used or change the memory allocation capacity Specify the size for the receiving buffer memory LP...

Page 300: ...n sent When LPD Spool is set to Off All print data spooled to the receive buffer of this printer including data in the process of printing will be deleted When switching on the power again the print data will not be found However if the power is switched off immediately after the print data has been sent the print data may be stored in the computer In this case when switching on the power again th...

Page 301: ...anceling sleep mode 107 capacity of output tray 289 caster 102 Embedded Web Server 39 checking total number of printed page by meter 267 collated 163 color mode 170 Configuration tab 58 consumables 295 contents of the printer meter report 268 control panel 102 104 cover A 102 cover B 102 cover C 102 cover for printer options 103 D Device settings tab 67 77 document stopper 102 draft mode 170 drum ...

Page 302: ...net printing 98 InternetServices 180 IP address 33 IPP 98 176 IPX SPXGFrameType 180 J job history report 257 L left cover 102 line termination 170 list of common menu 192 list of consumables 294 list of error codes 230 list of messages 222 list of optional products 294 lower left cover 102 low power mode 107 LPD 173 M machine clock 183 machine space required 291 mail notice service 265 main compon...

Page 303: ...t 261 Printer Specific Options Settings 91 printing list 254 printing long paper size 119 printing non standard paper size 119 printing report 254 printing speed 288 printing transparencies 116 process mode 162 properties dialog box 115 PS 187 Q quantity 162 169 R replacing toner cartridge 242 replacing waste toner bottle 250 S sample print 135 secure print 130 183 service life of consumables 296 ...

Page 304: ...ing 179 the system administrator menu 171 TIFF logical printers list 262 TIFF settings list 262 toner cartridge 103 tray priority 186 troubleshooting 199 U USB 177 USB connector 103 W warm up time 288 waste toner bottle 103 weight 291 WINS server 180 ...

Page 305: ......

Page 306: ...gstoke Hampshire RG24 8PD England U K Phone 44 870 872 2888 Fax 44 870 872 2889 http www tallygenicom co uk CANADA TallyGenicom 125 Traders Boulevard 9 Missisauga Ontario L4Z 2E5 Canada Phone 1 905 8904646 Fax 1 905 8904567 http www tallygenicom com MALAYSIA TallyGenicom Sdn Bhd Wisma KT Suite 3 02 No 14 Jalan 19 1 46300 Petaling Jaya Selangor Darul Ehsan Malaysia Phone 3 7625 1988 Fax 3 7625 2688...

Reviews: