


85
Hot-swappable parts
C
hap
te
r 6
P
a
rt
s
R
epl
a
ceme
n
t
2
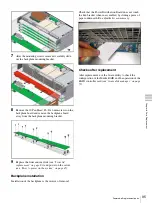
Lift the HDD from the carrier and set it down.
HDD installation in carrier
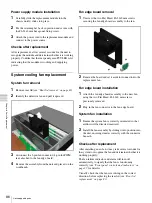
1
Insert the replacement hard disk drive into the carrier,
ensuring that the connector faces the rear of the tray.
2
Insert the four Pan Head, Thin Head Type, #6-
32x5 mm screws, previously removed, to secure the
hard disk drive to the carrier.
Carrier installation
1
Insert the HDD carrier into its drive slot.
2
Push the tray in by pushing the release button. Do not
use the aluminium handle to push-in the drive tray.
Make sure the front of the tray is flush with the front
of the chassis.
3
Close the aluminium handle to lock it in place.
Checks after replacement
After replacement, the HDD must be connected using the
RAID Controller Card 3ware utility (see
) to rebuild the data from the ‘mirror’
drive - this may take several hours. Do not replace any
further HDDs during this time or data may be irretrievably
lost.
Power supply module replacement
Three power supply modules are used to supply power to
the server unit.
Locate the faulty power supply module by checking the
green LEDs on the rear of the power supply module. The
module with the unlit LED is defective and should be
replaced.
Power supply module removal
1
Isolate and unplug the AC power cord from the
defective power supply module.
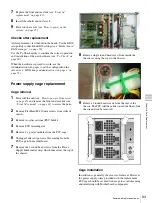
2
Remove the #6-32x6 mm hexagonal fixing screw on
the retaining bar that secures the power supply
modules.
3
Remove the retaining bar.
4
Squeeze the latch at the right side of the power supply
handle to release the latch locking mechanism.
Danger of burns - the temperature on the surface of
the power supply module maybe around 48°C
(120°F) to 60°C (140°F) depending on the ambient
temperature. Wear protective gloves as needed.
5
Pull the power supply module straight out clear of the
chassis and set it down on the workbench.
Hard disk Drive
Carrier
Warning
Retaining bar
Fixing screw
Summary of Contents for HDXS-C200
Page 2: ...2 ...
Page 10: ...10 Table of Contents ...
Page 13: ...13 Functional description Chapter 1 Overview ...
Page 68: ...68 PuTTY terminal emulator Chapter 4 Utilities ...
Page 96: ...96 Powered off replacement parts Chapter 6 Parts Replacement ...
Page 101: ...101 Parts location Chapter 8 Spare Parts Parts location 1 2 2 2 2 2 2 2 2 2 2 2 2 ...
Page 102: ...102 Parts location Chapter 8 Spare Parts 101 102 103 104 104 104 104 104 104 104 104 104 ...
Page 104: ...104 Parts location Chapter 8 Spare Parts A B A B 301 302 303 304 305 306 306 306 306 306 ...
Page 105: ...105 ...
Page 106: ...Sony Corporation ...


