Connect mains supply and network
Procedure
IMPORTANT
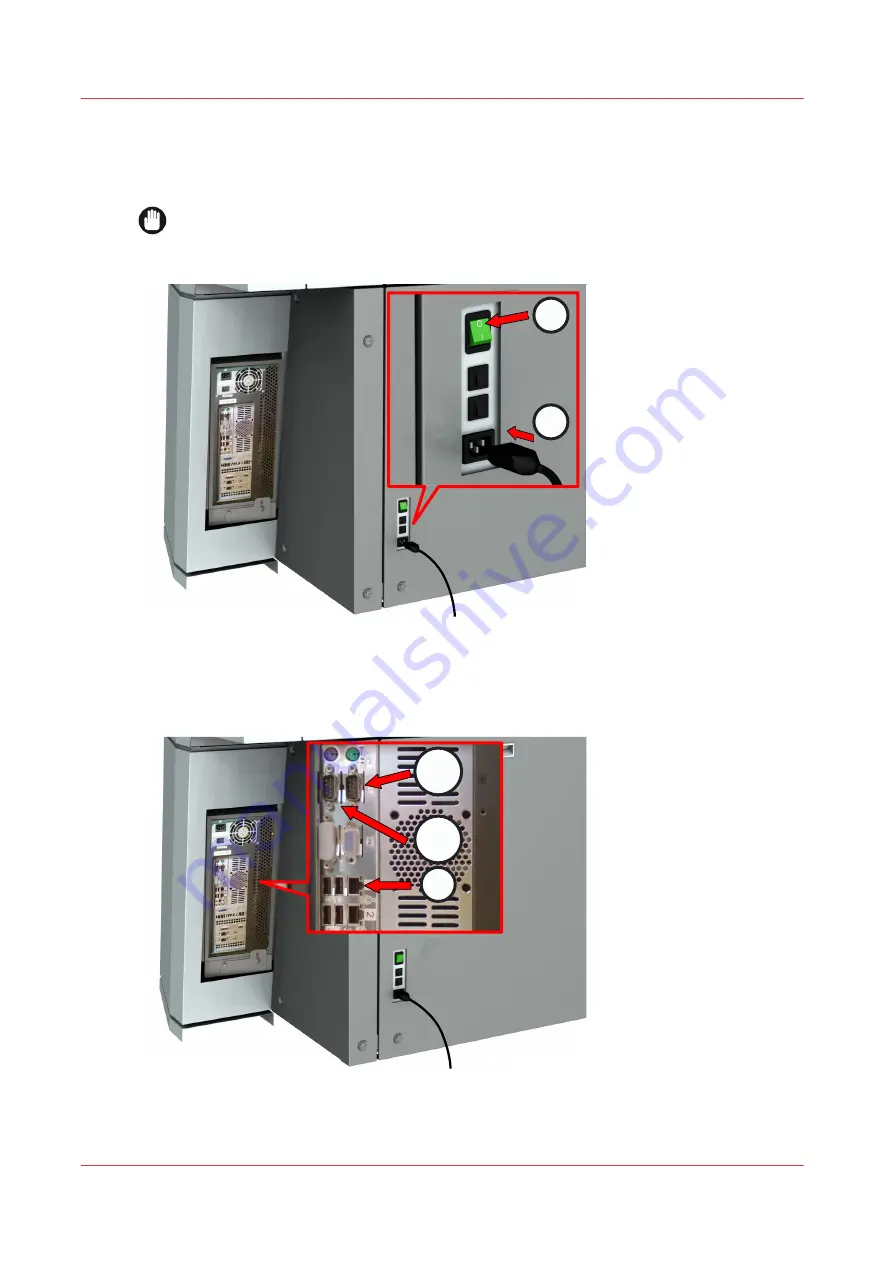
Make sure the power switch [A] is in off position.
1.
Plug the mains supply cable into the power connection at the back of the printer [B].
A
B
2.
Plug the other side of the mains supply cable into the wall socket.
3.
Make sure one end of the network cable is connected to your company network.
4.
Plug the other end of the network cable into the network connection at the left back of the printer
[C], to connect the printer to your company network.
D2
D1
C
5.
Optionally, connect your finishing device.
• If you use an Estefold 5011/5013 use connection [D1]
Connect mains supply and network
42
Chapter 3 - Getting started
Summary of Contents for ColorWave 900
Page 1: ...Operation guide Oc ColorWave 900 User Manual...
Page 7: ...Chapter 1 Introduction...
Page 14: ...Available documentation 14 Chapter 1 Introduction...
Page 15: ...Chapter 2 Explore the print system...
Page 33: ...Ease of operation Chapter 2 Explore the print system 33...
Page 40: ...Status of the printer 40 Chapter 2 Explore the print system...
Page 41: ...Chapter 3 Getting started...
Page 56: ...Move the printer 56 Chapter 3 Getting started...
Page 57: ...Chapter 4 Media handling...
Page 78: ...Check the media compatibility with folding devices 78 Chapter 4 Media handling...
Page 79: ...Chapter 5 Configure the print system...
Page 101: ...The Preferences System settings Chapter 5 Configure the print system 101...
Page 136: ...Accounting workflow 136 Chapter 5 Configure the print system...
Page 137: ...Chapter 6 Plan jobs...
Page 149: ...Chapter 7 Print jobs...
Page 163: ...Chapter 8 Adjust the print quality and print productivity...
Page 175: ...Chapter 9 Maintain the print system...
Page 190: ...Align printheads Manual horizontal 190 Chapter 9 Maintain the print system...
Page 259: ...Chapter 10 Troubleshooting...
Page 287: ...Chapter 11 Support...
Page 294: ...Downloads and support for your product 294 Chapter 11 Support...
Page 295: ...Chapter 12 References...
Page 319: ......


