


Drawing
105
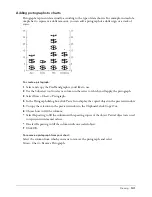
Creating a graphic hose
In a graphic hose, you can include up to 10 objects. These objects can be from your current
FreeHand document or from other documents. You can also use symbols as elements in a hose.
By using symbols, you can modify the symbol element to update all objects created by the graphic
hose automatically.
For more information, see “Using the Library panel” on page 297.
To create a graphic hose:
1
In the Tools panel, if the Graphic Hose tool is not showing, select it from its pop-up menu.
2
Double-click the Graphic Hose tool.
3
Choose a method to create a new set:
•
Select New from the Sets pop-up menu to add a new set.
•
Select Rename or Duplicate from the pop-up menu to base the new set on an existing one.
4
In the dialog box that appears, name the new set and click Save to add it to the list.
Note:
Hoses are stored in the Macromedia/FreeHand/11/English/Graphic Hose folder within your user-specific
Application Data (Windows) or Application Support (Macintosh) folder. The location of your user-specific
Application Data or Application Support folder can vary depending upon your operating system. For information
on how to locate this folder, see your operating system’s documentation.
5
In your document, select artwork to include in the hose.
6
Select Edit > Copy.
7
In the Graphic Hose dialog box, click Paste In. The artwork appears in the preview window as
an object in the Contents pop-up menu.
Each new object you add to a hose is assigned the name Object-1, Object-2, and so on. You
can select an object name from the Contents pop-up menu to preview it.
Note:
Avoid placing too many memory-intensive objects such as lenses, EPS images, and TIFF images in a
hose. In general, spraying a great number of these objects increases file size.
8
Repeat steps 5 through 7 as needed to complete the hose.
To delete a hose:
Locate and delete the FreeHand file for the hose in the Macromedia/FreeHand/11/English/
Graphic Hose folder within your user-specific Application Data (Windows) or Application
Support (Macintosh) folder.
Note:
The location of your user-specific Application Data or Application Support folder can vary depending upon
your operating system. For information on how to locate this folder, see your operating system’s documentation.
To restore the default hoses:
1
Navigate to the Graphic Hoses folder in the Installer/Support folder on the FreeHand MX
installation CD.
2
Copy any or all of the default hose files to the Graphic Hoses folder in the Macromedia/
FreeHand/11/English/Graphic Hose folder within your user-specific Application Data
(Windows) or Application Support (Macintosh) folder.
Note:
The location of your user-specific Application Data or Application Support folder can vary depending
upon your operating system. For information on how to locate this folder, see your operating system’s
documentation.
Summary of Contents for FreeHand MX
Page 1: ...Using FreeHand MX Macromedia FreeHand MX...
Page 42: ...Chapter 1 42...
Page 192: ...Chapter 6 192...
Page 232: ...Chapter 7 232...
Page 288: ...Chapter 8 288...
Page 308: ...Chapter 9 308...
Page 340: ...Chapter 11 340...
Page 362: ...Chapter 12 362...
Page 374: ...Chapter 13 374...
Page 388: ...Chapter 14 388...


