background image

Scan


98

Sca

n

3

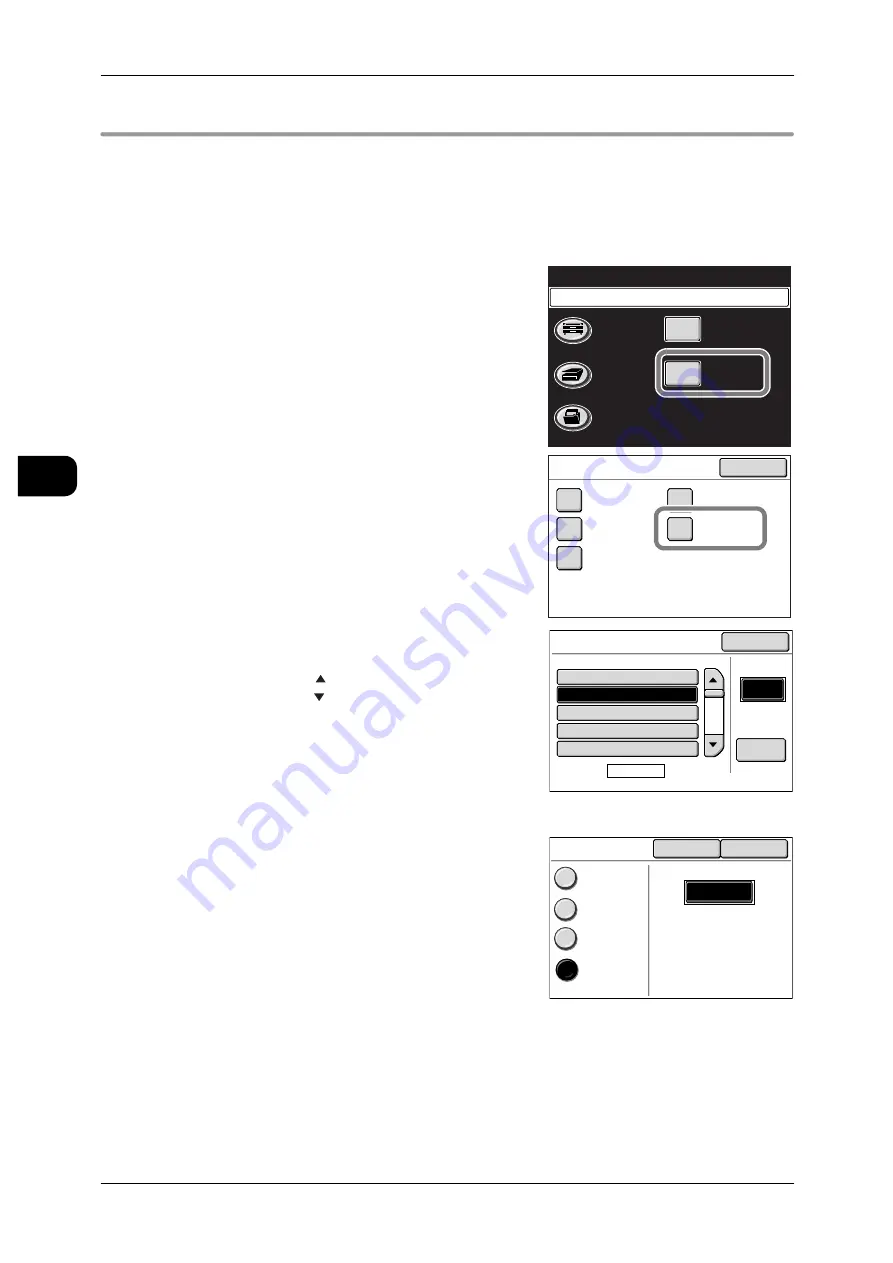
Creating Mailboxes

Up to 100 mailboxes can be created on the machine.

Note

Mailboxes can also be created with CentreWare Internet Services.
For details of how to create mailboxes via CentreWare Internet Services, refer to Centre-
Ware Internet Services Help.

1

Press the <Menu> button.

2

Select [Setup Menu].

3

Select [Mailbox]. 

4

Select a mailbox number not in use and press 
[Create/Edit].

Note

Press [ ] to display the previous screen and 
press [ ] to display the next screen.

To specify the mailbox number directly, enter a
3-digit number with the numeric keypad under
[Go to].

To change the settings of an already-regis-
tered mailbox, select a mailbox, and select
[Create/Edit].

5

Set a password, and press [Save].

Note

Enter four digits from 0 to 9 for the password.

For details of how to set a password, refer to
"Password" on the next page.

Menu

Copy

Scan

Stored
Programming

Setup Menu

Language

Please select the required service.

Close

Setup Menu

Stored
Copy Program

Stored
Scan Program

Stored Multi-
Job Program

Mailbox

Program
Distribution

Mailbox

Mailbox Name

Page

1 of 20

Go to

(001-100)

Create

/Edit

#

A Mailbox

001.

(Not in Use)

002.

(Not in Use)

003.

(Not in Use)

004.

(Not in Use)

005.

Close

Password

Cancel

Save

Password

Off

To Scan

To Scan & 
Retrieve

To Retrieve

****

Summary of Contents for DocuWide 6035

Page 1: ...Scan Scan Copy Before Using the Machine Stored Programming Appendix Machine Status System Settings Authentication Ploblem Solving Maintenance Job Status Printing Direct Scan Scan Copy Before Using the...

Page 2: ...f there is any problem in the hard disk Fuji Xerox is not responsible for any direct and indirect damages arising from or caused by such data loss As for the data set for Authentication Logical Printe...

Page 3: ...Components and their Functions 26 Names and Functions of Components of Machine 26 Control Panel 29 Using the Touch screen 31 Power On Off 33 Powering On 33 Powering Off 34 Power Saver Mode 35 Changin...

Page 4: ...Folding Copies 66 Copy Features 67 Copy Basic Copy screen 69 Reduce Enlarge 69 Media Supply 70 Media Type 71 Media Cut Mode 72 Copy Basic Copy Auto R E screen 73 Original Orientation 73 Media Size 74...

Page 5: ...e Format Scan Service 108 Using CentreWare Internet Services 110 Deleting Documents in Mailboxes 112 Scanning Multiple Documents as One Set 113 Stopping Scan Job 115 Interrupting for a Scan Job 116 Sc...

Page 6: ...us and Conditions with CentreWare Internet Services 140 Cancel Printing Operating the machine from its control panel 141 About Confidential Print 142 Secure Print 143 Private Charge Print 147 6 Job St...

Page 7: ...194 Functions Restricted by Authentication 195 Users Controlled by Authentication 196 Authentication and Mailboxes 197 Authentication Feature Settings 199 Step1 Authentication Settings 199 Step2 User...

Page 8: ...riginal Direction 238 Auto R E Default Settings 238 Detailed Settings 239 Scan Settings 240 Presets 240 Scan Defaults 241 Preset Size Buttons 243 Reduce Enlarge Buttons 244 Other Settings 244 Detailed...

Page 9: ...w of Machine Status 258 Machine Information 259 Billing Meter 261 Media Settings 262 13 Appendix Specifications 266 List of Options 276 Document Catch Tray 278 Notes and Restrictions 279 Notes and Res...

Page 10: ...ding this guide be sure to keep it handy for quick reference It will be useful in case you forget how to perform operations or if a problem occurs with the machine The equipment is certified by NEMKO...

Page 11: ...models as follows The DocuWide 6055 MF 4 roll model is used for explanation on this manual DocuWide 6035 6055 MF This model has copy print scan functions DocuWide 6035 6055 This model has only print...

Page 12: ...oftware to import scanned documents on the machine to your computer Wide Format Scan Service Wide Format Scan Service is software to import scanned documents on the machine to your computer with simpl...

Page 13: ...g paper jams daily care various settings items and safety information Quick Guide Introduces the main features of the machine as well as simple operating instructions DocuWide 6035 6055 Utilities help...

Page 14: ...res and operations 4 Direct Scan Describes the direct scan features and operations 5 Printing Describes the operations of printing from a computer 6 Job Status Describes procedures for confirming jobs...

Page 15: ...in the touch screen as well as the names of menus commands windows or dialog boxes displayed on the com puter screen and their button and menu names button Indicates a hardware button on the control p...

Page 16: ...arranty Contact your local Fuji Xerox representative for more information Used for item that if not followed strictly can lead death or severe or fatal injuries and the possibility to do it is compara...

Page 17: ...current in a connector It may generate heat and eventually cause a fire accident To avoid the risk of electric shock and a fire accident only use the power cord supplied with this product or the ones...

Page 18: ...ocate this product in the following places z Near radiators or any other heat sources z Near volatile flammable materials such as curtains z In the hot humid dusty or poorly ventilated environment z I...

Page 19: ...ors by covers or protectors which require a tool to remove To prevent electric shock and injuries never remove those covers and protectors To avoid the risk of electric shock and a fire accident switc...

Page 20: ...lt interrupter is embedded in this product If current leakage occurs the ground fault interrupter automatically cuts off power circuit to prevent electric shock and a fire accident The ground fault in...

Page 21: ...for its disposal Keep the drum and toner cartridges out of the reach of children If a child accidentally swallows toner spit it out rinse mouth with water drink water and consult a physician immediate...

Page 22: ...ing instructions marked on or supplied with this product To avoid the risk of burns and injuries never touch the area with the High Temperature or Sharp Edges marks on Never touch the exposed connecto...

Page 23: ...ce to radio communications However there is no guarantee that interference will not occur in a particular installation If this product does cause harmful interference to radio or television reception...

Page 24: ...materials or energy recovery z Proper disposal is required for toner cartridges or waste toner containers and drums photoreceptors no longer needed Do not open toner cartridges or waste toner containe...

Page 25: ...be illegal to copy or print in your country z Currency z Banknotes and checks z Bank and government bonds and securities z Passports and identification cards z Copyright material or trademarks without...

Page 26: ......

Page 27: ...as naming each component switching the machine on and off the operation of the touch screen and power saving settings z Machine Components and their Functions 26 z Power On Off 33 z Power Saver Mode 3...

Page 28: ...the right edge lever and open this cover to clear a document jam 4 Document Guide Align the right edge of document with this guide 5 Document Measuring Gauge Remove this gauge to measure thick docume...

Page 29: ...connect a computer 17 Maintenance Connector Do not use this connector because it is available only for our customer engineers 18 Option Interface Connector Used to connect Scan Counter Kit the optiona...

Page 30: ...ervice port Do not use the service port It is intended to be used only by our customer engineers Important Turn off the power of the machine and then connect the LAN cable 26 Toner Supply Port Toner i...

Page 31: ...d The Custom 2 button is not available for use See To register functions in this button Custom Buttons P 216 3 Menu Button Used to display the menu screen 4 Copy from Memory Button Indicator Used to r...

Page 32: ...umed 9 Stop Button Used to stop the scanning of the document in progress 10 Numeric Keypad Press this button to clear values entered on the numeric keypad 11 Start Button Used to start scanning a docu...

Page 33: ...s Enter the number of copies required using the numeric keypad ranging from 1 to 99 Press the C button to return the settings to 1 Check Box Press to select settings When selected a check mark is disp...

Page 34: ...r at a time Component Function Entry Area Press the entry range for numerical values then use the numeric keypad to enter the numerical value directly Displays the value entered on the numeric keypad...

Page 35: ...achine is switched off it will use up power of 12 W or less To avoid the consumption of this power you have to turn the power breaker of the printer main power switch off and unplug from the power out...

Page 36: ...ion Mode is displayed 2 Press the power switch to the side Important Power off processing is performed internally on the machine for a while after the power switch is turned off Therefore do not turn...

Page 37: ...ts To use the machine press the Power Saver button The Power Saver button goes out to indicate that the Power Saver feature is canceled Changing the Power Saver Mode Change Interval The time elapsing...

Page 38: ...last operation to low power mode from 5 to 240 minutes in 1 minute increments System Administrator Menu User Mode System Settings Check Repair Rgquests Common Settings Audio Tones Watermark Machine C...

Page 39: ...d Exiting the Power Saver Mode This section describes how to exit the Power Saver mode The Power Saver mode is exited by either z By pressing the Power Saver button z Receiving print data z When Exter...

Page 40: ...ng documents z The scanning area may become soiled if documents contaminated by glue or adhesive tape or documents on which corrective fluids have been used are placed in the scanner Take extreme caut...

Page 41: ...and print results Media Source Weight Loadable media size Recommended media Name G S M Media Weight Roll 1 Roll 2 Roll 3 Roll 4 Plain paper 64 81 4 g m2 Vellum 55 112 g m2 Film 75um 100um A0 A1 A2 A3...

Page 42: ...he Weight type set with Media Settings For setting method Media Settings P 44 Handling and Storing Media Handling Media Do not use media that has been folded creased or heavily curled It may result in...

Page 43: ...ve of the tape is com pletely removed When the adhesive gets inside of the machine the print quality may decrease Note When changing the media types size or weight ensure to change the media settings...

Page 44: ...t on the shaft guide of the tray 6 Rotate the roll media until the lead edge is securely inserted into the bottom of the roller The roll media is automatically loaded and stops Important If the roll m...

Page 45: ...rations For the setting method Media Settings P 44 1 Align the size guides of the manual feed tray to the size of the paper 2 Align the right edge of the media with the size guide and insert the lead...

Page 46: ...B4 ISO B series ISO B1 ISO B2 ISO B3 ISO B4 Special 1 series 880mm 625mm 440mm A3 A4 Special 2 series 860mm 620mm 435mm A3 A4 Arch 1 series 36 24 18 12 9 Arch 2 series 30 24 15 12 9 ANSI series 34 22...

Page 47: ...0 90g m2 Gateway73 73g m2 Film Premium Translucent 75 micron 75um Heavy Bond Vellum Film Premium Translucent 100 micron 100um Close Machine Info Billing Meters Media Settings Size Series Type Weight M...

Page 48: ......

Page 49: ...l Feeding 55 z Copying with Auto R E 56 z Interrupting for a Copy Job 58 z Reprinting Copy from Memory 59 z Making Sample Copies 61 z Applying Stamp to Copies 63 z Printing Control Number on the Backg...

Page 50: ...ures to set from the More Fea tures tab See Copy More Features screen P 80 Job Status Machine Status Log In Out Clear All Interrupt Start Stop Transmitting Copy Scan Menu Job in memory Copy from Memor...

Page 51: ...is automatically fed in and then stops at a certain position Then the machine starts scanning automatically Important Hold the document until the scanning starts or a jam may occur Note If the start m...

Page 52: ...document to be scanned 2 Adjust the document thickness adjustment lever to the thickness of the documents to be scanned 3 Align the document to the document guide and then insert it with the side to b...

Page 53: ...top screen appears select OK All scanned document images are deleted and the copy job is canceled Note Selecting Cancel allows the machine to con tinue the copy job Job Status Machine Status Log In Ou...

Page 54: ...n 3 Select Collated and press Close You can also set whether or not to insert a ban ner sheet or whether the output order is First in First out Forward or Last in First out Reverse See Banner Sheet P...

Page 55: ...ast Original Select this button when there are no more documents to be scanned Stop Select this button to stop the current document scanning or copy job 6 Set the second document 7 Select Last Origina...

Page 56: ...er of documents 800 sheets Maximum number of programs 300 patterns Maximum number of virtual distribution desti nations 40 bins Maximum copy quantity for a program 99 cop ies Job Status Machine Status...

Page 57: ...e document with its edge aligned to the document guide See Step3 Scanning Document P 49 The document is scanned and a message Install media Manual Feed Tray is displayed 6 Load media of the size orien...

Page 58: ...and media type for the document orientation and size See Advanced Settings of Auto R E P 75 3 Confirm Media Size for the document size and confirm Media Type Media Size Press this button to change th...

Page 59: ...Copy 2 6 Set the document with its edge aligned to the document guide The machine starts scanning and then copies are output per the settings for media size output orientation and media type See Step...

Page 60: ...nterrupt has been requested The current job is suspended When the machine is ready for the interrupt the Interrupt indicator illuminates 2 Set interruption copy conditions such as the ratio 3 Enter th...

Page 61: ...e can also be disabled For the setting method refer to Detailed Common Settings P 273 The following operation is disabled during copying from memory z Interrupting for a copy job 1 Press the Copy from...

Page 62: ...om memory operation is completed press the Copy from Memory button indicator again The Copy from Memory mode is canceled Note The Copy from Memory mode is automatically canceled after a predetermined...

Page 63: ...t When copying is executed with Auto R E When copying is executed with manual feeding During a sample copy job the following functions cannot be executed Interrupting for a copy job Reprinting Copy fr...

Page 64: ...e copy settings are reset to default each time To print additional sample copies set Sample Copy to Yes again 6 When you have obtained an optimized sample copy press the Copy from Memory button indica...

Page 65: ...ings for Original Orientation P 73 For details on how to create a stamp refer to DocuWide Series Stamp Tool User Guide You can check the list of the stamp data via CentreWare Internet Services For det...

Page 66: ...tamp P 82 7 Press Close 8 Set the document with its edge aligned to the document guide The machine starts scanning and then a copy with the stamp is output See Step3 Scanning Document P 49 Stamp Numbe...

Page 67: ...ct Control Number 3 Select On and enter the start number within the range of 1 to 999 Press Close 4 Set items such as Original Orientation as needed Note The orientation of the stamp is determined per...

Page 68: ...o fold copies refer to Simple Folder User Guide 1 On the Basic Copy screen select the More Features tab and select Folder The Folder screen appears 2 Select the folding method and then set addi tional...

Page 69: ...ors of cut and pasted documents blue prints and documents with blurred density 77 Sharpness Selects the edge sharpness of the image 78 Contrast Adjusts the contrast of the document 78 Black White Thre...

Page 70: ...on where the image is to be copied on the media 90 Scan Start Position Specifies the position where the scanning is to be started 91 Edge Erase Erases the edges of the doc ument image 91 Lead Tail Mar...

Page 71: ...e same time Reduce Enlarge 3rd Button Copies at the ratio displayed on the right of the button Note You can change the ratio to be displayed For the setting method refer to Reduce Enlarge 3rd Button P...

Page 72: ...large Buttons P 233 Calculator Allows you to specify a different size for the height and width If you specify both the document size and the copy size the copy ratios for the height and width are calc...

Page 73: ...Size Buttons P 232 Media Source Select from Roll 1 Roll 2 Roll 3 Roll 4 and Manual Media Supply Cancel Close Auto Select Standard Size Media Source ISO A0 Media Supply Cancel Close Auto Select Standar...

Page 74: ...smaller than the result of the Document Length x Copy Ratio equation A trail margin fol lows the copied image if the specified length is larger than the result of the equation Note The default value o...

Page 75: ...be inserted The media sizes and media types for the selected document orientation are displayed for each document size See For details of the document size series refer to Orig Size Dflt Disp P 239 S...

Page 76: ...ndard Size Landscape z Standard Size Auto Select Note For available combinations of media sizes and output orientations refer to the following table Copy Basic Copy Auto R E Media Type Allows you to s...

Page 77: ...hronized is selected under Original Media Direction Select from Standard Size Por trait Standard Size Landscape and Standard Size Auto Select Media Size To change the media size select the correspondi...

Page 78: ...e to copy printed materials such as posters and pamphlets Others Allows you to configure the settings for photographs transparencies blueprints and uneven toned documents z Photo Most suitable for pri...

Page 79: ...prints use this feature to prevent their back ground colors from appearing on the output copies Note When Original Type is set to Picture or Photo BG Suppress Background Suppres sion cannot be set to...

Page 80: ...ontrast Adjusts the contrast of the document The contrast can be selected from five levels from Lowest to Highest using Setting the level closer to Highest increases the lightness difference between t...

Page 81: ...g the checkbox activates the Adjust Color Density feature Density can be calibrated in seven levels for each of Red Yellow Green Cyan Blue Violet and Black Use to calibrate each density level The high...

Page 82: ...ize 210 mm when the paper orientation is set at portrait and 297 mm when set at landscape You can set whether or not to use Bind Margin Cross Fold The cross fold function folds all paper into A4 size...

Page 83: ...terns z Maximum number of document sheets for collated output 800 z Maximum output copy quantity for a program 99 copies For instance when the programs 001 002 003 in the table below are applied to th...

Page 84: ...plies no stamp to copies On Applies the stamp you specify The Stamp 1 or Stamp 2 screen appears Number Select the stamp number Color Select Black or Gray Note The gray density can be calibrated For th...

Page 85: ...pies z System Date Prints the date according to the internal calendar of the machine z Variable Date Prints an arbitrary date z Date Format Displays the Date Format screen You can set Format Year Mont...

Page 86: ...NT To Be Kept Within Premises For Internal Use Only and CONFIDENTIAL Note You can set additional Watermark related conditions such as the text size and density etc with System Settings For details ref...

Page 87: ...y Settings Displays the Sample Copy Settings screen Select from Part Output Density List Original Type List and Auto BG Suppr List and spec ify Scan Start and Measurement Part Output Allows you to out...

Page 88: ...ckground Suppres sion are selected concurrently sample copying is disabled for Picture and Photo Therefore an document type list containing only five vari ations will be output To specify values for U...

Page 89: ...ti job Change Set screen appears You can set or change the copy quantity for each Multi job number Document 2 Document 2 Document 3 Document Fuji Xerox 2008 08 08 Ito Fuji Xerox 2008 08 08 Ito Fuji Xe...

Page 90: ...e one set with Original Orientation the wrong edge is determined by the machine This will cause the Stamp and Watermark to be overlaid in the wrong orientation Head to Top Select this item when settin...

Page 91: ...Right Select this item when setting the right edge as the lead edge so that the characters are positioned horizontally Head to Left Select this item when setting the left edge as the lead edge so tha...

Page 92: ...the edge or corner of the media The direction can be selected from eight options Shift Adjustment Allows you to calibrate the shift distance The distance can be calibrated in the range of 0 to 999mm...

Page 93: ...in propor tion to the set ratio For details of the area that can be copied from the document refer to Image Loss P 267 Normal Erase The edge erase amount is set to 0mm in the X and Y directions Borde...

Page 94: ...ck area of the docu ment to white and vice versa Off Copies the document as is On Inverts the black and white of the document Note When Invert Image and Edge Erase are set concurrently the edge erase...

Page 95: ...in the docu ment image area creating margins on the right side of the copy Copy More Features Scan Speed Allows you to set slower document scanning speed for additional reliability Normal Scans the do...

Page 96: ......

Page 97: ...t Centre z Overview of Scanning 96 z Preparation for Network Scanning 97 z Network Scanning Procedure 103 z Importing Documents from Mailboxes 106 z Deleting Documents in Mailboxes 112 z Scanning Mult...

Page 98: ...Scanning allows you to save the scanned data in Mailbox This is the tem porary data location in the hard disk of the machine which allows you to import scanned data to a computer on the network The me...

Page 99: ...documents Network Settings Configure the network related settings on the machine See For details of the network settings refer to Network Settings P 222 Using Scanner Driver Network Scanning Preparat...

Page 100: ...3 digit number with the numeric keypad under Go to To change the settings of an already regis tered mailbox select a mailbox and select Create Edit 5 Set a password and press Save Note Enter four dig...

Page 101: ...word authentica tion when you scan a document to the mailbox To Retrieve Select this item to activate the password authentication when you retrieve the docu ments from the mailbox to a computer on the...

Page 102: ...specify the storage period will retain the documents even if you select Yes for this item Therefore make sure to specify the storage period as well See Document Expiration Period P 225 Deleting Mailbo...

Page 103: ...le for the machine z Scanner driver Network TWAIN Driver Software that imports mailbox stored documents with TWAIN compliant application software on your computer z Wide Format Scan Service Software t...

Page 104: ...3 Scan 102 Scan 3 Both programs are included on the CD ROM that is supplied with the machine Note For the installation procedure refer to the help included on the CD ROM...

Page 105: ...d press to display the next screen Or enter the 3 digit mailbox number under Go to using the numeric keypad Then the page describing the relevant mailbox appears Job Status Machine Status Log In Out C...

Page 106: ...uired See Scan Basic Scan screen P 118 2 Select the features to set from the Image Qual ity tab as required See Scan Image Quality screen P 121 Mailbox 002 B Mailbox Cancel Password Confirm Mailbox Ma...

Page 107: ...Hold the document until scanning starts or a jam may occur Note If the start method of document scanning has been set to Manual Start press the Start button For details of how to set Manual Start refe...

Page 108: ...es allows you to display the machine status and job status and to change the settings from the computer via a web browser under a TCP IP based environment Using Scanner Drivers This section describes...

Page 109: ...scanner 3 From the machine names listed under Scanner Name select the scanner name of this machine connected and click the Next button Note If the scanner name of this machine is not listed below Scan...

Page 110: ...e importing ends the display returns to the Import screen 8 If there are no more documents to be imported click X Using Wide Format Scan Service Wide Format Scan Service allows you to import the mailb...

Page 111: ...ou can set to automatically import the scanned data stored in a mailbox For the setting method refer to Wide Format Scan Service Help 1 From the Start menu open Program Fuji Xerox Wide Format Scan Ser...

Page 112: ...domain name server you can access the machine using a combination of the host name and the domain name as the URL For example if the host name is myhost and the domain name is example com then the UR...

Page 113: ...Importing Documents from Mailboxes 111 Scan 3 5 Select the checkbox of the doc ument to import and then click the Retrieve document button The document is downloaded to your computer...

Page 114: ...enoting year month day followed by four digit serial number and cannot be renamed Multiple documents can be selected To dese lect a document select it again To select all documents select Select Dese...

Page 115: ...The file format cannot be changed The Scan screen appears allowing you to change settings as needed Load the documents 4 Load the documents one after another Note When the number of pages contained i...

Page 116: ...14 Scan 3 5 Select Last Original when there are no more documents to be scanned Scan Save in Document Name Pages Mailbox 002 B Mailbox 002 081001 003 tif 3 Change Settings Last Original Stop Delete Pr...

Page 117: ...an cancel the scan job and delete all the pages already scanned 1 Press Stop on the touch screen 2 Press OK Job Status Machine Status Log In Out Clear All Interrupt Start Stop Transmitting Copy Scan M...

Page 118: ...press the Interrupt button again The interruption mode is canceled and the suspended print job is resumed Note The interruption mode will be automatically canceled after a certain duration elapses wit...

Page 119: ...density of the document on a color by color basis 124 Adjust Color Saturation Allows you to adjust the saturation of the document on a color by color basis 124 More Scan Size Allows you to specify the...

Page 120: ...Black White Select this item to minimize the file size when scanning documents that do not need to be reproduced in halftone e g drawings Halftone Select this item when scanning documents that need to...

Page 121: ...200dpi 300dpi 400dpi and 600dpi Single Page TIFF Saves each page of the document to one file in TIFF format Multi page TIFF Saves multiple pages of the document to one file in TIFF format Single Page...

Page 122: ...can be set is Document Width mm 25 4 x Resolution x Ratio 100 21600 914 4mm wide The minimum ratio that can be set is Resolution x Ratio 100 150 When the document size is A0 and the resolution is 600...

Page 123: ...mode Text Photo Select this mode to scan documents that contain both text and photos Others Allows you to configure the settings for printed materials photographs transparen cies blueprints and uneve...

Page 124: ...is On Auto Erases the background color of the document automatically The suppression can be calibrated in seven steps from Low to High The larger the value specified the more the background color is...

Page 125: ...just the sharpness of the document The sharpness can be selected from five levels from Lowest to Highest using The higher the level is set the more the edges of the image will be enhanced The lower th...

Page 126: ...brated in seven levels for each Red Yellow Green Cyan Blue Violet and Black Use to calibrate each density level The higher the level is set the lighter the color will become For example sliding the ma...

Page 127: ...reen 125 Scan 3 Saturation can be calibrated in seven levels for each Red Yellow Green Cyan Blue Violet and Black Use to calibrate each saturation level The higher the level is set the more saturated...

Page 128: ...the range of 100 to 15000mm in 1mm increments Scan More Features Edge Erase This feature allows you to prevent shadows along the edges of the document from appearing on the scanned data Note When set...

Page 129: ...n More Features Scan Start Position This feature allows you to set the position where to start scanning on the document Set the position relative to the lead edge of the document in the range of 0 to...

Page 130: ...Slow Reduces the scanning speed to 1 2 of the nor mal speed z Super Slow Reduces the scanning speed to 1 6 of the normal speed Color Note This item is displayed only when the color scanning feature op...

Page 131: ...s Important Color scan function is an optional package and is not available for some models For more information contact your Fuji Xerox Customer Support Centre z Overview of Direct Scanning 130 z Pre...

Page 132: ...ervice optional z Using Color Copy Assistant for DocuWide Color Copy Assistant Pro for DocuWide optional This section describes how to scan documents using the USB TWAIN driver Note Use USB2 0 based U...

Page 133: ...achine Connect this machine and your computer with USB Installing USB TWAIN Driver USB TWAIN driver is a software that provides the function for importing images in the software for importing document...

Page 134: ...ons Refer to Readme contained in the CD ROM that is provided with the machine For the DocuWorks operation Click on Help and refer to the DocuWorks online help For the USB TWAIN driver operation Click...

Page 135: ...ons tab Show Preview checkbox If you select this the preview screen appears after the docu ment is scanned If you do not select this the scanned document is saved with out displaying the preview scree...

Page 136: ...ng them You can confirm images by enlarging reducing them on the screen 1 Adjust or edit the images as needed and then press Reload Go directly to Step 2 if adjustment or editing is unnecessary Reload...

Page 137: ...ws environment Note The printing capabilities explained in this chapter are not available on all machines and may require optional accessories to execute such features For more informa tion contact yo...

Page 138: ...can print Note BT PlotAssistant is optional software application Data Series Printable Data Format HP GL series HP GL HP GL 2 HP RTL VERSATEC series VRF VCGL FX MMR TIFF JFIF series TIFF Version 6 0 c...

Page 139: ...onitor communications between your computer and printer confirm the current printing sta tus and change your printer settings via a browser Set your browser Operating Environment CentreWare Internet S...

Page 140: ...resulting in a blank screen If this happens you will need to deselect the proxy server in your browser and reset the IP address of the machine in your browser For details refer to your browser man ua...

Page 141: ...formats then you will be able to print multiple files with different file formats simultaneously Note BT PlotAssistant is an optional software application Refer to the BT PlotAssistant User Guide for...

Page 142: ...y 4 Click OK 5 The Print screen displays Click OK Confirming Printing Status and Conditions with CentreWare Internet Services This section describes how to verify the printer conditions and printing s...

Page 143: ...cel Printing Operating the machine from its control panel This section describes how to stop printing a document 1 Press Stop or Delete All while printing a docu ment When you want to stop a document...

Page 144: ...Secure Print refer to Private Charge Print Settings P 255 Private Charge Print You can select Private Charge Print only when a document owner is authenticated to save a document temporarily to printer...

Page 145: ...The print procedure will vary depending on your software application For details see the user guide that came with the software Secure Print The following flowchart lists the steps to create a Secure...

Page 146: ...and Password Note You can enter up to 24 alphanu meric characters as your user ID and between 4 to 12 numeric char acters for your password 6 From Retrieve Document Name select either Enter Document...

Page 147: ...to field to select a user 5 Enter your password and select Confirm Job Status Machine Status Log In Out Clear All Interrupt Start Stop Transmitting Copy Scan Menu Job in memory Copy from Memory Power...

Page 148: ...ings Sys tem Settings Stored Document Settings Show Print Confirmation this screen is not displayed Print and Delete This button is used to print and delete a Secure Print document on the machine Prin...

Page 149: ...rom your computer 1 Click Start on the taskbar then select Settings Printers 2 Right click the printer icon and click Properties 3 Click the Configuration tab 4 Select the Enable Account Setup checkbo...

Page 150: ...t document from your com puter See Using the Printer Driver to Print a Document P 140 Selecting Private Charge Print from the Machine This section describes how to print a Private Charge Print documen...

Page 151: ...rint Jobs More tab in the Job Status screen 4 Select Private Charge Print to display the Pri vate Charge Print screen Job Status Machine Status Log In Out Clear All Interrupt Start Stop Transmitting C...

Page 152: ...Sys tem Settings Stored Document Settings Show Print Confirmation this screen is not displayed Print and Delete This button is used to print and delete a Private Charge Print document on the machine...

Page 153: ...6 6 Job Status This chapter describes the Job Status feature z Overview of Job Status 152 z Confirming a Completed Job 153 z Printing and Deleting Stored Documents 154...

Page 154: ...Charge Print features enable you to print or delete a Secure Print document or Private Charge Print document See Printing and Deleting Stored Documents P 154 Job History Any copying printing or scanni...

Page 155: ...ect Update to update the screen 3 Select the job you want to view and confirm the job contents 4 After confirming the job press Close Job Status Machine Status Log In Out Clear All Interrupt Start Sto...

Page 156: ...Jobs More tab Note Secure Print and Private Charge Print can not be displayed at the same time For details on how to create a Private Charge Print document refer to Private Charge Print Settings P 255...

Page 157: ...Note If you set System Settings System Settings Stored Document Settings Show Print Confirmation to No the Secure Print screen does not display Even if you select Print and Save selecting Delete Secur...

Page 158: ...te If you send a document from the computer to the printer with a document name containing a font that the printer does not support the name of the document will not display correctly in the Control P...

Page 159: ...ngs System Settings Stored Document Settings automatically deletes the Private Charge Print document on the machine Print and Delete Pressing this button prints and deletes the Private Charge Print do...

Page 160: ......

Page 161: ...ing This chapter describes the Stored Programming features z Overview of Stored Programming 160 z Registering Stored Programming 161 z Deleting Information from Stored Programming 163 z Recalling Stor...

Page 162: ...ature and the quantity of copies It can record up to 40 items Stored Scan Program Stored Scan Program registers each setting selected in the scan feature It can record up to 40 items Stored Multi job...

Page 163: ...it number in the Go to field specifies a Stored Programming number 5 The current selections are displayed and can be changed as required 6 Press the Start button Note To cancel registration press the...

Page 164: ...Internet Services to specify a name you can enter up to 20 alpha numeric characters 10 in double byte charac ters For information about how to enter characters refer to Entering Text P 32 9 Press Clo...

Page 165: ...Press the Delete button 6 Select OK to delete Important Deleted data cannot be restored Note Select Cancel to cancel the deletion of Stored Programming job data 7 Press Close until the Menu screen is...

Page 166: ...bers Select to display the previous screen and select to display the next screen Enter a 2 digit number in the Go to field to specify a stored programming number 5 Select other features as required 6...

Page 167: ...8 8 Maintenance This chapter describes how to replace consumables and maintain the machine z Replacing Consumables 166 z Cleaning the Machine 172...

Page 168: ...used Areas exposed to direct sunlight Dirty or dusty areas z Always read the instructions and precautions on the packaging before using any consumables z When ordering have the product code of the con...

Page 169: ...for the machine s Print Mode For details refer to Machine Information P 259 1 Ensure that the machine has stopped Then raise the document table Next open the toner cartridge panel cover CAUTION z When...

Page 170: ...he right side of the toner cartridge refill opening 1 2 Lower the left side of the toner bottle and push the toner bottle into the toner cartridge refill opening until it clicks into place 2 4 Slide t...

Page 171: ...place the Toner Waste Bottle soon and Ready to Copy messages are dis played alternately every 10 20 seconds Important Prepare spare waste toner bottle in advance When a message displays to replace the...

Page 172: ...release the bottle while rotating it out wards 5 Separate the waste toner bottle from the waste spout and remove it from the machine 6 Replace and tighten clockwise the cap on the top of the waste ton...

Page 173: ...71 Maintenance 8 9 Close the upper unit of the machine Note If you do not return the waste toner bottle into its original position correctly a message dis plays even after closing the upper unit The m...

Page 174: ...en wipe with a dried cloth Do not use cleaning agents other than water or neutral detergent Cleaning the machine with an excessive amount of water may cause the machine to mal function or damage docum...

Page 175: ...e 173 Maintenance 8 4 Wipe the glass of the document scanning unit with a dried cloth Important Do not apply excessive force on the glass since it may result in malfunctions or physical damage 5 Close...

Page 176: ......

Page 177: ...what to do when an error occurs on the machine z Troubleshooting 176 z General Trouble 177 z Image Quality Problems 178 z Jam Problems 182 z Trouble during Copying Scanning Printing 183 z Error Messag...

Page 178: ...pport Centre Power is not turned on Action Refer to General Trouble P 177 No Yes Touch screen is not bright enough Action Refer to General Trouble P 177 No Yes Message is displayed Action Refer to Gen...

Page 179: ...ect the power cord firmly Then turn the power breaker main power switch and the power on again See Power On Off P 33 Is the power cord discon nected from the machine Is the voltage of power sup ply pr...

Page 180: ...P 122 Original Type P 121 Back ground Suppression P 122 Unwanted lines are printed on the scanned image Is the scanning area soiled Clean the scanning area See Cleaning the Machine P 172 The copy scan...

Page 181: ...he interior of the machine See Loading Media P 41 Part of the image is missing on the copy print scanned image smudged or unclear Is the media damp If the media is damp some parts of the copy may not...

Page 182: ...inger Toner is not fused to the paper The paper is soiled with toner Is the media damp Replace with media just unpacked See Loading Media P 41 Is the correct type of media used Load a correct type of...

Page 183: ...es screen P 126 The copy scanned image has shadows Is the document pasted together or folded Adjust the copy scan density and docu ment type settings See For copying refer to Copy Density P 77 Origina...

Page 184: ...en jammed or wrin kled Is the correct type of media used Load a correct type of media See Media Types P 39 Is the media loaded cor rectly Load the media correctly See Loading Media P 41 Is the media s...

Page 185: ...ng the Manual Feed Tray Bypass P 43 The corner of an document is folded Is the document curled Flatten the curled document before setting it Documentis not scanned at the desired size Did you select t...

Page 186: ...Connect the network cable of the machine Has any error occurred on the machine Check the error message and follow the instructions to solve the problem See Error Message P 185 Are the IP address and...

Page 187: ...and then contact your Fuji Xerox Customer Support Centre A fault has occurred Press Restart to start recovery If the trouble persists call for ser vice XXX XXX Cause A fault has occurred Remedy Press...

Page 188: ...clear the jam and then set the document again 1 Open the document cover by raising the lever at the right end 2 Remove the jammed document 3 Shut the document cover 4 Make sure there is no tear wrink...

Page 189: ...edia See the designated label for instructions Close RFC drawer 1 xxx xxx Paper Jam Paper jams in roll tray mis setting of roll feeding failure P 188 Paper jams in roll tray jam in the area from feedi...

Page 190: ...aper jams When the power is turned off all information stored on the machine s memory will be erased Do not touch components inside the machine This can cause print defects Paper jams in roll tray mis...

Page 191: ...fore setting it in place 4 Gently close the roll tray securely until it touches the interior of the machine Paper jams in roll tray jam in the area from feeding area to developer area This section des...

Page 192: ...will not disappear from the touch screen 4 Gently slide the roll tray until its lead edge touches the machine Paper jams in manual feed tray This section describes how to clear paper jams that occur i...

Page 193: ...orward slowly while lifting the lever on the right hand side on the rear side of the machine to remove the paper 5 Pull the green stopper to the front 1 6 Grasp the upper side of the manual feed tray...

Page 194: ......

Page 195: ...is chapter describes how to control the operation with the authentication fea ture Note The IC card authentication feature is optional z Authentication Feature 194 z Authentication Feature Settings 19...

Page 196: ...e machine The following two authentication methods are available on the machine z Authentication using control panel z Authentication with IC card Authentication using Control Panel Authentication is...

Page 197: ...s to operate the machine The features controlled by remote access are as follows Print Print directions from a computer are restricted To use the authentication feature the authentication information...

Page 198: ...General Users Users are classified into the following two types when the authentication feature is used Authenticated Uers Users who are registered with the machine When an authenticated user executes...

Page 199: ...ot used is as follows Note When changing the setting from the use of the authentication feature is to not using the fea ture general users cannot use the personal mailboxes created by authenticated us...

Page 200: ...ox Note When changing the setting from the use of the authentication feature to not using the fea ture authenticated users and unauthenticated users cannot use commonly shared mail boxes A commonly sh...

Page 201: ...ith the numeric keypad or the keyboard displayed and then select Confirm Note The default setting of the UserID is 11111 When the password entry field appears enter the system administrator password a...

Page 202: ...password during authentication and No to not Note It is recommended to set a password for better security 11 Press Save 12 Register a user See Step2 User Registration on the Control Panel on the Machi...

Page 203: ...ils of the items refer to Create User Account P 253 4 Press Acc Limit 5 Set the limitation on each service and then press Save See For details of Account Limit refer to Create User Account P 253 6 If...

Page 204: ...ord Save Press Cancel Password Change Keyboard Save Login UserID Password 11111 Please select the required service Please select the required service Press Log In Out button and enter User Details Use...

Page 205: ...ion Enter the password and then press Password Change 3 Enter the password twice and then select Save If a password is not set press Save with the entry field blank Note If you forget your password yo...

Page 206: ......

Page 207: ...scribes with the System Administrator in mind how to config ure the system defaults with the System Settings feature z System Settings Overview 206 z System Settings Menu List 207 z System Settings Pr...

Page 208: ...ID System Settings has the following features to be set z Common Settings z Network Settings z Stored Document Settings z Copy Settings z Scan Settings z Printer Settings System Administrator Setting...

Page 209: ...alert 215 Custom Buttons Allows you to assign features to the custom but tons Custom 1 and Custom 2 on the Control Panel 216 Default Language Allows you to select the language to be displayed on the...

Page 210: ...y feature 230 Media Size Buttons Allows you to set the media sizes for Standard Size to be displayed in Media Supply on the Basic Copy screen 232 Reduce Enlarge Buttons Allows you to set the ratio to...

Page 211: ...llows you to configure the printing related set tings 246 Job Recovery Allows you to set whether to resume after power on the print jobs that were not completed at shut down 246 Other Settings Allows...

Page 212: ...nter a password to use the Control Panel of the machine 254 Private Charge Print Settings Allows you to set how to apply the authentication results of Private Charge Print to the processing of print j...

Page 213: ...diately be changed after installing the machine For more information refer to System Administrator Set tings P 249 1 Enter the UserID of the System Administrator with the numeric keypad or the display...

Page 214: ...tem Settings Menu List P 207 1 Select the item to be set 2 Set any feature 3 After setting the feature press Close Step5 Exiting System Administration Mode 1 Press Close until the System Settings scre...

Page 215: ...on the System Set tings screen See For details of how to display the System Set tings screen refer to System Settings Proce dure P 211 2 Select Common Settings 3 Select the item to be set 4 Configure...

Page 216: ...the time from the last operation at which to enter the sleep mode from 5 to 240 minutes in 1 minute increments Note The From Last Selection to Sleep Mode time cannot be shorter than the From Last Sel...

Page 217: ...ne Set the tone to sound at the start of a document scanning when Scan Start Mode is set to Auto Start Job Complete Tone Select the tone to sound when a copy or print job completes normally Low Toner...

Page 218: ...This screen allows you select the language dis played on the machine from Japanese English and Simplified Chinese The factory default value is English There are two ways of selecting the language z P...

Page 219: ...value is Normal System Settings System Settings Common Settings Watermark This screen allows you to set the details of the text to be printed as Watermark Items Notes Auto Start Starts scanning automa...

Page 220: ...value 64 point z 80 point z 64 point z 48 point Density Set the density of the text to be printed as Watermark Factory default value Normal z Light z Normal z Dark Force Watermark Copy Set whether to...

Page 221: ...Settings Common Settings Other Settings This screen allows you configure Original Size System Metric Inch System and Overwrite Hard Disk Items Notes Finished Size Select the finished size of the fold...

Page 222: ...isk wipe data By overwriting the disk the content of the hard disk can be protected from illegal acquisition or restoration Temporarily stored data can also be processed with this feature The followin...

Page 223: ...of leakage is even lower when the process is performed three times Note however that it will take longer time During the overwrite the machine may operate slower than usual Note This feature requires...

Page 224: ...s refer to CentreWare Internet Services Help 1 Select System Settings on the System Set tings screen See For details of how to display the System Set tings screen refer to System Settings Proce dure P...

Page 225: ...Select Enabled when connecting via FTP SNMP Select Enabled when using our remote administration soft ware etc via SNMP Items Notes Auto Select this item to automatically detect the Ethernet communi ca...

Page 226: ...ad Items Notes IP Address Enter in the XXX XXX XXX XXX format Each three digit seg ment xxx must be in the range of 0 to 255 Note Specify a string that consists of numbers from 0 to 9 and full stops T...

Page 227: ...Set tings screen See For details of how to display the System Set tings screen refer to System Settings Proce dure P 211 2 Select Stored Document Settings 3 Select the items to be set or changed Note...

Page 228: ...cuments automatically make sure to enable the document deletion feature For details refer to Delete Secure Print Docs Delete Private Print Docs P 226 For details of deleting the documents stored in th...

Page 229: ...following items can be set Items Notes No The document selected will be automatically deleted after print ing is completed Yes When you make a print request a screen appears prompting you to select wh...

Page 230: ...reen See For details of how to display the System Set tings screen refer to System Settings Proce dure P 211 2 Select Copy Settings 3 Select the item to be set or changed 4 Press Close Check Repair Rg...

Page 231: ...ll 1 Roll 2 Roll 3 Roll 4 and Manual Note The items displayed vary depending on the model Preset Buttons 1 R E Button 3 2 Media Supply Button 2 3 Media Supply Button 3 4 Original Type Button 1 5 Origi...

Page 232: ...E Set whether to display the Basic Copy Auto Mode screen as the default screen instead of the Basic Copy screen whenever the copy function is selected Off Reduce Enlarge Set the default value for Redu...

Page 233: ...ensity Set the default value for Adjust Color Density on the Image Quality screen Off Image Location Set the default value for Image Location on the More Features screen No shift Edge Erase Set the de...

Page 234: ...the default value for Date Time under More Features Watermark Off Serial Number Set the default value for Serial Number under More Features Watermark Off Original Orientation Set the default value for...

Page 235: ...preset ratio buttons when More is selected under Reduce Enlarge on the Basic Copy screen Factory default values 25 0 35 3 50 0 70 7 141 4 200 0 Media Size Buttons ISO A0 ISO A1 ISO A2 ISO A3 ISO A4 J...

Page 236: ...en allows you to set the default value for Variable Length under Media Cut Mode JIS A0 Wide JIS B2 Wide JIS A1 Wide JIS B3 Wide JIS A2 Wide JIS B4 Wide JIS A3 Wide JIS B5 Wide JIS A4 Wide ISO B1 Wide...

Page 237: ...atures Stamp Note To use the Stamp feature DW6035 6055 Stamper Key AP optional is required Items Notes Factory Default Stamp 1 Number Set the number for the stamp data to be registered within the rang...

Page 238: ...e number for the stamp data to be registered within the range of 1 to 99 02 Stamp 2 Color Select Black or Gray for the stamp color Black Stamp 2 Position Select from Auto Top of the Edge and Bottom of...

Page 239: ...ems Notes Top of the Page The position can be specified for x direction and y direction rel ative to the top left corner of the media Bottom of the Page The position can be specified for x direction a...

Page 240: ...dscape under Original and then select the document size series to be configured under Media Settings Items Notes Auto Detect The document size is automatically detected Standard Portrait The document...

Page 241: ...Copy Settings Detailed Settings Allows you to configure additional settings related to the copying features For more information refer to Custom Presets Detailed Settings List P 273 Original Size Out...

Page 242: ...f how to display the System Set tings screen refer to System Settings Proce dure P 211 2 Select Scan Settings 3 Select the item to be set 4 Configure the item as required 5 Press Close System Settings...

Page 243: ...ons under File Format on the Basic Scan screen Factory default value 1st Single Page TIFF 2nd Multi page TIFF You can set the document type to be displayed next to the first and second buttons under O...

Page 244: ...ss Set the default value for Sharpness on the Image Quality screen Normal Contrast Set the default value for Contrast on the Image Quality screen Normal Black White Thresh old Set the default value fo...

Page 245: ...e in the More Features screen An document size is assigned to each of the twelve buttons Items Notes Standard Portrait Set the size and orientation for the standard sizes Standard Landscape Custom Siz...

Page 246: ...you to set the default ratios to be displayed in Reduce Enlarge on the Basic Scan screen Factory default values 25 0 35 3 50 0 70 7 141 4 200 0 Reduce Enlarge 25 0 400 0 0 1 0 1 Cancel 100 0 25 0 50 0...

Page 247: ...e factory default value is TIFF V6 Select TIFF V6 or TTN2 depending on the scanning software System Settings System Settings Scan Settings Detailed Settings Allows you to configure additional settings...

Page 248: ...ter Settings Job Recovery This screen allows you to set whether to resume when turning the machine on any print jobs uncompleted when the machine was turned off The factory default value is Off The fo...

Page 249: ...he drawing method for arcs Select Follow Allocation Command or Ignore Allocation Command Ignore Allocation Command HPGL Draw Dotted Line Set the drawing method for dotted lines Select NORMAL or EXTEND...

Page 250: ...ISO A3 ISO A4 Long Edge Det ISO A4 ISO A4 Dither Pattern Select the combination of dither pattern and den sity Select from the six combinations Pattern 1 Dark Normal Light Pattern 2 Dark Normal Light...

Page 251: ...o System Settings Proce dure P 211 2 Select the item to be set or changed 3 Press Close System Settings System Settings System Administrator Settings System Administrator ID This screen allows you to...

Page 252: ...ure allows you to protect the machine from unauthorized setting changes Set the number of maximum consecutive entries of an invalid System Administrator ID to lock the machine from additional login at...

Page 253: ...ttings screen See For details of how to display the System Set tings screen refer to System Settings Proce dure P 211 2 Select the item to be set or changed 3 Press Close System Settings System Settin...

Page 254: ...ou to set the password for the Stamp Data Administrator It is recommended to set the password for better security The factory default value is stamp Enter from 4 to 12 characters for the Password Note...

Page 255: ...gistered Important Before registering a user make sure to set the authentication mode For details refer to Login Setup P 256 Note Authentication mode can also be set with Cen treWare Internet Services...

Page 256: ...nabled It is recommended to set the password for better security User Name Set a user name z Setting via Control Panel Enter up to 32 characters z Setting via CentreWare Internet Services Enter up to...

Page 257: ...et Confidential Print jobs instructed from the printer driver are ignored When saving the print jobs in Private Charge Print enter the UserID up to 32 single byte characters If the UserID set with the...

Page 258: ...e For details of the printer driver settings refer to the online help Feature to be Restricted Notes Copy Service Copy operations from the Control Panel are restricted Scan Service Scan operations sav...

Page 259: ...12 12 Machine Status This chapter describes the features for checking the machine status z Overview of Machine Status 258 z Machine Information 259 z Billing Meter 261 z Media Settings 262...

Page 260: ...king machine information The machine configuration can be checked Print mode can also be set See Machine Information P 259 Billing meters Displays the counts of Meter 1 Meter 2 Meter 3 See Billing Met...

Page 261: ...e can be set Online The printer can accept data Offline The printing will stop after the data being received is printed and the remainder of the data will not be received Select Offline when you do no...

Page 262: ...ected the settings of the temperature are saved even after the power is turned on or off When not selected Auto Select is enabled after the power is turned on off Fuser Idle The fuser will be idled be...

Page 263: ...now unit m2 Meter 2 Displays the total length printed until now unit m or 0 1 m Meter 3 Displays the number of the pages stamped Note Stamps will be counted according to the number of the pages stamp...

Page 264: ...ries Media width ISO JIS A size series ISO A0 ISO A1 ISO A2 ISO A3 ISO A4 JIS B size series JIS B1 JIS B2 JIS B3 JIS B4 ISO B size series ISO B1 ISO B2 ISO B3 ISO B4 Special 1 series 880mm 625mm 440mm...

Page 265: ...are displayed respetively as Bond and Vellum on the screen Weight Media Type Name G S M Light Bond Vellum Film Standard Bond Premium 75g m2 Perfomance 75g m2 Vellum Xcellent80 80g m2 Premium Tracing...

Page 266: ......

Page 267: ...13 13 Appendix This chapter describes the specifications list of options and notes and restric tions z Specifications 266 z List of Options 276 z Document Catch Tray 278 z Notes and Restrictions 279...

Page 268: ...it 16 0 pages min Important The speed may be reduced in order to adjust the image quality The performance may be reduced depending on the paper type Paper Supplying System 2 roll model Roll X 2 Manual...

Page 269: ...50 60 Hz common use Scanner area AC208 240V 10 13A 50 60 Hz common use Maximum Power Con sumption Max Scanner area 480W Printer area 3 2kW Low power mode 16 5W or less MF 13 0W or less EP Warm up Time...

Page 270: ...22 C and a humidity of 55 Reduce enlarge presets 1 0 250 1 0 353 1 0 500 1 0 707 1 1 414 1 2 000 Custom reduction enlargement ratios 1 0 250 to 1 4 000 in 0 1 increments Memory Standard 1GB Max 1 5GB...

Page 271: ...execute image sta bilization process First Print Output Time 22 0 seconds or less with A0 size document 1 28 MB data roll 1 Magnification 100 0 4 excluding larger than A0 size Applied at an ambi ent...

Page 272: ...d The following speeds can be selected Monochrome Normal 152 4mm sec Low speed 76 2mm sec Super low speed 25 4mm sec Full color Normal 50 8mm sec 1 Low speed 25 4mm sec 1 Connectivity Ethernet 10BASE...

Page 273: ...80 mm 8m 15m Special A1 625 mm 12m 15m Special A2 440 mm 15m 15m Docu ments A4 A3 JIS B3 A2 JIS B2 A1 JIS B1 A0 A4 100 0 141 4 173 2 200 0 245 0 282 8 346 4 400 0 A3 70 7 100 0 122 5 141 4 173 2 200 0...

Page 274: ...353 500 ISO B4 250 353 ISO B5 176 250 ANSI series ANSI E 34x44 863 6 1117 6 ANSI D 22x34 558 8 863 6 ANSI C 17x22 431 8 558 8 ANSI B 11x17 279 4 431 8 ANSI A 8 5x11 215 9 279 4 ARCH 1 series Architect...

Page 275: ...en out put when setting this parameter to 0 or a value that exceeds the capacity of the mem ory 0 m 14 Set whether to use the reprinting feature 0 disable 1 enable 1 enable 15 Set whether or not to co...

Page 276: ...nsity 1 Sharpness 61 Top right 2 Contrast 62 Bottom left 3 B W Threshold 63 Bottom right 4 Adjust Color Den sity Set the initial display of the feature button of More Features tab 70 tab 1 Top left 0...

Page 277: ...1 Basic Scan Set the initial display of the feature button of Image Quality tab 60 Tab 2 Top left 0 Off 1 Image Quality File Size 2 Sharpness 3 Contrast 4 B W Threshold 5 Adjust Color Density 6 Adjust...

Page 278: ...e color scanning function on the MF model DW6035 6055 Stamper Key AP A kit to use the stamp DW6035 6055 Security Key AP A kit to enhance the security of data written to the hard disk DW6035 6055 PDF P...

Page 279: ...supported application on your computer USB TWAIN driver Wide Format USB TWAIN Source A TWAIN based USB driver to import documents scanned on the machine to your computer Printer driver DocuWide plot d...

Page 280: ...eeded Note Our customer engineers install the document catch tray 1 Lift the document catch tray with one hand 2 Turn the indicator of one dial with the other hand according to the purpose 3 Turn the...

Page 281: ...a or spooled information in the machine memory Before switching off the power during normal operation ensure that all data stored in the memory is processed Before you turn the power back on after tur...

Page 282: ......

Page 283: ...ttings 231 242 Brightness Control 29 BT PlotAssistant 139 C C Button 30 Cancel Printing 141 CentreWare Internet Services 110 137 Changing Default Language 216 Changing the scan start position 91 127 C...

Page 284: ...ormat System Settings 242 File Format 1st and 2nd Buttons System Settings 241 File Storing 270 First Copy Output Time 268 First Print Output Time 269 Folder System Settings 232 G General Users 196 Gen...

Page 285: ...e TIFF 119 N Network Scanning Procedure 103 Network Settings System Settings 222 Numeric Keypad 30 O Option Interface Connector 27 Original Direction 238 Original Feed System 268 Original Jams 186 Ori...

Page 286: ...System Settings 242 Scan Speed System Settings 232 Scan Start Mode System Settings 217 Scan Start Position 91 127 Scan Start Position System Settings 231 242 Scanner Driver 106 Scanning Halftone 270 S...

Page 287: ...ower is not turned on 177 Printing 184 Scanning 183 Touch screen is not bright enough 177 Trouble during Copying 183 Trouble during Copying Scanning 183 Trouble during Copying Scanning Printing 183 Tr...

Page 288: ......

Page 289: ...DocuWide 6035 6055 User Guide Fuji Xerox Co Ltd DE3988E2 1 Edition 1 September 2008 Copyright 2008 by Fuji Xerox Co Ltd...

Page 290: ...Scan Scan Copy Before Using the Machine Stored Programming Appendix Machine Status System Settings Authentication Ploblem Solving Maintenance Job Status Printing Direct Scan Scan Copy Before Using the...

Reviews: