Basic Operation
27
Operator Panel
NOTE:
•
Moving to a different menu or returning to a previous screen cancels the current entry or setting. Make sure to save the
current entry or setting.
•
For details on how to use the number pad to enter numbers, see "Using the Number Pad" on page 257.
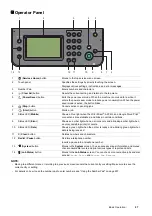
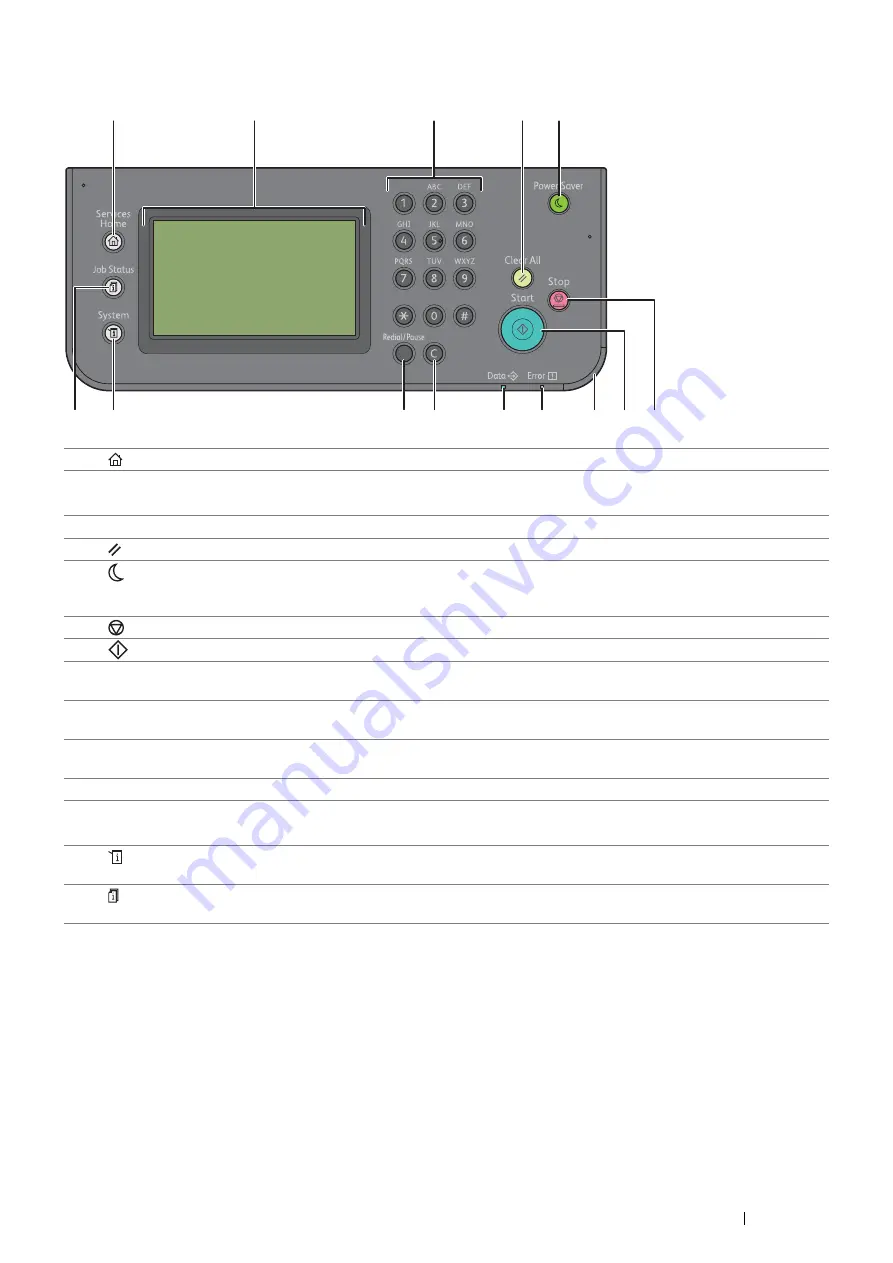
1
(
Services Home
) button
Moves to the top service menu screen.
2
Touch panel
Specifies the settings by directly touching the screen.
Displays various settings, instructions, and error messages.
3
Number Pad
Enters numbers and characters.
4
(
Clear All
) button
Resets the current setting, and returns to the top menu.
5
(
Power Saver
) button
Exits the power saver mode. When the machine is not used for a while, it
enters the power saver mode to reduce power consumption. When the power
saver mode is active, the button blinks.
6
(
Stop
) button
Cancels active or pending jobs.
7
(
Start
) button
Starts a job.
8
Status LED (
Mobile
)
Shows a blue light when the Wi-Fi Direct
®
, AirPrint, and Google Cloud Print
™
connections are established, and blinks in certain conditions.
9
Status LED (
Error
)
Shows an amber light when an error occurs and a blinking amber light when
an unrecoverable print error occurs.
10
Status LED (
Data
)
Shows a green light when the printer is ready and a blinking green light when
data is being received.
11
C
(
Clear
) button
Deletes numbers and characters.
12
Redial / Pause
button
Re-dials a telephone number.
Inserts a pause into a telephone number.
13
(
System
) button
Moves to the
System
screen. You can access various information and menus,
check consumable levels, and print various types of reports and lists.
14
(
Job Status
) button
Moves to the
Job Status
screen. You can check or cancel active jobs and also
access
Secure Print
and
Secure Fax Receive
.
3
2
1
5
6
4
7
10
9
8
11
12
4
1
3
1
Summary of Contents for DocuPrint CM225FW
Page 1: ...DocuPrint CM225 fw User Guide ...
Page 10: ...10 Contents Technical Support 338 Online Services 339 Index 340 ...
Page 260: ...260 Digital Certificates 11 Digital Certificates Using Digital Certificates on page 261 ...
Page 272: ...272 Troubleshooting 4 Lower the levers to their original position 5 Close the rear cover ...

