


38
1
2
3
The 64K data communication is a communication
system you are charged according to the duration
of connection. (Maximum communication speed:
64 kbps) To use a provider other than “mopera”,
you may need to separately apply for the service
and sign a contract with the provider.
Using a provider other than “mopera U” or
“mopera” as an access point
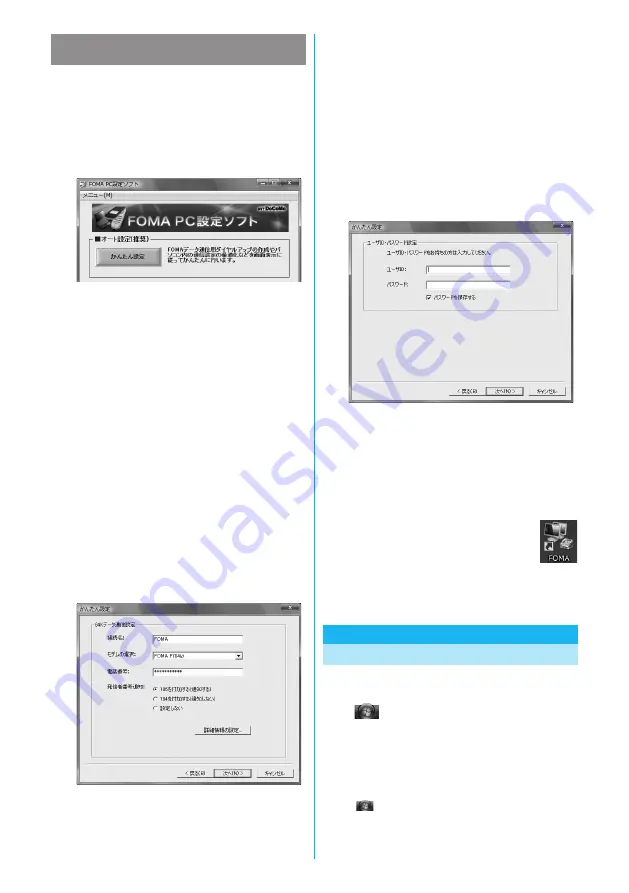
Click “
かんたん設定
(Easy Setting)”.
Select “64K
データ通信
(64K data
communication)”, then click “
次へ
(Next)”.
Confirm that “64K
データ通信
(64K data communication)” is
checked, then click “
次へ
(Next)”.
Select “
その他
(Others)”, then click “
次へ
(Next)”.
Confirm that “
その他
(Others)” is checked, then click “
次へ
(Next)”.
4
5
6
7
8
9
Enter dial-up information.
When connecting to a provider supporting ISDN-
synchronous 64K other than “mopera U” or “mopera”,
register the following items when creating the dial-up.
①
“
接続名
(Access point name)” (arbitrary)
②
“
モデムの選択
(Select a modem)” (FOMA P704i
ȝ
)
③
“
電話番号
(Phone number of provider access)”
④
Set whether to notify your caller ID for dial-up connection.
Correctly enter these items according to the provider
information.
Ɣ
For the setting of the caller ID notification, follow the
instructions from the provider you use.
Ɣ
You cannot enter the following half-pitch characters in the
“
接続名
(Access point name)” field: ¥, /, :,
½
, ?, !, <, >, |,
and ”.
Click “
詳細情報の設定
(Set detailed information)”.
The display for specifying “IP
アドレス
(IP address)” and
“
ネームサーバー
(name server)” appears. When entering
dial-up information for the provider you have subscribed or
Intranet LAN system, specify addresses according to the
entry instruction information, then click “OK”.
When specifying the user name and password, correctly enter
the information supplied from your Internet service provider,
taking care of uppercase and lowercase letters and so on.
Click “
次へ
(Next)”.
Specify “
ユーザー名
(User name)” and “
パス
ワード
(Password)”, then click “
次へ
(Next)”.
Confirm the set information, then click
“
完了
(Complete)”.
Click “OK”.
The set contents are listed on the display. Confirm that there is
no problem on the set contents, then click “
完了
(Complete)”.
Ɣ
To change the set contents, click “
戻る
(Back)”.
Ɣ
If “
デスクトップにダイヤルアップのショートカットを作成
する
(Create a dial-up shortcut on the desktop)” is checked,
a dial-up shortcut will be created on the desktop.
The setting is completed.
Open the dial-up shortcut icon automatically
created on the desktop; then the connection
display for starting communications appears. After confirming
that the connection starts, you can start the Internet browser
or mail browser for communication. (See page 38)
1
Carrying Out Set Communication
Perform the operation on page 3 to connect the
FOMA phone to your personal computer.
“
[スタート
(Start)
]
”
Ź
Open “
接続先
(Access point)”, select an
access point and click “
接続
(Connect)”.
Ɣ
Open the FOMA connection shortcut icon created at
communication setting; the connection display for starting
communication appears. Bring up the icon by the following
operations if it is not displayed:
“
[
スタート
(Start)]”
ĺ
“
コントロールパネル
(Control panel)”
ĺ
“
ネットワークとインターネット
(Network and Internet)”
ĺ
“
ネットワークと共有センター
(Network and sharing center)”
ĺ
“
ネットワーク接続の管理
(Management of network connection)”
0GZV2CIG
0GZV2CIG
Summary of Contents for FOMA P704IU
Page 86: ...84 MEMO...
Page 146: ...144 MEMO...
Page 348: ...346 MEMO...
Page 390: ...388 MEMO...
Page 440: ...438 MEMO...
Page 441: ...439 MEMO...
Page 442: ...440 MEMO...
Page 443: ...441 MEMO...
Page 444: ...442 MEMO...
Page 445: ...443 MEMO...
Page 446: ...444 MEMO...
Page 447: ...445 Index Quick Manual Index 446 Quick Manual 454...
Page 524: ...Kuten Code List...


