Programming: Introduction
Merchant™ Operators’ Guide
August 2009
42
1810025
Programming: Introduction
The Display
The Merchant™ features our new interactive menu display. The LCD display makes navigating the
programming menu structure easy and intuitive.
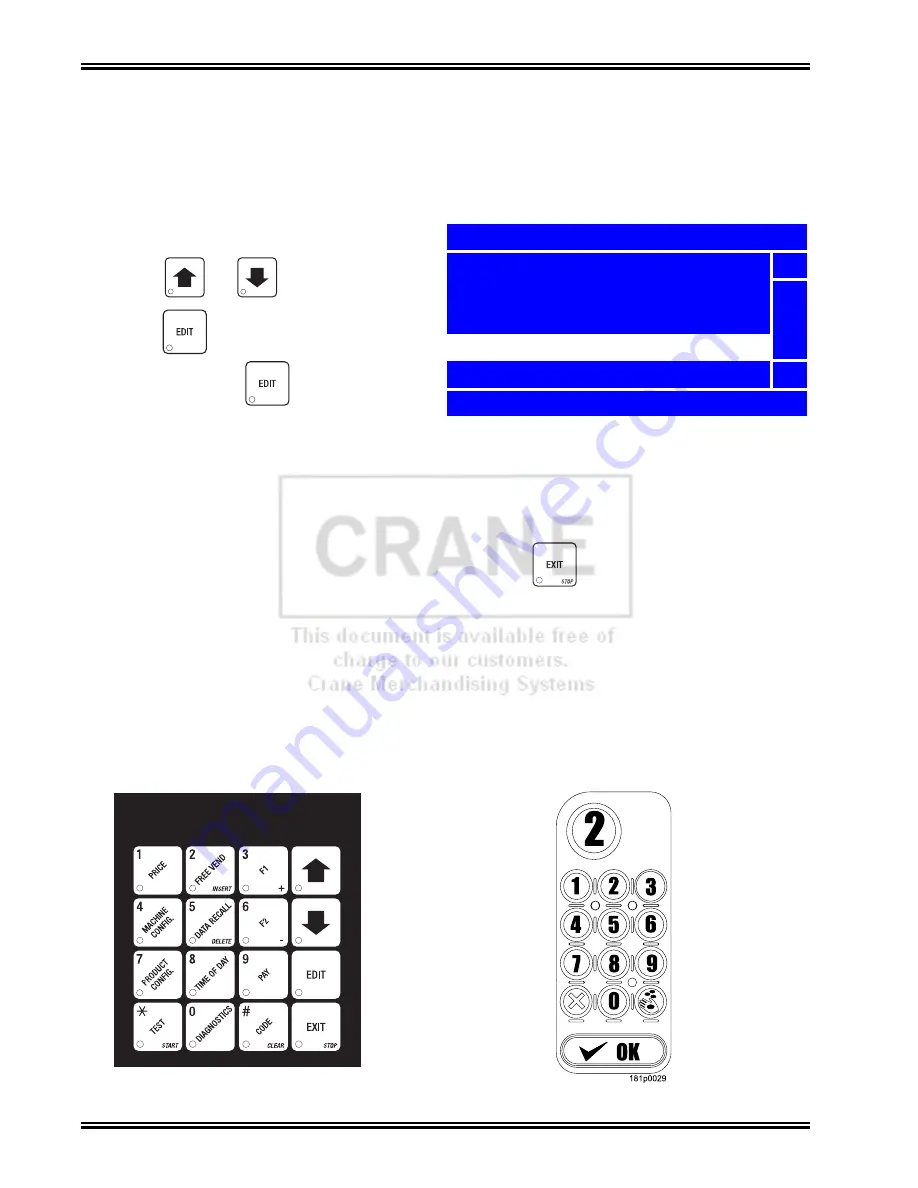
The Keypads
This merchandiser has two keypads:
a.
Service Keypad
This 16 button keypad is located on the upper left hand side of the
monetary assembly and is only available with the merchandiser’s door open. This is the
principal keypad operators use to program the merchandiser.
b.
Customer Keypad
This is the 13 button keypad on the front of the merchandiser.
Customers use it to make selections, and operators can use it to enter numbers when
programming the merchandiser
.
•The top line of the screen is the menu title.
•Selected items are highlighted in white.
•Press
or
to highlight an item.
•Press
to select it. In the example at
right, pressing
will display the
Screen Contrast
menu.
•Pay attention to the bottom line of the display as it often shows important information. In certain
configuration menus, it will display the current value for the selected item. In the example
above, we can see that the setting for
Screen Contrast
is reading “
= 9
”. This is a valuable
way to quickly check the settings of the merchandiser, and to confirm that a value you
changed is correct.
•To return to the Idle mode from any screen, simply press
until the display shows an
idle message.
System Settings
Data Transfer
5
Serial Flash
Backup/Restore Data
Screen Contrast
Software Version
6
= 9
SERVICE KEYPAD
CUSTOMER KEYPAD
Summary of Contents for Merchant Six 180
Page 1: ......
Page 7: ...Merchant Operators Guide Initial Setup 1810025 1 August 2009 FRONT EXTERIOR VIEWS ...
Page 9: ...Merchant Operators Guide Initial Setup 1810025 3 August 2009 ALL MODELS MONETARY STANDARD ...
Page 10: ...Initial Setup Merchant Operators Guide August 2009 4 1810025 INTERIOR VIEW ...
Page 204: ...Program System Settings Merchant Operators Guide August 2009 198 1810025 Service ...


