4
Instrument Panel
BODY AND TRIM
INSTRUMENT PANEL
1
1
2
3
4
2697B
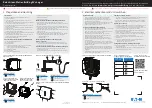
Figure 4-6
Instrument Panel
INSTRUMENT PANEL REMOVAL
1.
Remove the screws (1)
2.
Tilt instrument panel (2) up to release it from the dash assembly (3).
3.
Disconnect the electrical connector (4) on the passenger side.
INSTRUMENT PANEL INSTALLATION
1.
Connect the electrical connector (4) on the passenger side
.
2.
Install the instrument panel (2) into the dash assembly (3). Make sure that the tabs on the instrument panel
engage in the slots on the dash assembly.
3.
Make sure that electrical wires are not exposed or pinched.
4.
Install the screws (1). Tighten the screws to 22 lb·in (2.5 N·m).
Page 4-10
2020 Precedent,Villager 2 and 4 Maintenance and Service Manual
Summary of Contents for DS Villager 4
Page 2: ......
Page 6: ......
Page 481: ...GASOLINE ENGINE HARNESS Wiring Diagrams Gasoline Engine Harness 26 ...
Page 482: ... Page intentionally left blank ...
Page 483: ...GASOLINE MAIN HARNESS Wiring Diagrams Gasoline Main Harness 26 ...
Page 484: ... Page intentionally left blank ...
Page 485: ...GASOLINE INSTRUMENT PANEL HARNESS Wiring Diagrams Gasoline Instrument Panel Harness 26 ...
Page 486: ... Page intentionally left blank ...
Page 488: ... Page intentionally left blank ...
Page 489: ...ELECTRIC MAIN HARNESS Wiring Diagrams Electric Main Harness 26 ...
Page 490: ... Page intentionally left blank ...
Page 492: ... Page intentionally left blank ...
Page 494: ... Page intentionally left blank ...
Page 495: ...ELECTRIC LIGHT HARNESS Wiring Diagrams Electric Light Harness 26 ...
Page 496: ... Page intentionally left blank ...
Page 497: ...ELECTRIC DC TO DC CONVERTER HARNESS Wiring Diagrams Electric DC to DC Converter Harness 26 ...
Page 498: ... Page intentionally left blank ...
Page 507: ...NOTES ...
Page 508: ...NOTES ...
Page 509: ......
Page 510: ......