background image

doseBadge⁵ noise dosimeter - instrument handbook

60

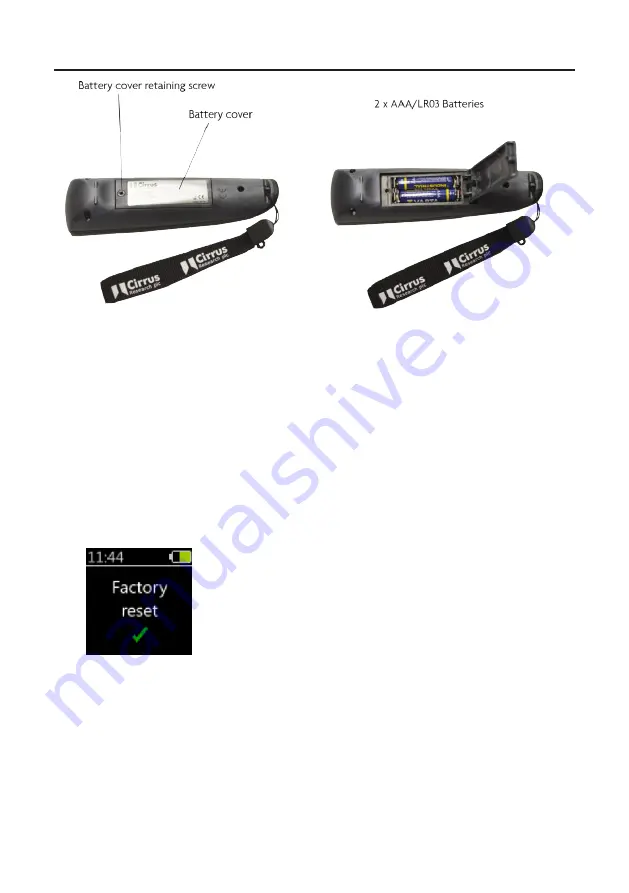
Replace  the  batteries  and  secure  the  cover.  Take  care  to  ensure  that  the  batteries  are 

inserted to match the polarity as shown in the battery compartment.

15.6  

Factory reset

When started for the first time, the wand will ask you to select a language before doing 

anything else. This is shown when you first receives the wand and will only be asked once.  

However, it is still possible to change the language after this from the Language menu (see 

page 59).

There is a special function on the wand to reset this feature, so the language selection 

screen will be displayed when the wand is next restarted. This screen is shown to confirm 

the reset:

Summary of Contents for doseBadge5 CR:120A

Page 1: ...Instrument Handbook CR 120A doseBadge5 Noise Dosimeters...

Page 2: ...e for an acoustic calibrator This manual describes the recommended usage of the doseBadge5 Any warnings will be indicated by the following symbol It is not possible to change the way that the instrume...

Page 3: ...with the instrumentation manufactured by Cirrus Research plc No responsibility is accepted for damage caused by the use of any other parts or accessories In order to take account of a policy of contin...

Page 4: ...n level 9 2 Removing the windshield 9 3 Connecting the acoustic calibrator 9 4 Post measurement calibration 10 Attaching removing your doseBadge 11 Measuring noise with your doseBadge 11 1 Starting a...

Page 5: ...adge noise dosimeter instrument handbook 5 19 Glossary of terms 20 Preset integrator settings 21 Support troubleshooting 22 Declarations 23 Warranty information 24 Cirrus Research offices 75 76 77 81...

Page 6: ...h daily timers Remote communication to the dBLink App Android iOS and the doseBadge5 wand View measurements configure the doseBadge5 with the dBLink App for mobile devices Tap sensor to protect your m...

Page 7: ...change The doseBadge5 uses Bluetooth connectivity to either the RC 120A wand or to the dBLink app which is available to download for free for both Android and iOS devices This allows measurements to b...

Page 8: ...wind shield attached The materials used in the CR 120A doseBadge5 RC 120A Wand and CU 120A Dock should only be cleaned using a damp cloth Do not use solvent or chemical based cleaners When the Bluetoo...

Page 9: ...dge5 The CR 120A doseBadge5 is supplied complete with a windshield which is secured to the carrier and mounting clips to attach the instrument to the person whose noise exposure is to be measured Wind...

Page 10: ...wrist strap and 2 x AAA LR03 batteries The battery compartment is on the back of the wand unit along with the serial number and compliance information Please note the wand is sold as an optional acce...

Page 11: ...Type A to Type B There are five slots each of which can accommodate one of your doseBadge5 instruments All of the slots provide charging and data download functions The serial number of the dock is s...

Page 12: ...nd peak channels Check the configuration 13 4 Program scheduled timers 13 Allocating instruments to a person place or project 16 5 Calibrate your doseBadge 22 6 Attach to a person 24 7 Start the measu...

Page 13: ...ct the CU 196A mains power supply to the power socket on the dock and then to a suitable supply The green LED on the dock will indicate that power is connected The USB connection is used to donload me...

Page 14: ...the ambient temperature is between 15 C and 30 C 59 F to 86 F Charging at higher temperatures may increase the charge time required or may result in a failure to fully charge Please note that the CU 1...

Page 15: ...Connection to the NoiseTools software is through the CU 120A Dock which connects to a PC via a USB connection See page 14 for details of configuring the doseBadge5 via NoiseTools and page 32 for deta...

Page 16: ...nt The advantage of the doseBadge5 is that it allows up to 4 independent integrators to be run at the same time each of which can be individually tailored as needed Full control over the exchange rate...

Page 17: ...ge 45 for details of configuring the scheduled timers 7 2 Configuring through NoiseTools The NoiseTools software allows all of the configuration options on your doseBadge to be adjusted Settings can b...

Page 18: ...d to a powered CU 120A dock and it is connected to the NoiseTools software via a USB cable it will appear in the Instrument window If you have more than one doseBadge5 instrument connected to the dock...

Page 19: ...nt of download into NoiseTools or afterwards when measurements are analysed This information is stored along with the measurement data in the NoiseTools database allowing the measurement information t...

Page 20: ...will be highlighted in blue and from the Transfer Settings button select From Selected Instrument The setting will be copied from the source badge to the other doseBadges on the dock Settings can also...

Page 21: ...without the need for user intervention Up to three periods can be set during the day allowing for breaks to be accommodated where regulations require and the schedules can be enabled or disabled for d...

Page 22: ...76 for details of the pre set integrators 7 2 7 2 Custom integrators To customise an integrator select Custom from the drop down list and choose the required parameters See page 76 for details of the...

Page 23: ...g ISO OSHA PEL ACGIH etc and two acoustic values e g LAeq Lavg TWA exposure dose etc 2 The values only template which contains two acoustic values not linked to an integrator channel e g LCPeak 3 The...

Page 24: ...This can affect the validity of noise measurements and so it is useful to know when this occurred The measurement data can be recalculated to exclude areas where the tamper sensor has been activated...

Page 25: ...ded into NoiseTools along with the measurement Set the clock synchronise the clock in your doseBadge to the one on your mobile device Clear the instrument s memory Select the integrators Up to four in...

Page 26: ...our doseBadge can be cleared using either NoiseTools see page 21 the wand unit see page 60 or dBLink see page 67 Important note please ensure that all measurement data from your instruments has been d...

Page 27: ...CR 515 which provide a calibration level of 94dB To change or check the level connect your doseBadge to NoiseTools via the dock and go to the Configure menu Adjust the calibration level as required a...

Page 28: ...signal from the calibrator and will start the calibration process If the level provided by the acoustic calibrator is within the tolerances acceptable to your dosimeter the instrument will calibrate...

Page 29: ...pre and post measurement calibration levels to be reviewed To carry out a post measurement calibration follow the same process as outlined in the previous section The second calibration is recorded by...

Page 30: ...your doseBadge can affect the measurements data and so the dosimeter will record impacts using the internal accelerometer When the sensor is activated the time history data is marked and this can be s...

Page 31: ...is connected to a powered CU 120A dock the scheduled measurements will not be activated 11 1 2 Starting a measurement with NoiseTools Measurements can be started and stopped through NoiseTools The sta...

Page 32: ...your instrument is not measuring the only option is to start a measurement Pressing the Left button will start a measurement and a confirmation will appear for a few seconds 11 1 4 Starting a measurem...

Page 33: ...measuring data the blue LED will flash every two seconds The measurement can be paused using a number of different methods as described below 11 2 1 Pausing a measurement with the wand Connect to your...

Page 34: ...our doseBadge5 is paused the blue LED will flash every five seconds See page 77 for details of the LED status indicators 11 3 Mid shift readings It can be useful to view the accumulated noise exposure...

Page 35: ...e information for the current measurement The word Meas and the green icon show that the badge is running and that this is a mid shift reading Press the round centre key to exit from the reading 11 3...

Page 36: ...ement data for other integrators select the badge and swipe to view the Current Measurement screen or use the menu to select the View Measurements option The current information can be refreshed by se...

Page 37: ...is measuring the options are to either pause it or stop it The small green recording icon in the status bar indicates that the instrument is measuring Pressing the right button will stop the measurem...

Page 38: ...for measurement reports to be created For further guidance on using NoiseTools please refer to online documentation training videos and support information When a doseBadge5 is connected to a powered...

Page 39: ...be added to the appropriate measurement Click Open After Download to open all measurements once the download has completed The progress of the download is shown by a green bar Close the download wind...

Page 40: ...nd the place person and project to be allocated to each measurement can be changed The Group downloaded measurements option allows a number of measurements to be grouped together for analysis comparis...

Page 41: ...When the measurements have been selected click Download to store the measurements into the NoiseTools database If the Open After Download option is selected the downloaded measurements will be shown...

Page 42: ...see Mid Shift readings on page 34 or at the end of a measurement once the instrument has been stopped Please refer to page 64 for details of viewing measurements with the dBLink App 11 5 3 Viewing mea...

Page 43: ...into Transport Mode which shuts down the instrument disables the shake to wake sensor and puts the instrument into its lowest power mode This can be used if the instrument is being shipped or where m...

Page 44: ...will be set to Transport Mode Remove the doseBadge5 from the dock and store in the carrying case To disable Transport Mode reconnect your doseBadge to a powered dock If you need to set multiple doseB...

Page 45: ...or dBLink If a doseBadge5 is connected to a powered dock the scheduled measurements will not be activated If a scheduled start is missed if the badge is still on the dock for example the instrument c...

Page 46: ...me and duration can be selected either by typing it into the box or by using the pre set selection Choose the start time and the duration of the measurement NoiseTools will show the stop time based on...

Page 47: ...configurations for scheduled measurements On the following pages are examples of how scheduled measurements can be used 13 3 1 Example 1 Start at 8am and run for eight hours 13 3 2 Example 2 Start at...

Page 48: ...e noise dosimeter instrument handbook 48 13 3 3 Example 3 Start at 8am and run for 12 hours with a one hour pause at 1pm 13 3 4 Example 4 Start at 8 30am and run for eight hours Tuesday Wednesday and...

Page 49: ...octave band analysis over the entire measurement and when combined with NoiseTools allows individual noise sources to be identified making the selection of hearing protection quicker simpler and more...

Page 50: ...doseBadge noise dosimeter instrument handbook 50 Frequency bands screen A weighted...

Page 51: ...entre of the keypad The wand will display the Cirrus Research logo and then show the Connect screen To switch off the wand press and hold the round key and wait for the countdown to complete The wand...

Page 52: ...owing screens will be displayed Connection lost will be displayed when your doseBadge moves out of range of the wand When the wand is connected to a doseBadge more options become available from the ma...

Page 53: ...e status of your doseBadge battery level remaining memory calibration information etc Settings check and change your doseBadge s settings enable timers change the clock clear the memory etc Settings c...

Page 54: ...Measure This page lets you start stop peause resume measurements The available actions depend on whether the instrument is currently measuring or not 15 3 3 1 Your doseBadge is not measuring When the...

Page 55: ...on will appear for a few seconds The message is split into two lines Pressing the up button will pause the measurement and a confirmation will appear for a few seconds The message is split into two li...

Page 56: ...esent the results 15 3 4 1 Instrument is empty If the instrument is not measuring and does not contain any measurement data a message will be displayed for a few seconds 15 3 5 Review After reading th...

Page 57: ...fromyourdoseBadge 15 3 5 1 Measurement summary This page displays the number of the measurement the start date and time and the measurement duration If your doseBadge is currently measuring the measur...

Page 58: ...hannel e g dose exposure 15 3 6 Status This screen displays the battery level and remaining available memory This screen displays the unique serial number of your instrument and its model name A CR 12...

Page 59: ...menu that allows you to change the configuration of the wand 1 Clock set the clock on the wand 2 Language change the language of the wand s user interface 3 Display change how the date and time is ds...

Page 60: ...first time the wand will ask you to select a language before doing anything else This is shown when you first receives the wand and will only be asked once However it is still possible to change the...

Page 61: ...out having to disturb the person wearing the doseBadge 16 1 Connecting to your doseBadge Connection to dBLink is via Bluetooth Ensure that Bluetooth is enabled on your mobile device To connect to an a...

Page 62: ...bile device You can also perform the following functions on the settings screen Clear the instrument s memory Select the integrators up to four independent integrators can be enabled at any time Selec...

Page 63: ...te to accept the new values or Cancel to return to the previous screen 16 4 Scheduled measurements Scheduled measurements can be enabled or disabled on dBLink New settings can be added and existing se...

Page 64: ...ement with dBLink connect to the required instrument and from the instrument discovery window press the Green button Press again to confirm 16 6 Mid shift readings To view the measurement status of an...

Page 65: ...e current information can be refreshed by selecting the menu in the top right and by choosing Refresh Current Measurement Tte current status of the instrument is shown at the bottom of the screen Plea...

Page 66: ...onnect to the required instrument and from the instrument discovery window press the red stop button Press again to confirm 16 9 Viewing measurements Measurement can beviewedwhilst theyare being made...

Page 67: ...available measurements The current measurement number is shown at the top of the screen Use the menu to return to the instrument summary instrument settings or instrument discovery screen 16 10 Clear...

Page 68: ...doseBadge noise dosimeter instrument handbook 68 Press Clear Memory followed by Confirm to erase all the measurement data from your doseBadge...

Page 69: ...s The doseBadge5 provides simultaneously the following measurement channels Four independent Integrator channels Two independent Peak channels Configuration of the integrators and peak channels can be...

Page 70: ...40 dB in 1 dB steps ULT time weighting None Fast or Slow ULT frequency weighting A C or Z SPL max time weighting Fast or Slow SPL max freq weighting A C or Z LED threshold trigger User selectable chan...

Page 71: ...tave band filters activated Typical 3 hours charge time from empty Charging should be carried out where the ambient temperature is between 15 C and 30 C 59 F to 86 F Charging at higher temperatures ma...

Page 72: ...Bluetooth communication to the doseBadge5 Temperature 10 C to 50 C 14 F to 122 F operating 20 C to 60 C 4 F to 120 F storage 16 3 CU 120A doseBadge5 Dock Weight Dimensions 305 mm x 100 mm x 22 mm 12...

Page 73: ...ng humidity 25 to 90 relative humidity Operating static pressure 65 kPa to 108kPa Operating temperature 10oC to 50oC Storing Temperature 20oC to 60oC Effective Volume 6 19 cm3 0 2 cm3 Cavity Diameter...

Page 74: ...the CU 120A dock but if the case is opened or damaged the magnets may become visible Keep a safe distance 50mm between the magnets and all objects that can be damaged by magnetism These include mechan...

Page 75: ...ary of the terminology used in the doseBadge5 can be downloaded from the Cirrus Research website This information is available in a range of different languages and is free of charge Please visit www...

Page 76: ...HC C 5 Slow C 80 dB 8 hrs 90 dB 115 dB MSHA HC 5 Slow A 80 dB 8 hrs 90 dB 105 dB MSHA PEL 5 Slow A 90 dB 8 hrs 90 dB 105 dB ACGIH 3 Slow A 80 dB 8 hrs 85 dB 115 dB Custom integrators can be configured...

Page 77: ...ully charged Green solid Badge charging and measuring Orange solid Blue flashing Badge charged and measuring Green solid Blue flashing Badge charging and memory full or badge error Orange solid Red so...

Page 78: ...nating flashes Battery low measuring and dose threshold exceeded Orange flashing Blue flashing Alternating flashes Battery low paused and dose threshole exceeded Orange flashing Red flashing Alternati...

Page 79: ...tart the calibration process This will not show as a failure rather the instrument will simply not calibrate If the calibration level is within 3dB of the expected value but is unstable for example if...

Page 80: ...dbook 80 2 Open the Configure screen for the doseBadge 3 On the Advanced options tab ensure that the Calibration Level matches the one being provided by the acoustic calibrator Adjust the level if nee...

Page 81: ...A doseBadge5 Personal Noise Dosimeter CU 120A doseBadge5 Dock RC 120A doseBadge5 Wand CR 518 Acoustic Calibrator Along with their standard accessories According to EMC Directives 89 336 EEC and 93 98...

Page 82: ...nnas complies with Part 15 of the FCC Rules The device meets the requirements for modular transmitter approval as detailed in FCC public Notice DA00 1407 transmitter Operation is subject to the follow...

Page 83: ...age et 2 l utilisateur de l appareil doit accepter tout brouillage radio lectrique subi m me si le brouillage est susceptible d en compromettre le fonctionnement PAN1740 est garanti conforme aux dispo...

Page 84: ...arranty however there will be a reduced charge for their replacement during the annual Traceable Calibration 8 On completion of the annual Traceable Calibration by Cirrus Research plc or an official C...

Page 85: ...5 230 2424 44 0 1723 891 655 Fax 44 0 1723 891 742 Email sales cirrusresarch com Website www cirrusresearch com Cirrus Research Deutschland Cirrus Research plc Deutschland Arabella Center Lyoner Stras...

Page 86: ...Version 1 Q4 2018 www cirrusresearch co uk sales cirrusresearch co uk...

Reviews: