204
Chapter 12 Appendix
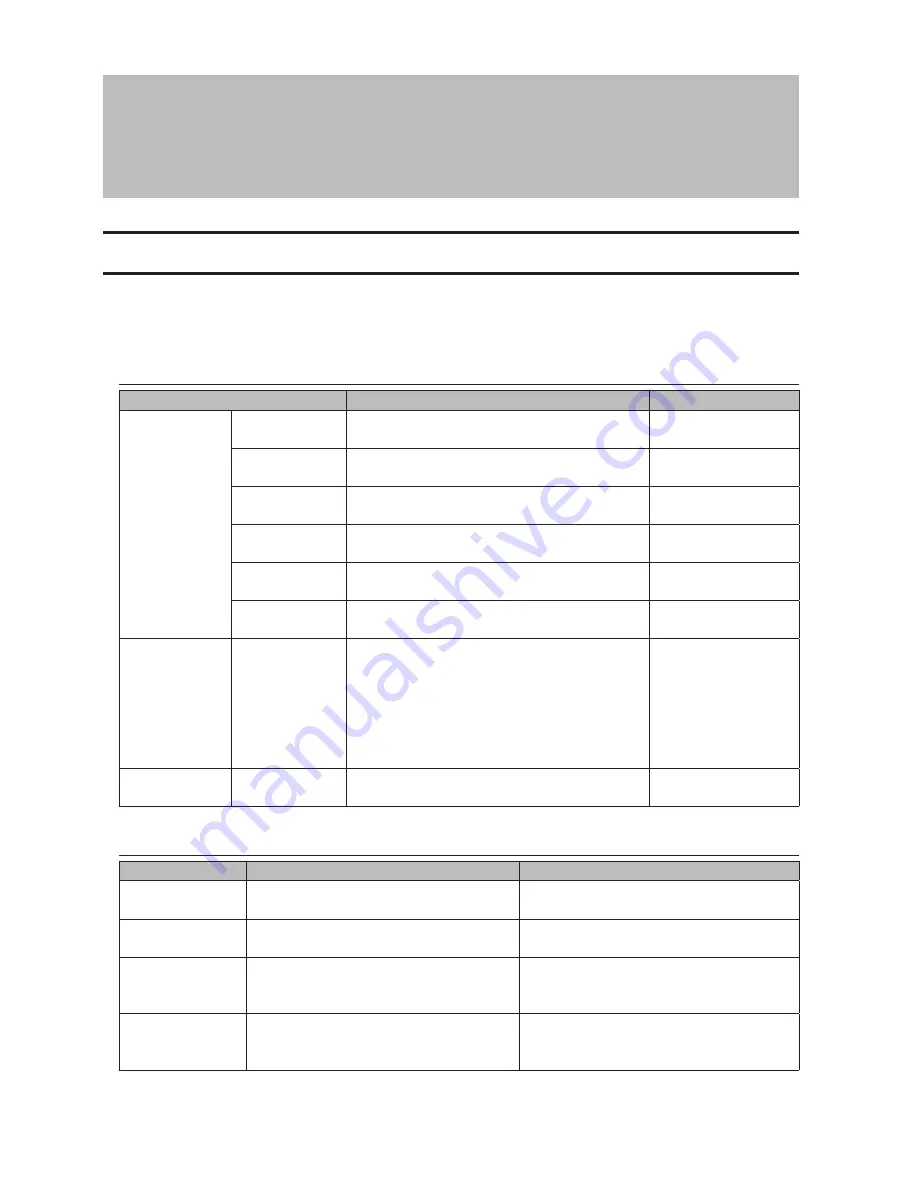
LCD Display
The LCD display can be cycled through different modes by pressing the display button on the front of the
TeraStation. Also, the items displayed can be configured at
Management
-
Notifications
-
Front Panel Display Settings
in Settings.
Modes
LCD Message
Description
Corrective Action
LINK SPEED
Note:
When an
Ethernet cable
is connected
to LAN Port 2,
"LINK SPEED 2"
is displayed.
LINK SPEED
No LINK
Not connected to network.
Connect an Ethernet
cable to the LAN port.
LINK SPEED
10 Mbps HALF
Connected at 10 Mbps half duplex.
-
LINK SPEED
10 Mbps FULL
Connected at 10 Mbps full duplex.
-
LINK SPEED
100 Mbps HALF
Connected at 100 Mbps half duplex.
-
LINK SPEED
100 Mbps FULL
Connected at 100 Mbps full duplex.
-
LINK SPEED
1000 Mbps
Connected at 1000 Mbps full duplex.
-
Hostname / IP
Address
TSxxxx xxx
192.168.11.150
Displays the hostname and IP address. At the
end of the IP address, F (fixed IP address) or D
(IP address automatically acquired from a DHCP
server) is displayed.
Note:
When an Ethernet cable is connected to
LAN port 2, "NETWORK2" is displayed in the
hostname section.
-
Calendar / Clock
DATE TIME
2012/1/1 11:11
Displays the date and time set in the TeraStation.
-
Errors
LCD Message
Description
Corrective Action
BOOT FAIL
Hard drive not found.
Contact Buffalo technical support for
assistance.
SYSTEM Error E04
Can't Load Krnl!
The firmware is corrupted.
Contact Buffalo technical support for
assistance.
E10 UPS Running
Off Battery
The TeraStation is running on the UPS
battery due to a power outage. The system
will now be shut down safely.
Check that power is being supplied to the
UPS, and if there are no problems, turn on
the TeraStation.
I10 System Is
Overheating
A rise in the system temperature may have
exceeded the allowable safety value.
Move the TeraStation to a cool location. Do
not place objects in the area around the
TeraStation.
Summary of Contents for TeraStation TS3200D
Page 22: ...21 4 Configure the desired settings then click OK...
Page 84: ...83 2 Click to the right of Backup 3 Click List of LinkStations and TeraStations...
Page 86: ...85 3 Click Create New Job Note Up to 8 backup jobs can be configured...
Page 119: ...118 6 Click OK then OK again 7 Move the iTunes server switch to the position...
Page 124: ...123 4 Open the License tab then click Activate Free License To deactivate the license click...
Page 126: ...125 3 Click Next 4 Click Find Cameras...
Page 132: ...131 2 Select the search criteria on the left side of the search screen then click Search...
Page 133: ...132 3 The search results are displayed Click a thumbnail to start the media viewer...
Page 214: ...213 For Customers in Taiwan BSMI For Customers in China CCC A...


