


104
3
Click
Edit
.
4
From
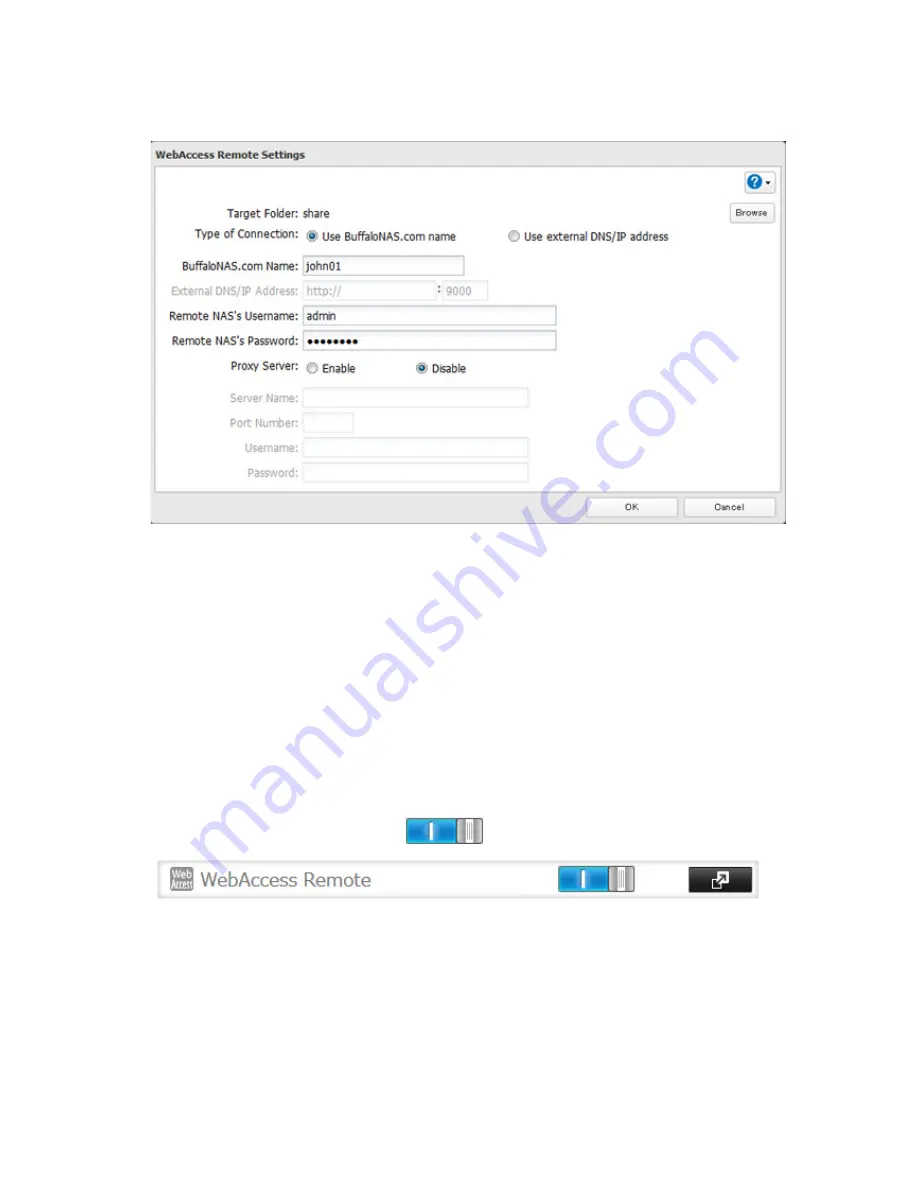
Target Folder
, select the shared folder that will be connected.
Notes:
• The selected folder is used internally by "WebAccess Remote". Files are not added to this folder and the
amount of used space does not increase.
• If using both Amazon S3 and WebAccess Remote, configure the same shared folder for both. Don't use
different folders for these services.
5
You may choose to enter a BuffaloNAS.com name or an external DNS/IP address. If using a BuffaloNAS.com
name, it should be the same BuffaloNAS.com name assigned to the source TeraStation. If using an external
DNS/IP address, enter either the IP address of your DNS server, or the global IP address of the remote
TeraStation's WebAccess.
6
Enter the remote TeraStation's WebAccess username and password.
7
Click
OK
.
8
Move the WebAccess Remote switch to the
position to enable WebAccess Remote.
9
You can directly access the shared folder in the remote TeraStation by entering the path displayed in "Target
Folder" into the address box in Explorer, My Computer, or other file manager.
Notes:
• If no files and folders are displayed in the target folder, disable WebAccess Remote and Amazon S3, reboot
the TeraStation, and turn on both services again.
• If you change the NAS internal port number from the default value (9000) on the target TeraStation, enter the
new port number after the external DNS/IP address with a colon. Example: http://buffaloamericas.com:9002
Summary of Contents for TeraStation TS3200D
Page 22: ...21 4 Configure the desired settings then click OK...
Page 84: ...83 2 Click to the right of Backup 3 Click List of LinkStations and TeraStations...
Page 86: ...85 3 Click Create New Job Note Up to 8 backup jobs can be configured...
Page 119: ...118 6 Click OK then OK again 7 Move the iTunes server switch to the position...
Page 124: ...123 4 Open the License tab then click Activate Free License To deactivate the license click...
Page 126: ...125 3 Click Next 4 Click Find Cameras...
Page 132: ...131 2 Select the search criteria on the left side of the search screen then click Search...
Page 133: ...132 3 The search results are displayed Click a thumbnail to start the media viewer...
Page 214: ...213 For Customers in Taiwan BSMI For Customers in China CCC A...


