background image

74

System Configuration

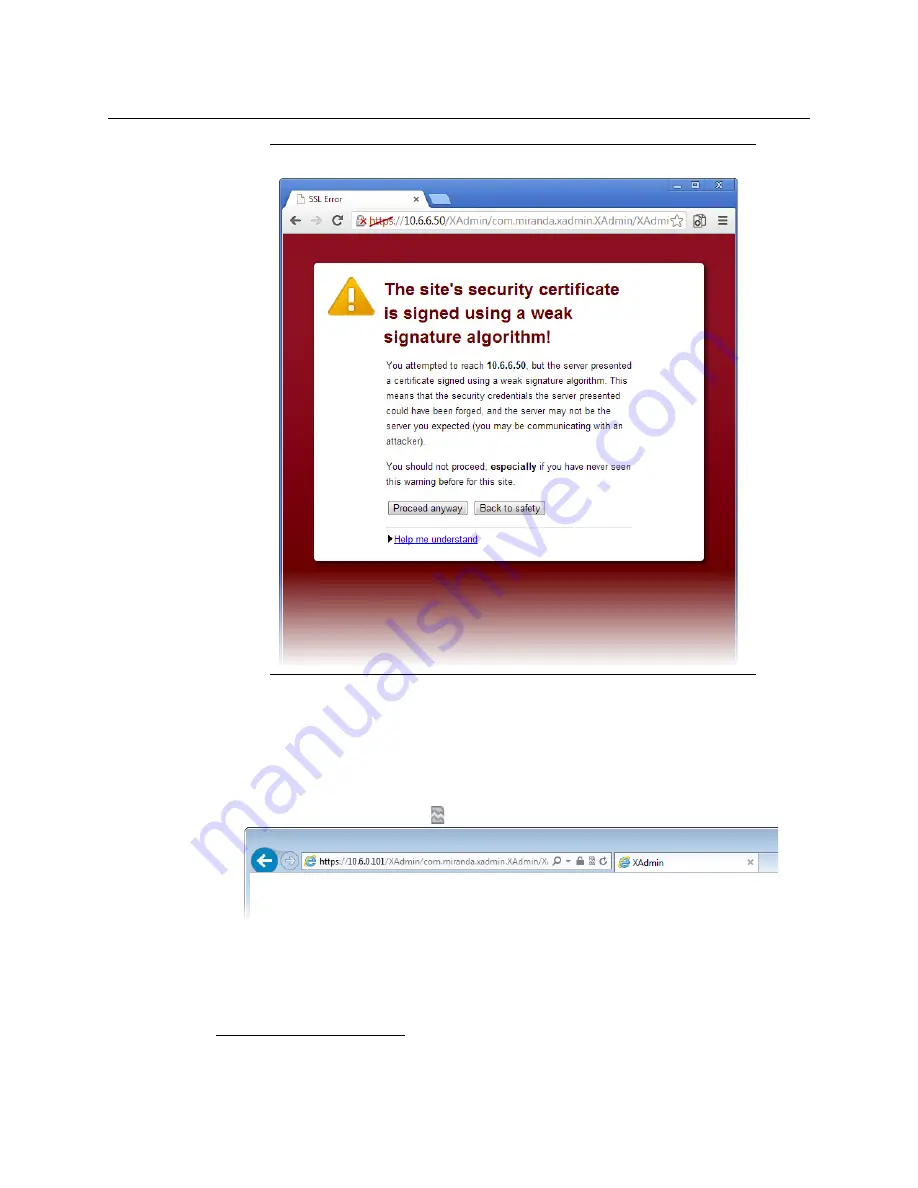
Enabling the Compatibility View in Internet Explorer

Enabling the Compatibility View in Internet Explorer

When you try to access XAdmin, from your multiviewer’s home page, 

in Internet Explorer 8, 

9, or 10,

 you may 

see a blank page instead of XAdmin’s Status and Options page.

1

To enable the compatibility view for your multiviewer’s XAdmin Web client

• Click the Compatibility View 

 button at the end of your browser’s address bar.

XAdmin’s Status and Options page appears

Special note for Chrome Web browser users

 (continued)

1.Should this happen with Internet Explorer 11, refer to 

Fix site display problems with Compatibility View,

 at 

http://windows.microsoft.com/en-us/internet-explorer/use-compatibility-view#ie=ie-11

Summary of Contents for Grass Valley KALEIDO-X16

Page 1: ...Installation Service Manual M869 9902 117 2018 03 02 KALEIDO X16 SUPER SILENT 16 INPUT DUAL OUTPUT MULTIVIEWER...

Page 2: ...Multiviewers to use their product manuals for their own internal business use Manuals for Grass Valley products may not be reproduced or transmitted in any form or by any means electronic or mechanica...

Page 3: ...r to making any other equipment connections Identifies an external protective grounding terminal which may be connected to earth ground as a supplement to an internal grounding terminal Indicates that...

Page 4: ...id or aerosol cleaners use only a damp cloth Dangerous voltages may exist at several points in this equipment To avoid injury do not touch exposed connections and components while power is on High lea...

Page 5: ...ipment Electrostatic Discharge ESD Protection Electrostatic discharge occurs when electronic components are improperly handled and can result in intermittent failure or complete damage adversely affec...

Page 6: ...ence dans le texte doit tre remplac par un fusible du m me calibre Identifie une borne de mise la terre de protection Il faut relier cette borne la terre avant d effectuer toute autre connexion l quip...

Page 7: ...endommager les connecteurs Coupez l alimentation avant de nettoyer l quipement Ne pas utiliser de nettoyants liquides ou en a rosol Utilisez uniquement un chiffon humide Des tensions dangereuses peuve...

Page 8: ...parations autres que celles qui sont d crites dans le pr sent manuel sauf si vous tes qualifi pour le faire Confiez les r parations un technicien qualifi La maintenance doit se r aliser dans un milieu...

Page 9: ...the requirements of the following standards for safety of information technology equipment CSA C22 2 No 60950 1 07 2nd Edition UL 60950 1 2nd Edition EN 60950 1 2006 ITE IEC 60950 1 2005 2nd Edition...

Page 10: ...bstance contained in all of the homogeneous materials for this part is below the limit requirement in GB T 26572 2011 X GB T 26572 2011 X Indicates that this toxic or hazardous substance contained in...

Page 11: ...rials 21 Physical Interface 22 Frame Description 22 Mechanical Installation 23 Mounting the Kaleido X16 in a Rack 23 Ventilation 23 CompactFlash 25 3 Multiviewer Cabling 27 Cabling Diagram 27 Port Ava...

Page 12: ...Ways to Access XAdmin 64 Opening XAdmin from a Browser 64 Opening XAdmin from XEdit 65 Registering your Multiviewer s Security Credentials with your Browser 65 Enabling the Compatibility View in Inter...

Page 13: ...113 Troubleshooting Common Issues 114 Disposal and Recycling Information 116 7 Configuring a Kaleido X16 Cascade 117 Introduction 117 Physical Installation 117 Interconnecting the Multiviewers 117 Co...

Page 14: ...puts 143 Audio I O 144 Control 145 Frame 146 Multiviewer Integration with other Systems and Equipment 146 Optional Drivers for Controlling Routing Devices from the Multiviewer 146 Optional Drivers for...

Page 15: ...t software drivers and sample databases from the Downloads section of the Grass Valley s website www grassvalley com dl multiviewers Document Number Title M770 2800 Kaleido Software User s Manual M770...

Page 16: ...on is set to automatically detect the resolution of the associated display If this information is not available it will fall back to 1280 1024 60 Hz Refer to the Kaleido Software User s Manual for ins...

Page 17: ...22 When downgrading this multiviewer certain other requirements and limitations may be in effect see Upgrading the Multiviewer on page 104 for more information To upgrade a multiviewer see Upgrading t...

Page 18: ...tem overview Available Models The Kaleido X16 system is available in two model types a single head model Kaleido X16 S and a dual head model Kaleido X16 D Throughout this manual Kaleido X16 refers to...

Page 19: ...RCP 200 multi function remote control panel Audio Bridge Terminal ABT Functional block diagrams The following diagram shows a basic Kaleido X16 system configuration with a single Kaleido X16 feeding...

Page 20: ...20 Overview Functional block diagrams...

Page 21: ...r power supply Kaleido Multiviewers Documentation Resource Guide One mouse Four serial port adapters one with straight wiring and one with crossover wiring for each of the two RS 422 ports on your mul...

Page 22: ...ocumentation Resource Guide and some related documents e g welcome letters warranty cards are distributed in printed form You can obtain the latest version of the Kaleido X User s Manual and Installat...

Page 23: ...ed by the brackets 2 Position the Kaleido X16 frame at the designated location within the rack and secure the front of the frame to the rack by using suitable screws and washers not included Ventilati...

Page 24: ...Each PSU draws air through the frame s front grille through the PSU then out to the closest rear fan to be exhausted out the side of the frame see diagrams above and below Air Filter Cooling air drawn...

Page 25: ...influence airflow inside the frame altitude and airflow obstruction on the sides of the unit CompactFlash In order to boot the CPU you must ensure the appropriate CompactFlash CF card is properly inse...

Page 26: ...26 Installation CompactFlash...

Page 27: ...ido X16 cabling diagram Port Availability The Kaleido X16 offers a wide variety of ports for incoming and outgoing signals However with a view towards future expansion the following ports exist but th...

Page 28: ...eo inputs 1 to 16 MV OUT 1 2 HDMI HDMI output including embedded audio for each head SDI OUT 1 2 BNC Serial digital HD output signal for monitoring purposes REF BNC Reference signal to genlock the mul...

Page 29: ...for specification details Mosaic Outputs HDMI Outputs There is one progressive scan HDMI output for each output head MV OUT 1 MV OUT 2 See HDMI Outputs on page 141 for specification details The HDMI c...

Page 30: ...50 00 59 94 1280 768 WXGA 50 00 59 94 1280 1024 SXGA 50 00 59 94 1280 1024 Barco 59 94 1360 768 NEC 50 00 59 94 1480 1200 Christie 50 00 59 94 1600 1200 UXGA 50 00 59 94 1920 1080 Baycat 50 00 59 94 1...

Page 31: ...information about Routers and the Kaleido X16 see the Routers chapter of the Kaleido Software User s Manual See Related Documentation on page 15 Audio I O The Kaleido X16 supports audio monitoring thr...

Page 32: ...e Kaleido X16 D is as follows Bottom row Center row Top row 19 GND 10 AES Out 1 1 AES Out 1 20 GND 11 AES Out 2 2 AES Out 2 21 GND 12 GND 3 GND 22 GND 13 Analog Left Out 1 4 Analog Left Out 1 23 GND 1...

Page 33: ...o Monitoring Color in the Calibrating the Kaleido X chapter of the Kaleido Software User s Manual See Related Documentation on page 15 Control The connectors located in the middle of the rear connecto...

Page 34: ...connector is as follows Bottom row Middle row Top row Pin Description Pin Description Pin Description 31 GND 16 GPI Output N 1 1 GPI Output P 1 32 GPI Output N 2 17 GPI Output P 2 2 GPI Output N 3 33...

Page 35: ...sing positive and negative terminal connections Each column on the terminal block has 6 positive and 6 negative terminal connections that correspond to each pin position Negative pins labelled with an...

Page 36: ...output events see Triggering GPI Output Events in the Operation of the Monitor Wall chapter of the Kaleido Software User s Manual calibrating GPI lines see Calibrating GPI Lines in the Calibrating the...

Page 37: ...One USB connector on the front of the frame Commissioning the Multiviewer To make the multiviewer operational first power it up and then interconnect the multiviewer with its associated equipment Pow...

Page 38: ...n the right side of the rear connector panel as you face the rear of the frame This should be on the same side of the frame as the one PSU you have installed If you do not do this your system cannot d...

Page 39: ...the Output Resolution below for detailed instructions 3 Connect one or more video sources to your multiviewer s inputs see Cabling Diagram on page 27 4 Check the LEDs in the Kaleido X16 frame Make su...

Page 40: ...o X16 2 Right click anywhere on the monitor wall point to Monitor wall if you clicked a monitor and then click Display resolution The Display Resolution window appears If you would like the system to...

Page 41: ...background and then click Display Resolution on the menu 2 Select the Use detected monitor resolution check box 3 Click OK Notes The monitor EDID auto detection feature is enabled by default in order...

Page 42: ...42 Multiviewer Cabling Enabling EDID Auto Detection from the Monitor Wall...

Page 43: ...on page 15 A GPI interface allows remote layout selection See Loading a Layout on page 98 The output resolution of the card can be controlled automatically through the EDID interface with the display...

Page 44: ...ps full duplex LED LED Status Green Blinking green Red Blinking red Yellow Blinking yellow Off CPU Normal operation Application booting Error Live Update OS Booting N A Front cover is closed CPF Activ...

Page 45: ...o X16 multiviewer to join a TCP IP network it must be configured with an IP address a network mask a gateway and a system name The IP address system name and other parameters can be set via a control...

Page 46: ...r generates a low to moderate amount of client to server data traffic and therefore has a minimal bandwidth impact on a network TCP UDP Port Usage The various Kaleido X16 communication protocols requi...

Page 47: ...connection 13100 TCP Used for calibration data from XEdit 5120 RCP2 TCP Used to listen for Kaleido Software discovery packets 10000 TCP For RCP2 protocol 10001 TCP For RCP2 protocol 5120 UDP On multic...

Page 48: ...TCP Responsible for discovery and communications between devices services on a network 32768 65535 Java RMI TCP Remote Method Invocation client server communication Dynamic Allocation of ports Require...

Page 49: ...vices that use the TSL UMD version 5 0 protocol Port Used for Notes 2000 TCP Used to control the multiviewer s internal router via the SAM Snell Pro Bel SW P 02 protocol 4381 TCP Used to control the m...

Page 50: ...er in the advent that such a change was made by mistake or that it as been forced for some reason you will have to repair the broken cluster see Repairing a Cluster System in the Kaleido Software User...

Page 51: ...ettings directly on the multiviewer or you can work locally on the computer and then export your changes to the multiviewer If you have only one multiviewer or if you have more than one but you intend...

Page 52: ...n the address bar The multiviewer s home page appears 2 Click the XEdit button The browser prompts you to save an executable file to your hard drive Kaleido windows32 online exe1 This file is an onlin...

Page 53: ...10 shortcuts are added to your desktop and to the Start menu under All Programs If you have Windows 8 1 or Windows 8 XEdit will appear on your desktop in the Apps view with all the other applications...

Page 54: ...ase a message will appear to confirm the font update and instruct you to restart the application Click OK to continue and then open XEdit again by using the shortcut on your desktop in your Apps view...

Page 55: ...on page 56 If you have been using XEdit versions earlier than 7 20 you may want to uninstall them by clearing the Java cache on your PC or laptop See Uninstalling XEdit Version 7 11 or Earlier on page...

Page 56: ...ars 4 Click Uninstall This removes XEdit including all shortcuts launchers and other elements that were installed with it from your system Uninstalling XEdit Version 7 11 or Earlier To uninstall XEdit...

Page 57: ...s may allow you to run the file directly Depending on your browser s security features warnings may appear which you may safely dismiss 3 Unless your browser let you run the file and you chose to do s...

Page 58: ...thin your multiviewer system in addition to the KX Router logical router 4 In Router Control click the router you want to control and then click Open Depending on your Windows Firewall settings a secu...

Page 59: ...iew Start screen see page 57 or from the Start menu Whenever you install a new version of the Kaleido Software on the multiviewer the next time you open Router Control your installed copy of the appli...

Page 60: ...wser prompts you to save an executable file to your hard drive Kaleido__SignalPathViewer windows32 online exe1 This file is an online installer which will download Signal Path Viewer from your multivi...

Page 61: ...or Windows 8 Signal Path Viewer will appear on your desktop in the Apps view with all the other installed applications on your PC Windows 8 1 or in your Start screen Windows 8 Once the installation h...

Page 62: ...k Uninstall Signal Path Viewer An uninstall screen appears 4 Click Uninstall Notes Once it has been installed from the multiviewer Signal Path Viewer remains on your PC or laptop and can be launched f...

Page 63: ...with your PC Under this circumstance proceed as follows There is no compatibility problem if only the patch revision number is different between the Kaleido Software version on the multiviewer and the...

Page 64: ...page 65 Internet Explorer users may also need to enable compatibility view see Enabling the Compatibility View in Internet Explorer on page 74 Opening XAdmin from a Browser To open XAdmin from a brows...

Page 65: ...ation area on the left side of the page Registering your Multiviewer s Security Credentials with your Browser When you open your multiviewer s home page or try to access XAdmin your browser may report...

Page 66: ...rity Credentials with your Browser To register your multiviewer s security credentials with Firefox 1 Click I understand the Risks at the bottom of the page The message expands 2 Click Add Exception 3...

Page 67: ...without seeing the warning This will remain effective until the multiviewer s IP address is changed in which case you will need follow the procedure again Suppressing certificate error in Internet Exp...

Page 68: ...68 System Configuration Registering your Multiviewer s Security Credentials with your Browser Internet Explorer s security warning Chrome s security warning...

Page 69: ...xplorer 1 Click Continue to this website not recommended The address bar now indicates the certificate error 2 Click Certificate error 3 In Untrusted Certificate click View certificates 4 In Certifica...

Page 70: ...ion Registering your Multiviewer s Security Credentials with your Browser 5 In Certificate Import Wizard click Next 6 In Certificate Import Wizard click Place all certificates in the following store a...

Page 71: ...71 Kaleido X16 Hardware Description Installation Manual 7 In Select Certificate Store select Trusted Root Certification Authorities and then click OK 8 Back in Certificate Import Wizard click Next...

Page 72: ...72 System Configuration Registering your Multiviewer s Security Credentials with your Browser 9 Click Finish A security warning appears...

Page 73: ...n You should now be able to access XAdmin from your multiviewer home page without ever seeing the security warning again unless the multiviewer s IP address is changed in which case you will want to r...

Page 74: ...n s Status and Options page 1 To enable the compatibility view for your multiviewer s XAdmin Web client Click the Compatibility View button at the end of your browser s address bar XAdmin s Status and...

Page 75: ...modifying a multiviewer s system configuration Enabling XAdmin Access Control To enable access control in XAdmin 1 Open XAdmin See Opening XAdmin on page 63 2 Click Access control in the navigation a...

Page 76: ...ess indicator appears momentarily followed by a confirmation message 7 Click OK The Log in to XAdmin page appears Other XAdmin sessions open against the same multiviewer are also redirected to the log...

Page 77: ...New password and the Confirm boxes The password must contain between 6 and 20 alphanumeric characters or symbols 4 Click Save A confirmation message appears 5 Click OK to close the message window The...

Page 78: ...cess control in the navigation area on the left side of the page The Access Control page appears 3 Click Disable access control A confirmation message appears 4 Click OK to close the message window an...

Page 79: ...Path Viewer Double click the Signal Path Viewer shortcut on your desktop The application automatically connects to your multiviewer and the Signal Path Viewer panel appears Viewing a Multiviewer s Sta...

Page 80: ...nter to an input signal status indicator to view the associated signal format 3 Click the arrow button at the end of a module s heading row to view more detailed information about this card or multivi...

Page 81: ...Hardware and Software Options on page 94 Configuring a Multiviewer s IP Time and Date Settings with XAdmin To change your system s IP address and other parameters 1 Open XAdmin See Opening XAdmin on p...

Page 82: ...tion frame or card IP addresses network mask and default gateway By default all network adapters are set to auto negotiate The connection speed and duplex mode will be set automatically based on the c...

Page 83: ...e system immediately 11 Click OK If you have changed the multiviewer s IP address you will need to edit the XAdmin URL in your Web browser s address bar in order to log on to the multiviewer again Not...

Page 84: ...the SELECT area rotate the leftmost control knob to select IP ADDRESS 5 Use the four control knobs in the CHANGE area to set the new address The current address is displayed in the CURRENT box for re...

Page 85: ...creen Kaleido Multiviewer rooms are listed in the form multiviewer name room name If a room belongs to a cluster system its name appears once for each of the member multiviewers e g if two multiviewer...

Page 86: ...itor wall control panel appears on the right hand screen with the ASSIGN CHANNEL category selected If a mouse is connected to the RCP 200 then after touching WALL MOUSE you should be able to see and m...

Page 87: ...assign a source to a monitor located in a part of the layout that belongs to a different member of the cluster or cascade You only need to do this once for every multiviewer that is part of a cluster...

Page 88: ...ic IP address 10 0 3 191 Assigning a static IP address to the Kaleido RCP2 To assign a static IP address to the Kaleido RCP2 1 Press and hold the ENTER button until the ESC button lights up to display...

Page 89: ...key to move up in the list or the 8 key to move down the list 4 When the appropriate room name is highlighted press ENTER to accept the new selection 5 When prompted log on to the selected room See L...

Page 90: ...procedure To log on to a Kaleido Multiviewer system from the Kaleido RCP2 1 Press the LOGIN key The following message will appear on the LCD display LOGIN Position Admin 2 Press ENTER to select Admin...

Page 91: ...PC to Configure the ABT s Network Settings on page 93 configure the PC with the following network settings 3 Apply power to the Audio Bridge Terminal and make sure it is connected to the same switch...

Page 92: ...ntation on page 15 Property Setting DHCP OFF Static IP address 10 0 3 190 Subnet mask 255 255 0 0 Default gateway 10 0 0 1 Notes The Kaleido X16 supports one ABT device You can achieve redundancy by c...

Page 93: ...then press Enter 2 In the search box type adapter and then under Network and Sharing Center click View network connections 3 In Network Connections right click the network adapter you wish to configu...

Page 94: ...ware options are enabled by entering a software key that has been sent to you once you have purchased the option The following tables list options that can be enabled via the XAdmin Status and Options...

Page 95: ...Rotation license for Kaleido X16 D Dual router output KXS X16 RTR16X2 Dual router output option 1 frame SDI Monitoring Output KXS X16 HDM S SDI monitoring output for Kaleido X16 S KXS X16 HDM D SDI m...

Page 96: ...Multiviewer input card you would need to locate the appropriate card in XAdmin s Status and Options page expand it and then locate the KXI 16 CC XDS option line 4 Click the Enable button A window appe...

Page 97: ...System IP Address and Application Version To find the system IP address system name and application version 1 Connect a mouse to a USB connector either the USB at the front of the frame or one of the...

Page 98: ...ashboard at the bottom right Enlarged view of dashboard Loading a Layout To load a layout on the monitor wall 1 Connect a mouse to the Kaleido RCP2 if available and log on to the Kaleido X16 from the...

Page 99: ...you clicked a monitor and then click Load layout on the shortcut menu Monitor wall shortcut menu A layout browser appears on the displays associated with the current room 3 Select the layout you wish...

Page 100: ...rred to as PSU A and the PSU on the right side is PSU B Power supply for the Kaleido X16 frame Access the power supplies by removing the front cover of the frame Viewed from the front of the frame the...

Page 101: ...SU and pull the PSU out of the frame Installing a Power Supply To install a power supply 1 Position the power supply PSU in front of an empty power supply slot in front of the frame with the connector...

Page 102: ...ratching vacuum the dust from the inner side of the cover 4 Turn the cover over and vacuum the outer side of it 5 Reinstall the cover onto the frame Generating a System Snapshot A system snapshot crea...

Page 103: ...appears 3 Click system snapshot The system snapshot generation may take a few moments after which your browser prompts you to save the resulting compressed folder to your hard drive 4 Browse to the l...

Page 104: ...ware version 5 22 or higher Ref KX 4751 The Internal router logical router is not supported anymore When the multiviewer s internal router is controlled from an external router control device or appli...

Page 105: ...tation of virtual alarms has changed as of version 6 30 of the Kaleido Software If you are upgrading the multiviewer from a version prior to 6 30 then once the upgrade is completed it will be necessar...

Page 106: ...alarm will be raised after 5 seconds In this example after the upgrade you should set the Set duration parameter to 15 seconds to maintain the same behavior It is recommended to review and note down...

Page 107: ...see Verifying the Version Number on page 111 Preparing a USB Key To copy all files required for the upgrade to a USB key 1 Download the update files onto your PC s hard drive See Software and Firmwar...

Page 108: ...tem file with the following format kxos 9 10_build_xxxx 4GB img The img file will be copied to the USB key This may take a few minutes When the copying process has finished a message appears 8 Click O...

Page 109: ...nnect the mouse directly to a USB port on the multiviewer and then make sure you can move the pointer on the monitor wall See Troubleshooting with the Multiviewer s USB connector on page 113 for more...

Page 110: ...o restart the system The multiviewer now restarts IMPORTANT To cancel the upgrade process you must click to ABORT within 30 seconds During the 30 second countdown period you may expect that removing t...

Page 111: ...ll menu within composite monitor menu After a brief delay the dashboard appears at the bottom right corner of the monitor and the command Hide dashboard replaces Show dashboard on the menu Dashboard o...

Page 112: ...ated for the Card revision attribute must be 0x4 or more Support for feeding a Kaleido X16 s HDMI output to an EdgeVision device requires version 5 30 or later A Kaleido X16 multiviewer that shipped w...

Page 113: ...ear in the Status dashboard lower right corner and in the Upgrade dashboard lower left corner on the Monitor wall Status dashboard messages Message Description PSU A 12 V PSU A is absent overheating h...

Page 114: ...in XAdmin for each card See Enabling Options on page 95 Valid licenses have a green dot Purchase and install a license for each card as required Contact Technical Support for more information and see...

Page 115: ...me and exchange their positions within the frame before firmly reinserting the cards into the frame To RMA a defective card see Grass Valley Technical Support on page 152 Swapping around a Power Suppl...

Page 116: ...safe handling practices Do not dispose of batteries in a fire as they may explode Batteries may explode if damaged or overheated Do not dispose of batteries as household waste Do not dismantle open or...

Page 117: ...the last multiviewer which sends the resulting output to the monitor wall display Unlike the cluster whose purpose is to increase the number of output heads in a room the cascade increases the maximum...

Page 118: ...ending on the multiviewer model dual or single and on your specific purposes Connecting the Displays Connect the available displays to the appropriate HDMI outputs on the last Kaleido X16 in the casca...

Page 119: ...The multiviewers you wish to add to a cascade must have the Kaleido Software version 6 20 or later and all cascade members must have the same version of the software Each multiviewer you wish to add t...

Page 120: ...ou wish to add are on the same subnet then you can select the multiviewer s IP address from the list Otherwise type the appropriate IP address in the box The multiviewer is added to the System list 4...

Page 121: ...roperties pane its name appears in the Output head box In the case of a cascade with three multiviewers select the first multiviewer i e the one farthest from the monitor wall from the Layer 3 head fo...

Page 122: ...er head 4 On the File menu click Save The updated room configuration is automatically propagated to the other multiviewers in the cascade Configuring Layouts for a Cascade Room Creating cascade layout...

Page 123: ...is will replicate the proper room configuration to the other members of the cascade At the same time the layouts will also be updated on all multiviewers in the cascade Cascade Upgrade Update the mult...

Page 124: ...the IP address of the multiviewer in the address bar The Kaleido Software home page appears 5 Click the XAdmin button The XAdmin Status and Options page appears 6 Click the Reset button at the end of...

Page 125: ...ns audio monitoring output assignment for each RCP user sources channels and router configurations pointer size configuration If two multiviewers in a cascade are connected to the same router then the...

Page 126: ...126 Configuring a Kaleido X16 Cascade Limitations...

Page 127: ...ne Kaleido X16 multiviewer With a Kaleido IP Kaleido X16 Cascade system the Kaleido IP provides some parts of the monitor wall image sends it to the Kaleido X16 which adds some more elements to the ou...

Page 128: ...output on the Kaleido IP to the second DVI input on the Kaleido X16 3 Connect the appropriate HDMI outputs on the Kaleido X16 to one or two monitor wall displays depending on the multiviewer model dua...

Page 129: ...iviewer or change its IP address while the other member of the cascade is unavailable remove it from the cascade configuration first and then add it again after you made the required change You will t...

Page 130: ...head order in your physical configuration To configure a cascade room 1 In XEdit while connected to the Kaleido X16 open the room you wish to configure Notes The system type is automatically adjusted...

Page 131: ...a cascade room all logical sources from all the multiviewers associated with this cascade room are available When you save a Kaleido IP Kaleido X16 cascade layout any changes are automatically propag...

Page 132: ...pair the cascade configuration 1 In XEdit connect to System B the multiviewer that was unavailable when the change was made once it is available again 2 In the Description Calibrations tab remove Syst...

Page 133: ...g the other without waiting for the restart to be completed To upgrade a Kaleido IP Kaleido X16 cascade system 1 Load an empty layout on the monitor wall or make sure that the bottom area of the curre...

Page 134: ...te to the RUN package you wish to install select it and then click Open The selected file is uploaded to the Kaleido IP This may take a few seconds Internet Explorer users If the page remains blank th...

Page 135: ...ce you can monitor its progress if you wish or wait until the system prompts you to restart the Kaleido IP unit 8 Once the upgrade has completed if you wish to keep a copy of the log messages scroll d...

Page 136: ...leido X16 upgrade package files to a USB key see Preparing a USB Key on page 107 14 Insert the USB key into any of the USB ports on the Kaleido X16 After a while a message appears at the bottom left c...

Page 137: ...es are not automatically propagated to all members of a cascade If you wish to have the same configuration for every multiviewer in a cascade then the following elements must be manually replicated sy...

Page 138: ...ted EDID auto detection is not supported When configuring a cascade room make sure the Use detected monitor resolution check box is not selected for any of its displays Refer to Enabling EDID Auto Det...

Page 139: ...the video inputs are genlocked and two or three fields if the video inputs are not genlocked Signal inputs require BNC connectors Composite Inputs Signal NTSC SMPTE ST 170 NTSC J PAL BGDHI PAL N PAL M...

Page 140: ...3Gbps Inputs Signal 4 2 2 SMPTE ST 424 2006 2 97 1 001 Gbps Formats 1080p50 1080p59 94 Audio SMPTE ST 299 1 Return loss 15 dB up to 1 485 GHz 10dB up to 2 97GHz Jitter 0 2 UI Cable length 100 m 328 f...

Page 141: ...B4012DV Connector DVI I dual link HDMI Outputs Signal DVI D Resolution From 1024 768 to 1920 1200 NI all progressive scan H frequency 37 kHz to 96 kHz Refresh rate 50 59 94 Hz Cable length 5 m 15 ft 1...

Page 142: ...en 1694A Alignment jitter 100 KHz 0 2 UI p p Connectors BNC 3G SDI Monitoring Outputs Signal 4 2 2 SMPTE ST 424 2006 2 97 Gbps 2 97 1 001 Gbps Formats Level A only 1080p50 1080p59 94 Audio SMPTE ST 29...

Page 143: ...ype BNC HD SDI Router Outputs Signal 4 2 2 SMPTE ST 292 C 1 5 Gbps Formats 720p59 94 1080i50 1080i59 94 1080PsF23 98 1080PsF24 1080PsF25 1080PsF29 97 1080p23 98 1080p24 1080p29 97 Cable length 100 m 3...

Page 144: ...AES3 digital audio and analog audio SDTI Audio Input Signal SMPTE ST 305 up to 128 channels 64 AES Cable length 250 m 820 ft Belden 1694A Connector BNC Analog Audio Output Signal Balanced analog audio...

Page 145: ...dance 10k Connector BNC GPI INPUT up to 32 Description Contact closure to GND Pull up voltage 3 3 Volts Source current 30 A when input shorted Low level activation 0 8 Volts max Over voltage 24 Volts...

Page 146: ...USB Signal USB Version 1 0 Connector USB Power supply Hot swappable redundant power supply Input voltage 100 240 V Frequency 47 63 Hz Power 300 W 75 of PSU Max current 4 A Max power 300 W Dimensions H...

Page 147: ...rial 6 Yes Jupiter VM 3000 system controller Imagine Communications Harris Leitch Harris XY Passthrough Protocol No Platinum Xplus Integrator Via 32 Panacea Xpress Lantronix Lightwave Matrix Hub Proto...

Page 148: ...homson Grass Valley Series 7000 devices our current implementation of the Series 7000 Native Protocol supports serial devices in addition to some Encore system controller models which are also support...

Page 149: ...cated port number on the multiviewer in the case of a TCP IP protocol RS 422 Connection Diagram The Kaleido X16 supports two RS 422 serial inputs over RJ 45 connectors These inputs allow the Kaleido X...

Page 150: ...rs chapter of the Kaleido Software User s Manual See Related Documentation on page 15 Note The two RS 422 ports on the Kaleido X16 side have no ground pin Using the appropriate DE 9S to RJ 45 adapter...

Page 151: ...151 Kaleido X16 Hardware Description Installation Manual...

Page 152: ...tain a local phone number for the support center nearest you consult the Contact Us section of Grass Valley s website www grassvalley com An online form for e mail contact is also available from the w...

Reviews: