


Configuring Communication
50
NXD/T-1200V Wall/Flush Mount Touch Panel
Step 4: Using a USB to Configure a Virtual Master (using NetLinx Studio)
Before beginning:
1.
Verify the panel has been configured to communicate via USB within the System Settings page and that the USB
driver has been properly configured. Refer to the previous section for more information.
2.
Launch NetLinx Studio 2.x (default location is
Start
>
Programs
>
AMX Control Disc
>
NetLinx Studio 2
>
NetLinx Studio 2
).
3.
Select
Settings
>
Master Communication Settings
, from the Main menu to open the Master Communication
Settings dialog (FIG. 56).
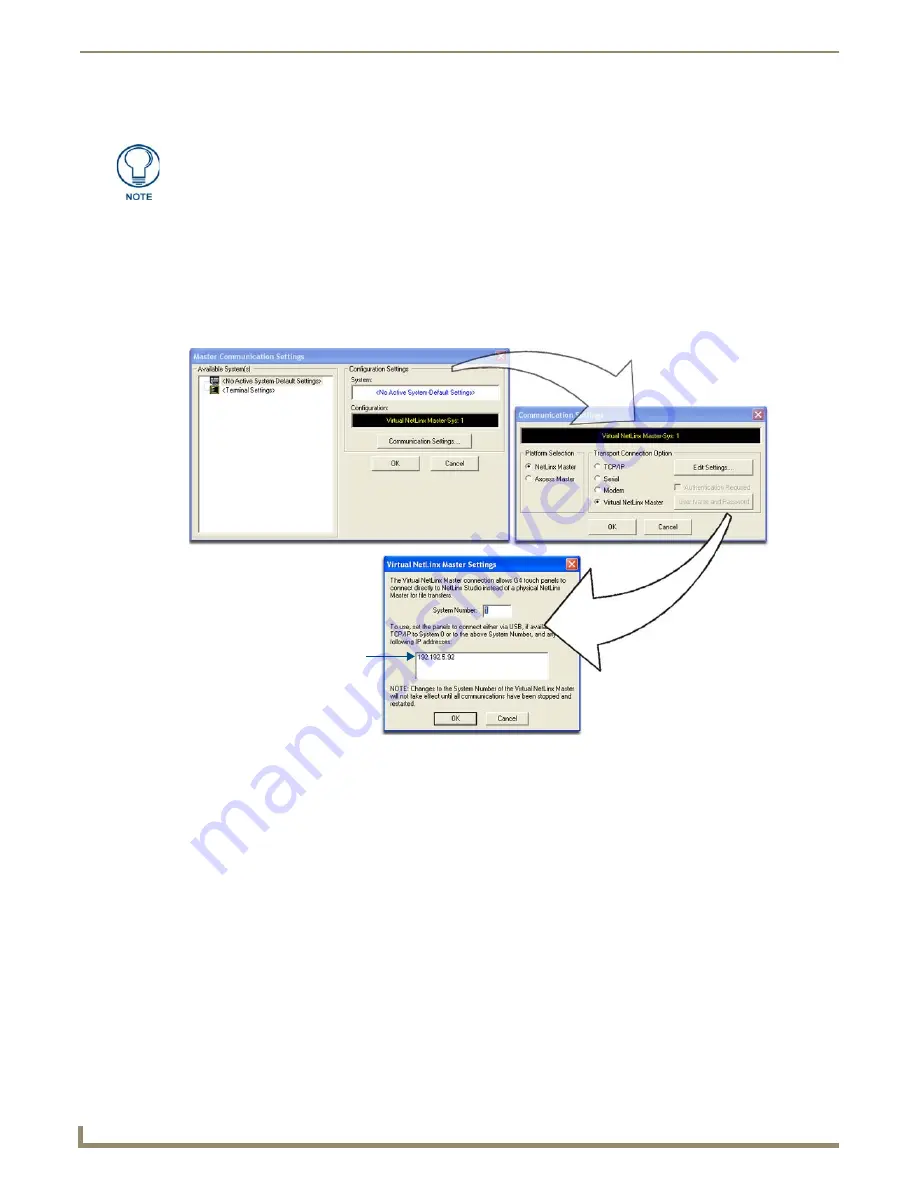
4.
Click the
Communications Settings
button to open the Communications Settings dialog.
5.
Click on the
NetLinx Master
radio button (
from the Platform Selection section
) to indicate that you are working as
a NetLinx Master.
6.
Click on the
Virtual Master
radio box (
from the Transport Connection Option section
) to indicate you are wanting
to configure the PC to communicate directly with a panel. Everything else such as the Authentication is greyed-out
because you are not going through the Master’s UI.
7.
Click the
Edit Settings
button (
on the Communications Settings dialog
) to open the Virtual NetLinx Master
Settings dialog (FIG. 56).
8.
From within this dialog enter the System number (default is
1
).
9.
Click
OK
three times to close the open dialogs, save your settings, and return to the main NetLinx Studio
application.
10.
Click the
OnLine Tree
tab in the Workspace window to view the devices on the Virtual System.
The default System
value is one
.
11.
Right-click on the
Empty Device Tree/System
entry and select
Refresh System
to re-populate the list.
The panel
will not appear as a device below the virtual system number (in the Online Tree tab) until both the system
When configuring your panel to communicate via USB with a Virtual Master (on your
PC), ONLY the USB connection option must be selected within the Type field. Since
this is a direct connection, the PC’s IP Address is not needed.
FIG. 56
Assigning Communication Settings for a Virtual Master
(not needed as this is a direct
USB connection)
IP Address of computer
Summary of Contents for Modero NXD-1200V
Page 40: ...Touch Panel Accessories 28 NXD T 1200V Wall Flush Mount Touch Panel...
Page 80: ...Configuring Communication 68 NXD T 1200V Wall Flush Mount Touch Panel...
Page 92: ...Upgrading Modero Firmware 80 NXD T 1200V Wall Flush Mount Touch Panel...
Page 164: ...Programming 152 NXD T 1200V Wall Flush Mount Touch Panel...
Page 170: ...Appendix 158 NXD T 1200V Wall Flush Mount Touch Panel...
Page 175: ...Troubleshooting 163 NXD T 1200V Wall Flush Mount Touch Panel...


