


Chapter 3 The Web Configurator
NBG7815 User’s Guide
32
OpenVPN Client
Use this screen to:
•
View basic information about OpenVPN Server accounts that you are
connected to
•
Add an OpenVPN Server Account you want your NBG7815 to connect to
when the NBG7815 functions as an OpenVPN client.
USB Application
SAMBA
Use this screen to:
•
Set up file-sharing via the NBG7815 using Windows Explorer or the
workgroup name
•
Configure the workgroup name and create file-sharing user accounts
FTP
Use this screen to set up file sharing via the NBG7815 using FTP and create user
accounts.
USB Media
Sharing
Use this screen to configure settings for media sharing.
Internet
Internet
Connection
This screen allows you to configure ISP parameters, WAN IP address
assignment, DNS servers and the WAN MAC address.
NAT & Port
Forwarding
Use this screen to enable NAT.
Use this screen to configure servers behind the NBG7815 and forward incoming
service requests to the servers on your local network.
Passthrough
Use this screen to change your NBG7815’s port triggering settings.
Port Trigger
Use this screen to configure ALGs (Application Layer Gateway) and VPN pass-
through settings.
Dynamic DNS
Use this screen to configure dynamic DNS.
UPnP
Use this screen to enable UPnP on the NBG7815.
WiFi
Main WiFi
Use this screen to enable the wireless LAN and configure wireless LAN and
wireless security settings.
Guest WiFi
Use this screen to configure multiple BSSs on the NBG7815.
MAC Filter
Use the MAC filter screen to configure the NBG7815 to block access to devices
or block the devices from accessing the NBG7815.
WPS
Use this screen to configure WPS.
Scheduling
Use this screen to schedule the times the Wireless LAN is enabled.
LAN
LAN IP
Use this screen to configure the NBG7815’s LAN IP address and subnet mask.
Use this screen to configure the IPv6 address for the NBG7815 on the LAN.
Use this screen to enable the NBG7815’s DHCP server.
IPv6 LAN
Use this screen to configure the IPv6 address for your NBG7815 on the LAN.
Firewall
IPv4 Firewall
Use this screen to configure IPv4 firewall rules.
IPv6 Firewall
Use this screen to configure IPv6 firewall rules.
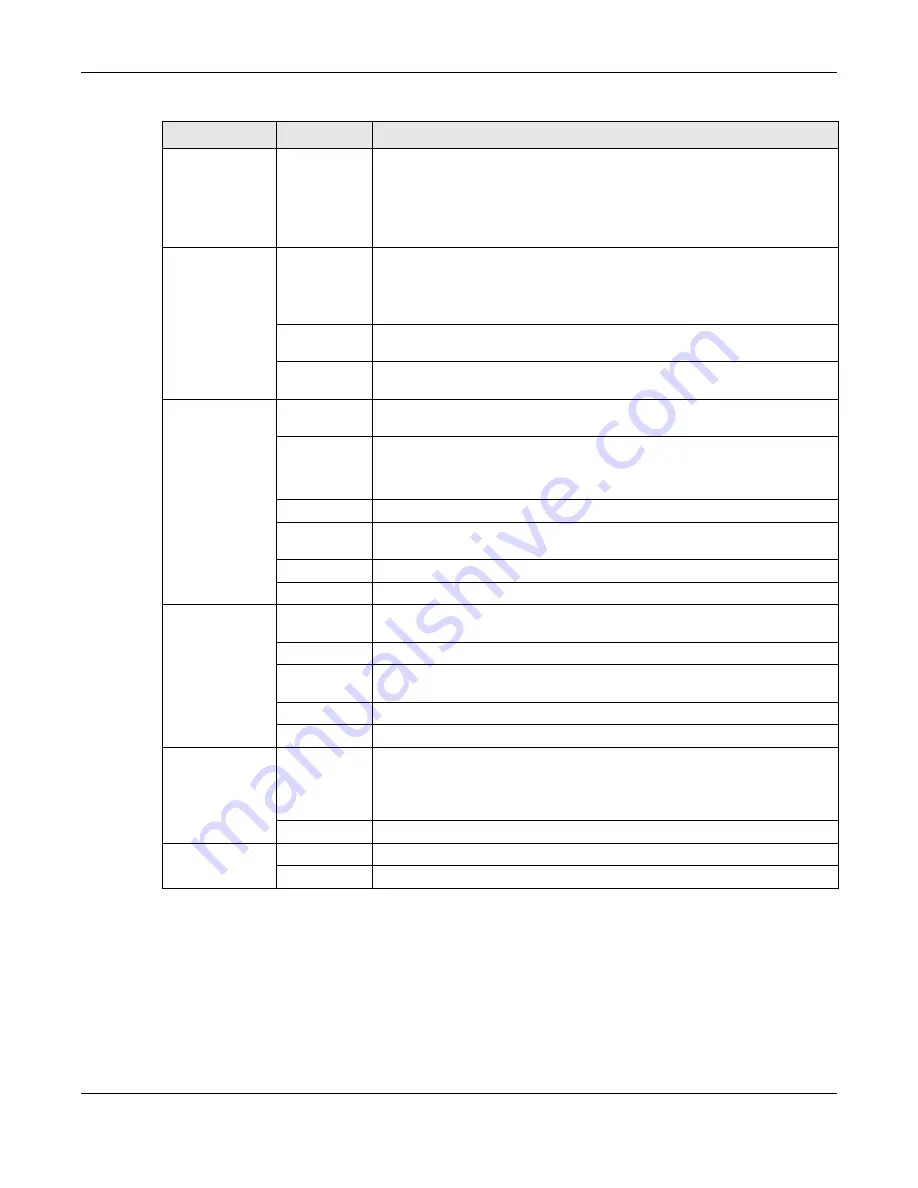
Table 3 Settings > System > Status (Standard Mode) (continued)
LINK
TAB
FUNC TIO N
Содержание ARMOR G5
Страница 10: ...10 PART I Use r s Guide...
Страница 29: ...Chapter 3 The Web Configurator NBG7815 User s Guide 29 Figure 8 Overview Standard Mode...
Страница 46: ...Chapter 7 Tutorials NBG7815 User s Guide 46...
Страница 55: ...Chapter 7 Tutorials NBG7815 User s Guide 55...
Страница 56: ...56 PART II T e c hnic al Re fe re nc e...
Страница 77: ...Chapter 8 Applications NBG7815 User s Guide 77 5 Once you log in the USB device displays in the usb1 folder...
Страница 99: ...Chapter 9 WAN NBG7815 User s Guide 99 2 Click Change Advanc e d Sharing Se ttings...
Страница 102: ...Chapter 9 WAN NBG7815 User s Guide 102 2 Click Ne twork and Sharing Ce nte r 3 Click Change advanc e d sharing se ttings...
Страница 109: ...Chapter 10 Wireless LAN NBG7815 User s Guide 109 Figure 57 Settings WiFi Main WiFi...
Страница 118: ...Chapter 11 LAN NBG7815 User s Guide 118 Figure 65 Settings LAN LAN IP Standard Mode...
Страница 134: ...Chapter 13 System NBG7815 User s Guide 134 Figure 76 Settings System Status Standard Mode...