wc_tx004029gb_FM10.fm
70
Rammer
Disassembly and Reassembly
Continued from the previous page.
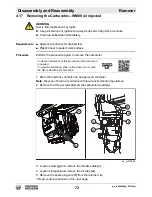
11.Place the two wood blocks
(h
and
k)
on the cylinder guide.
12.With the aid of an assistant, position the crankcase on the two wood blocks and
align the crankcase connecting rod
(q)
with the ram
(j)
.
13.Install the piston pin
(n)
and new end plugs
(m)
.
Note: Use new end plugs (m) whenever the piston pin (n) has been removed.
14.Remove the two wood blocks.
15.Apply Loctite® 243 to the four screws
(o)
.
Note: When reusing bolts, clean the threads thoroughly before use.
16.Fasten the ramming system to the crankcase with four screws
(o)
and washers.
Torque the four screws
(o)
to 43 Nm (32 ft.lbs.).
This procedure continues on the next page.
wc_gr012850
m
n
q
m
h
k
j
o
Содержание BS 50-4s, BS 50-4As
Страница 1: ...Repair Manual Vibratory Rammer 5100018465 01 1015 5 1 0 0 0 1 8 4 6 5 EN...
Страница 6: ...wc_tx004061gb_FM10 fm 6 Rammer Foreword...
Страница 10: ...Table of Contents Rammer wc_br5100018465_FM10TOC fm 10...
Страница 180: ...wc_td000553gb_FM10 fm 180 Rammer Technical Data Notes...
Страница 192: ......
Страница 193: ......

