wc_tx004029gb_FM10.fm
100
Rammer
Disassembly and Reassembly
Continued from the previous page.
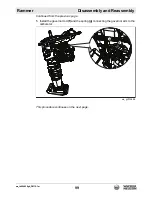
6. Connect the fuel filter hose
(m)
, the vent hose
(j)
, and the fuel hose
(h)
to the
carburetor fittings.
7. Connect the breather tube
(k)
to the carburetor.
8. Connect the air tube
(d)
and tighten the hose clamp
(e)
.
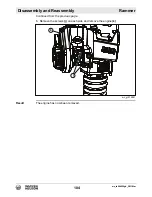
9. Apply Loctite® 243 to the four screws
(c)
and fasten the carburetor guard
(b)
to
the machine. Torque the screws to 25 Nm (18 ft.lbs.).
10.Apply Loctite® 243 to the screw
(a)
and the nut fastening the fuel filter and clip
to the carburetor guard
(b)
. Torque the screw to 25 Nm (18 ft.lbs.).
11.Install any wire ties attached to the carburetor guard
(b)
.
Result
The carburetor has now been installed.
wc_gr012683
j
k
m
h
wc_gr012682
a
d
e
b
c
c
Содержание BS 50-4s, BS 50-4As
Страница 1: ...Repair Manual Vibratory Rammer 5100018465 01 1015 5 1 0 0 0 1 8 4 6 5 EN...
Страница 6: ...wc_tx004061gb_FM10 fm 6 Rammer Foreword...
Страница 10: ...Table of Contents Rammer wc_br5100018465_FM10TOC fm 10...
Страница 180: ...wc_td000553gb_FM10 fm 180 Rammer Technical Data Notes...
Страница 192: ......
Страница 193: ......


