15
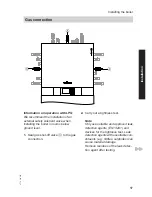
M
L
>200
1.
If a DHW safety valve is connected,
connect hose
L
to the safety valve
drain.
Note
If no DHW safety valve is connected,
do not change the position of hose
L
(serves as a vent).
2.
Route condensate hose
M
to the
back (drain in wall
G
) or to side aper-
ture
H
(see page 8).
Note
Pull the condensate hose far enough
out of the boiler that no unnecessary
bends are created inside the boiler.
3.
Route condensate hose
M
as a U-
bend and connect with a constant fall
and a pipe vent to the public sewage
system or to a neutralising system.
If necessary, connect to an on-site
siphon. Ensure this connection is
secure.
Only
g
■ The condensate pipe is connected
with the discharge pipe of the safety
valve. The condensate hose supplied
meets the temperature requirements
that are part of the CE certification.
■ We recommend the internal connec-
tion of the condensate pipe to the
domestic drain, either directly or via a
tundish.
■ If the condensate pipe is routed out-
side the building, use a pipe with at
least
7
30 mm and protect this pipe
from frost. Avoid long external pipe-
lines.
!
Please note
Frozen condensate pipes can
result in faults and damage to
the boiler.
Always insulate condensate
pipes against frost.
■ Observe local building regulations.
Installing the boiler
Condensate connection
5773 216 GB
Installation
Содержание Vitodens 222-F B2TA series
Страница 12: ...12 2 5 1 4 2x 3 Installing the boiler Removing the front panels 5773 216 GB...
Страница 13: ...13 1 2 SW17 Installing the boiler Siting and levelling the boiler 5773 216 GB Installation...
Страница 19: ...19 2x 4x 4 3 5 2 1 Installing the boiler Opening the control unit casing 5773 216 GB Installation...
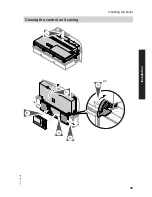
Страница 29: ...29 5 4 2 6 2x 3 1 Installing the boiler Closing the control unit casing 5773 216 GB Installation...
Страница 31: ...31 4 1 5 2 2x 3 Installing the boiler Fitting the front panels 5773 216 GB Installation...
Страница 194: ...194 5773 216 GB...
Страница 195: ...195 5773 216 GB...


