Low Voltage Power Supply
Replacement Procedures
Force EZ-C Series Service Manual
8-25
Install the Low Voltage Power Supply
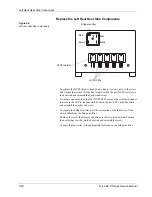
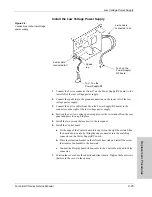
Figure 8-6.
Connections to the low voltage
power supply
1.
Connect the 2-wire connector (from J7 on the Power Supply/RF board) to the
lower left of the low voltage power supply.
2.
Connect the spade lug to the ground connection on the lower left of the low
voltage power supply.
3.
Connect the 4-wire cable (from J4 on the Power Supply/RF board) to the
connector on the right of the low voltage power supply.
4.
Position the new low voltage power supply over the two standoffs on the rear
panel and press to snap it in place.
5.
Install the two screws that secure it to the rear panel.
6.
Install the Control board.
a.
Fit the edge of the Control board into the slot on the right heat sink. Slide
the board down, carefully fitting the edge connector into the matching
connector on the Power Supply/RF board.
b.
Place the retention bracket on the left rear heat sink and install the screw
that secures the bracket to the heat sink.
c.
Connect the Display board ribbon cable to the Control board and lock the
connector.
7.
Position the cover above the chassis and slide it down. Tighten the four screws
that secure the cover to the chassis.
4-wire cable
connected to J2
To J4 on the
Power Supply/
RF board
To J17 on the
Power Supply/RF
Spade
lug
2-wire cable
connected to J1
Содержание Force EZ - C Series
Страница 1: ...Service Manual Valleylab Force EZ C Series Electrosurgical Generator with Instant Response Technology...
Страница 6: ...vi Force EZ C Series Service Manual...
Страница 20: ...1 6 Force EZ C Service Manual...
Страница 64: ...4 30 Force EZ C Series Service Manual...
Страница 156: ...7 26 Force EZ C Series Service Manual...
Страница 158: ...Interconnect Diagram 8 2 Force EZ C Series Service Manual Interconnect Diagram Figure 8 1 Electric cable connections...
Страница 208: ...10 18 Force EZ C Series Service Manual...


