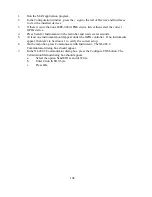
(Winsock)” in the “Connect using” list box.
2.
Insert the recorded IP address in the “Host address” text box and port number in the
“Port number” text box.
3.
Click the “OK” button.
4.
Set the following properties for HyperTerminal’s ASCII setup:
a.
Send line ends with line feeds.
b.
Echo typed characters locally.
c.
Append line feeds to incoming line ends.
5.
Type “*IDN?” in the input window and press enter. The identification of the
instrument should appear.
B.3
Ethernet Communications using a Web Page Browser
The Ethernet interface has an embedded web server that allows the user to view and change
the module's network settings and provides basic control of the power supply. Magna-
Power Electronics’ optional Ethernet option is LXI Class C compliant under LXI Standard
Revision 1.2.
B.3.1 Connectivity
When the Ethernet module is configured for DHCP, but the DHCP server cannot be
located, the module falls back to an Auto-IP configuration. The device then automatically
selects an IP address from 169.254.x.x subnet as described in RFC 3927 (Request for
Comments 3927 - Dynamic Configuration of IPv4 Link-Local Addresses). This routine is
the same as that used with operating systems such as Microsoft Windows. This allows the
user to use the Ethernet interface in the absence of a DHCP server.
The LAN status LED, located at the rear of the power supply, provides LAN fault and
device identification as defined as follows:
1.
On – Normal Operation. The device has a properly configured IP address and the
network cable is connected,
2.
Flashing – Device Identify. The LXI Device Identification function was enabled
via the Instrument Identification web page. This can help the user to quickly locate
the unit and distinguish it from similar devices.
3.
Off – LAN Fault. The device is experiencing one or more of the following LAN
fault conditions: failure to acquire a valid IP address, detection of a duplicate IP
address on the network, failure to renew an already acquired DHCP lease, or the
LAN cable is disconnected.
The LAN Reset button provides a way to reset the LAN configuration password and to set
the device back to DHCP/Auto-IP mode. To activate the LAN Reset function, ensure the
power supply is on and in standby mode. Hold down the LAN Reset button for
approximately 4 seconds. Observe that the LAN LED rapidly flashes and after 4 seconds,
release the LAN Reset button. The LAN configuration password will be reset to blank and
108
Содержание XR III series
Страница 1: ...OPERATING AND SERVICE MANUAL XR SERIES III DC POWER SUPPLIES...
Страница 2: ......
Страница 3: ...MAGNA POWER ELECTRONICS INC 39 ROYAL ROAD FLEMINGTON NJ 08822 February 20 2012...
Страница 4: ......
Страница 88: ...Figure 4 1 Status Byte Generation Figure 4 2 ESE and ESR Generation 76...
Страница 95: ...IEEE Standard CLS ESR ESE STB SRE IDN SAV RCL RST Notes 1 C command Q query 83...
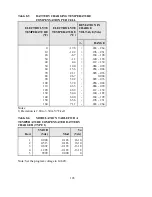
Страница 97: ...Figure 5 1 Configuration setup Figure 5 2 GPIB communications setup 85...
Страница 99: ...Figure 5 4 Virtual Control Panel Figure 5 5 Command Panel 87...
Страница 102: ...Figure 5 7 Calibration Panel Figure 5 8 Firmware Panel 90...
Страница 103: ...Figure 5 9 Modulation Panel 91...
Страница 123: ...Figure B 1 Information Panel Figure B 2 Configure Panel 111...
Страница 124: ...Figure B 3 Reboot in Progress Panel Figure B 4 Web Control Panel 112...


